Earlier this week Autodesk released Point Layout, a really smart tool which allows you to better integrate BIM coordinate data into the field. You can import & export data from Autodesk® AutoCAD®, Autodesk® Revit®, or Autodesk® Navisworks® Manage for the creation of QC/QA as well as as-built model coordination & checking. Its worth checking out the details here as well as free trial .
Thứ Sáu, 23 tháng 8, 2013
Thứ Ba, 6 tháng 8, 2013
Get your views in order – Project Browser
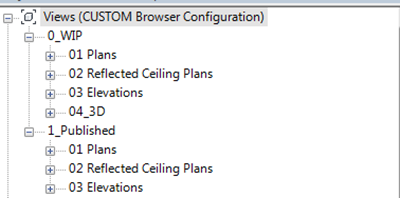
This is going to be obvious to existing Reviteers & Revit implementers, but getting your views organised & configured within your project browser as part of your implementation is an essential. Just accepting the out of the box View setup holds little value. Whilst there are no exact answers to how you should organise your views, typically this should be based on your modelling / documentation process. You should spend time discussing with your teams how you/they want the browser configured. Avoid long debates, as this is not productive, but engaging the teams as part of the process is certainly worth doing.
You may end up with a number of different configurations, which is what I had when when I worked at HOK. What I would say, is once you have it setup, train your teams in its use. Recently where I have been helping firms to implement Revit, we like to use their template as part of the training. This way they know no difference, for them its just the way they have to work.
The process of configurations is actually very straight to do. I like to follow a BS.1192 methodology, whilst not exactly matching this standard, it does at least start to help you structure the browser in a fashion. So my advice to firms is to work on the principle that you start at the top of the browser with WIP or work in progress, then you have PUBLISHED, these are the views that go on sheets. Then finally you have the actually sheets with the views placed on them. So progressing down the browser. Now you can also add in other groups as well such as EXPORT or COORDINATION, but in this example tutorial we will just limit the browser structure to WIP & PUBLISHED. I hope you find it useful.
Thứ Sáu, 26 tháng 7, 2013
Switch Join Order
This one passed me by in Revit 2014, but may have been picked up by others; you can now switch the join order of elements. This is probably best demonstrated when needing to join like minded materials together, such as concrete beams & slabs
Here we have 3 pre-cast concrete beams & a slab. We obviously want to join the elements together to create nice clean joins.
If we choose Join Geometry from the modify tab, we can select the slab & join it to the beams.
Now if we don’t want to show the beams projected into the slab as indicated in the image above, select the Switch Join Order tool, & the select the slab & then each individual beam to switch the way the concrete cleans up.
The cutting rules are recognised when you create a section box through the model as well. Here I have joined one beam so it projects into the slab, the other 2 remain flush to the underside of the slab.
Thứ Sáu, 19 tháng 7, 2013
Thứ Sáu, 12 tháng 7, 2013
Curtain Wall icon – speed green - 2014
Was testing some Revit 2014 things today & suddenly my Curtain Wall icon went funny? Not sure why, but after a restart it sorted itself out. I do find if you do get these sort of glitches in graphics, a restart typically solves the problem. Neither less, it was a surprise & colourful addition to the Revit 2014 interface!
Auditing Walls
After my recent blog post about Location Line consistency, Luke Johnson asked…..
“Dave, when auditing a project (and trying to fix inconsistent location lines), do you have any tips on the most reliable way to do this?
If a wall is oriented incorrectly and needs to be flipped, do you recommend switching to 'Wall Centreline' and then using the flip control?”
When you audit a file you can’t schedule the wall Location line which is an annoyance. The only obvious way is to select the wall & observe the constraint set in the properties palette then change it. Like you are going to go through each wall in your project one by one???!!! It’s just not going to happen.
However, this parameter is exposed via the API. So once again CASE Exceler8 comes to the rescue!
If you export all your walls from your project via Exceler8 you will see the Location Line parameter listed in the resulting Excel workbook for every wall. However, it does not provide you with the actually location name, instead it’s defined as a number from 0 to 5. The values equate to the following:-
- Wall Centerline = 0
- Core Centerline = 1
- Finish Face: Exterior = 2
- Finish Face: Interior = 3
- Core Face: Exterior = 4
- Core Face: Interior = 5

Thứ Ba, 9 tháng 7, 2013
Be Consistent – Wall Location Line:
This is going to seem an obvious, but being consistent with the management of the wall Location Line constraint is essential when laying out walls in your project. When I dig around users projects, I often find inconsistent strategies, which “can” lead to issues with wall joins. You can set the wall location line parameter when you first place a wall, this is available from options bar.
New users often don’t know what all these different parameters are or what they even do. They merrily go away & place walls with different Location Lines set, only to find that walls are not cleaning up as expected. Let me show what each of these parameters are referring when you place a wall. The diagram below shows what each parameter alignment does.
The Core boundary is set in the wall type itself. All wall system families have a core Boundary, internal & external. Observe that its the “green” lines in the screen grab above.
Now whilst this might be a slight sweeping statement, but I advice users to be as consistent as they can. If you are placing your external facade walls, typically ensure they are all set to the same location line. Also, watch the location you choose. If you choose Wall Centreline & you have to flip the direction of the wall, there are no differences, as you are mirroring the wall around its centre line, on which you placed it. If on the other hand you choose Finish Face: Exterior, when you flip the wall, you are flipping the whole wall width, this can impact areas, so be mindful of this.But if you have to change the wall makeup, then Finish Face: Interior may be preferable as you might not want to impact areas within the building.
“Ok!'” What do you recommend then? To play safe, I either make all my external walls be Finish Face: Exterior or Finish Face Interior. What I choose very much depends on the project stage & whether I know the wall build up. As for internal walls, I try very hard to always make internal partition be wall centreline. This strategy has worked for me, I hope you have similar success. But do remember you can change the wall Location Line at any time if you need to, by selecting the wall & changing the Location Line parameter from the properties dialogue box.
Thứ Hai, 8 tháng 7, 2013
Shared Coordinates
Shared coordinates seems to be one of those subject areas which causes a mental block. Not actually sure why, but it does. I know others including Steve Stafford having documented & shared this with people time & time again. I even posted something a few years back which defined the process. Anyway, this is my quick step guide to setting up shared coordinates by “specifying a coordinate” at a point. I am 100% confident with this process, a bold statement I know, but I have helped setup some mega projects using these steps & it works every time for me.
Start by opening the survey drawing in AutoCAD; as good practise check the unit of the DWG, this is achieved by select or typing “DDUNITS”. It’s also worth Auditing the DWG for any errors using the “AUDIT” command in AutoCAD. Next using the “ID” command, ID a point, this may be a benchmark or a survey pin on the survey plan. In the example below, it is an Easting & Northing of 100000,100000, with the units of the DWG set to millimetres.
In Revit, start a new project. Next go to the Site view & notice the Survey Base Point & the Project Base Point. Do not move them right now.
Next import the DWG survey, but it is essential to import “centre to centre”. Do this by going to the Insert tab > link CAD this will open up the Import CAD dialogue. Locate the DWG & ensure the units are set & that you are importing centre to centre.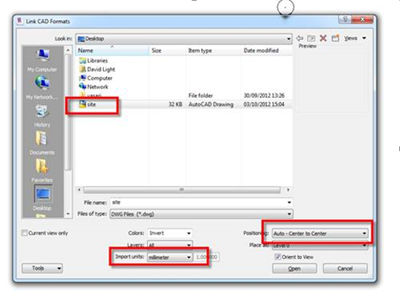
Once you have everything setup, click the Open button & the DWG will be imported. If you zoom all, you should see the DWG imported & the elevation symbols, very small. Resolve this by changing the scale of the view. If for any reason the DWG is not imported centre to centre, you need to go back into AutoCAD & check the DWG file as there may be an ordinate dimensions setup which can mess with the result. Remove the ordinate dimensions from the CAD file & go back a step to import again.
Next we need to align the coordinate system of Revit with the imported DWG file. Start by upclipping both the Survey Base Point & the Project Base Point.
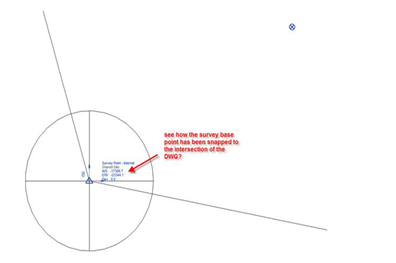
Next we will move them to a location of 100000,100000 which is on the bottom left hand corner of the DWG. You may want to put the view into thin line mode to help with the line weights, as this can be distracting. Ignore the Northings & Eastings, we will resolve this in a moment. Place the Survey Base Point as below. Do NOT clip the Survey Base Point yet.
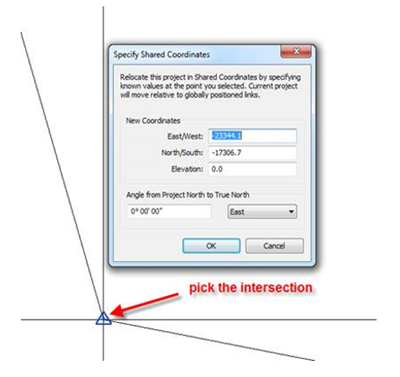
Next go to the Manage tab & the Coordinates. Choose the Specify Coordinates at Point command.
Pick the intersection. If this is problematic, draw a model line from the intersection & pick the end of the line where it intersects with the DWG.
In the Specify Shared Coordinates, type in the Northing & Easting to match the DWG file. You may also want to address the elevation level if you know this.
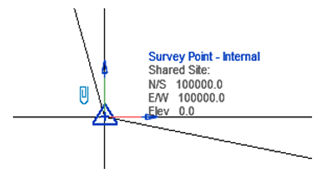
Once you have done this, click OK, to set the shared coordinates. Select the Survey Base Point & now click the paper clip, this will lock the Survey Base Point in place.
With the Project Base Point still unclipped you can then move this either to the Survey Point or to another reference location on the linked CAD file, if you know another survey coordinate or even a grid intersection, place it there. Once you have chosen a suitable location, clip the Project Base Point.
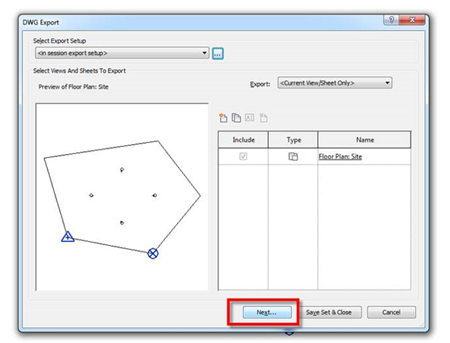
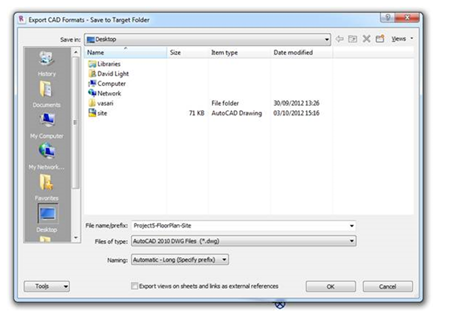
So as a double check, its good practice to save the file & then export the survey view as a DWG by shared coordinates back to CAD to see if everything has been setup correctly. To do this, go to Application Menu, big R>Export>CAD Formats> DWG files
This will open the export DWG dialogue; next go to button with 3 dots which is the Modify Export Setup.
Go to Units & Coordinates & ensure the Coordinate system basis is set to Shared. Select OK.
This will return you to the export dialogue, choose Next.
Name the export ; then Export the DWG to a suitable location. Ensure Export views & sheet links as external references is NOT ticked.
Next open the resulting DWG in AutoCAD. Use the ID command to double check the coordinates have been passed back correctly.
In this example we have zoomed into the location of the Survey base point & used ID in AutoCAD to check the coordinates. We can see from the example that they are spot on in the resulting DWG export.
As an extra check, you can always Xref in the original Survey CAD plan. If they drop in correctly on top of one another, you can be confident that the shared coordinates between AutoCAD & anything you export from Revit are correct.
Thứ Sáu, 5 tháng 7, 2013
Managing Revit data in Excel
I have already demonstrated the power of using a tool such as Exceler8 to export data to Excel. This short video steps you through the process of exporting to Excel, then linking that data to another Excel workbook. The thing I like about this, is that you keep the data moving all the time. Whilst it can get complicated on large datasets its a useful process to get accustomed to. Also, if you update your data in Revit, just export to Excel, over writing the first Excel sheet the second sheet will reflect that change.
Thứ Năm, 4 tháng 7, 2013
Cross referencing parameters
I’m not convinced this is good practise but it might be useful. A request came to me the other day, “I would like to show the keynote parameter & the window mark parameter in the same tag?” On further investigation you soon discover you can either have a dedicated keynote tag which will pull out the keynote reference, but you can’t pick up the window mark type. Or you have a window tag, which can pull out the mark type, but not the keynote reference. This client wanted to show both parameters in one tag. So a quick hack around with some shared parameters & we resolved the request very simply. This is how…..
I started by creating a “text” shared parameter called fake_keynote.
Next I ensure this parameter is used in the project. I assign the parameter to the window category, I also ensure the parameter is setup as an instance parameter.
I opened up the window tag, added a new label & assign the fake keynote shared parameter to the label in the tag & loaded the family back into the project.
This is what my new window tag now looks like.
You will observe that the tag is still not filling in any keynote data. Now the cool thing here is you can cross reference parameters, but you need to edit the window family to achieve this. I select the window & choose to edit the family.Then I add the fake_keynote shared instance parameter to the family.

Save the family & then load the family back into the project updating any existing versions in the project. Now when the window is loaded into the project, the keynote data is cross referenced into the fake_keynote parameter & the tag in turn displays the actual keynote data in the window tag.
Thứ Tư, 3 tháng 7, 2013
Exceler8 – QA your template
One neat techniques when using Exceler8, is the ability to export out all the content included in a Revit project or template to an Excel spread sheet. How many times have you questioned the naming of or wanted to know all the loaded families within a project or template? Well its easy with Exceler8, just start open a project or a template file. Choose the Export Category icon…..
This will open up the Exceler8 dialogue.
Next Check all the categories from the Category list, ensure one Category Per tab in Excel, radio button is selected, finally ensure Only Types (Include ALL Types) radio button is selected. Then choose Export.
Exceler8 will do its thing & produce a nicely formatted Excel spreadsheet for you. Open up the resulting Excel & you will see tabs for all the families loaded listed for each category.
Simple…..
Thứ Ba, 2 tháng 7, 2013
Mastering Revit Architecture 2014

Wiley Europe:-
http://eu.wiley.com/WileyCDA/WileyTitle/productCd-1118521307.html
Wiley USA:-
http://www.wiley.com/WileyCDA/WileyTitle/productCd-1118521307.html
Exceler8
In the early days of Revit it was not easy to export data from Revit to Excel, but it was possible. Then suddenly it got difficult for the average user, but as the API matured it opened up opportunities to develop tools which could pass data backwards & forwards to between Revit & Excel once again. Now there are already various tools available on the market which do this, but the most recent addition to the Revit to Excel data party is Exceler8, part of the CASE Pro Apps. More details can be found here….
http://apps.case-inc.com/content/subscription-exceler8-revit
I have been experimenting with this tools for a few months & it’s a god send. It has a few tricks up its sleeve which some of the other tools on the market can’t do. But let’s start with why you might want a tool like this. Let’s be honest, filling in data in a Revit schedule can be slow, sometimes incredibly slow especially on large projects. Then there is the fact that maybe all the data shouldn’t be included in the model, a discussion for another day. So in this situation choosing a tool which is more appropriate ie. Excel for data input would make a lot of sense. As we move into a more data centric BIM workflow, the data or “information” becomes more important than just the 3d geometry or the 2d deliverables. You will hear many BIM protagonists say it’s all about the “I” in BIM. In my early days of Revit use, I would say I didn’t really recognise this. For me, it was about the ability to model & visualise your design & the produce a coordinated set of information. I recognised the ability to schedule rooms & data, but it was not a deal breaker for me. But as my experience in Revit grew, I learned that it was the data or information which was the real benefit to this whole BIM process. What Exceler8 allows you to do is pass / export data from Revit to Excel, add, clean, tidy up in Excel & then synch it back from Excel into the Revit model driving change & updating parameter information.
Take a look at this video from my colleague Don Rudder which will explain most of what you need to know.
So here is another trick, not a particularly great video explanation, all done live & rather rushed, but this example this has been shown many times at RTC. Using Exceler8 I can drive the height of instance base masses. Its not really a useful practical example, but its fun neither the less, but it does at least step you through the process of exporting & importing data to in turn drive geometry.
Thứ Năm, 9 tháng 5, 2013
Scheduling Apartments
I can’t take full credit for this post, as it was Becks Aaron Maller who reminded me of this, as it seems that I had wiped it from my memory. Neither the less, let me explain. More often than not, project teams working on residential schemes will use groups for apartment or flat layouts. If you apply a sound strategy, with clean interfaces between the elements in the group & the main structure of the building; this actually works well.
I also recommend to users that they don’t mirror the groups, instead they create left & right versions. In this instance, if I did require a handed version, I would group, name appropriately, mirror, then ungroup the mirrored version, regroup & rename as the handed version.

In Revit 2014 we still can’t schedule groups! However some minor enhancements open up more opportunities to push data into elements within groups & allow us to schedule this data. The reason for this, is we can use the “new variance parameter by group” functionality in 2014. Let me explain how this could be used.
This example gives a brief description of the implementation process. Typically I would probably use a generic model family as well as shared parameters as my data collector in the group, but to demonstrate the process I will create simple in-place generic model family.
We will start by creating a couple of project parameters manage; tab > settings tab > project parameters.
We will add two new Project Parameters, in this example I have made them Project Parameters, but they could easily be Shared parameters which would allow us to tag them.
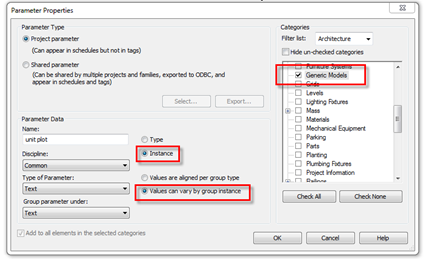
Set the Type of Parameter to be Text, as we want to drive data in. When you change the Type of Parameter to Text, “Values are aligned per group” or “Values can be vary by group” instance radio boxes will become available.
We will define 2 new parameters one called unit plot and the other called bedroom number. I have applied these 2 new parameters to generic models categories & set the “Values can vary by group instance” parameter.
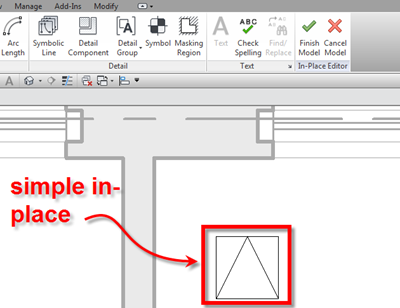
Next I have created a very simple in-place family & name this as “data collector”.
This in-place family just includes a few symbolic lines for this exercise so we can locate it.
Now when we create our apartment layout ensure this in-place family is included in the group for each apartment layout.
We will now create a new schedule. In Revit 2014 we can now schedule generic models.
In the schedule we can include the name of the in-place family as well as the previously project parameters we created.
Now if you start to add data to the schedule this gets driven back into the in-place family instance within each group. If we now tab select the in-place family we created, you can see the data we have driven from the schedule back into the in-place family within the group.
As you copy the group around the project this data is retained.
Whilst the example here is rather crude, just to get the concept across, this provides a far better way to schedule groups and include useful “data” within each group for apartments and flats.



![image[10] image[10]](https://blogger.googleusercontent.com/img/b/R29vZ2xl/AVvXsEhubWaZpqBdyWzynvkLbciKhrPYZA5Ghr-6542E7hGVkk6ftCZsXBu0gZ4u4NpZ4fznM3sVeQhRXaoQdDkWzArHL7ih1th0amcaQUBdJqgr6QUjgGUHFfqsGgujU4SKyYHDMNPCbi9qns0/?imgmax=800)


