Thứ Ba, 31 tháng 1, 2006

The New LL Hip Pads


We are really excited about the new hip pad system. We have been working on it for quite a while trying to make it simple and bomber. We didn't want it to be some gimicky system. There are no inflatable bladders, no neoprene or elastic sleeves that slip around, just a couple screws and some velcro. We wanted something that was very durable, easy to use, and extremely adjustable.

All you need is the same screwdriver you use to adjust the seats and thighbraces in our boats to loosen up the pads, release the velcro on top of the pad, and then you are ready to adjust up and down, forward and back, or twist so that you can get a super custom fit.

If you need to tighten the fit, or make the hip pads bigger, you can slip shims in behind the hip pads by just loosening the hip pad a little, you don't need to take the screws all the way out, and slip more shims in behind the the pad.

I like to get in the boat and make sure the pads feel right. Once I have them positioned how I want them I mark the spot with a marker. That way once I jump out of the boat I can make sure that I have them in the right place. Then just tighten down the screws and pull the velcro into place. I think at that point you will be hard pressed to find a more adjustable, simple, and durable set of hip pads in the industry.


Here is a link to the video of how they work.
Click Here
Shane

Liquidlogic's New Foot Foam

Here is the new foot foam set up that will be coming in all the boats that don't have a bulk head.

The foot foam blocks will come in a bag in your boat and the "Cone of Comfort" will come in place in the bow of your boat.
What I like to do is jump in the boat with only the front foam piece in place in the foot cone. Then I add foam pieces as I need them. Obviously someone shorter might start with a couple of the extra pieces in place.

Once I have the number of foam shims I need to make a good tight fit I like to glue them all together. That makes them much more solid and helps keep them in the boat. The other thing that I do is custom shape the foam so that it fits exactly the way I want it to. A lot of people like to trim out a place for their big toe. Anyway you get the idea.

When you put it all back in the boat I like to put the bow wall on top of the front edge of the cone of comfort. That helps keep it in place and makes getting in the boat smooth.

Here is the link to the video.
How to Use the Foot Foam Video, Click This!
Hope this helps
Shane

Big Boatin' The Noli


We hadn't done a Big Boat session in a while so Woody and I decided to make a trip up to the Noli and bring along some newbie long boat paddlers. Whitney has paddled a Pisgah once before, but Yonton hadn't done the big boat thing before. We knew he would like it but pretty foreign to him.

We all loaded up in Woody's reliable Buick LeSabre. Four paddlers four Pisgahs. The one thing we remembered a little late was the fact that when you paddle boats that are that long you actually do need a bow line. We drove up I-26 with the middle boats pointing more and more towards the sky. We tried retying but that didn't help. We looked like the guy with the mattress on his roof trying to hold it on with our hands.

Whitney, Woody, and I have all been paddling long enough that we actually paddled whitewater boats that were nearly this long, but Yonton doesn't have that much experience in the long boats. So we weren't sure how that was going to go. We gave him a boat with a rudder figuring if things went really bad he could drop the rudder and guide himself home.

It was a beautiful day out there. January 28th and it was 60 degrees. The water was cold as hell but still and awesome day.
Here is the video. Its a 15mb video so it may take a minute to load.
Big Boatin' the Noli Video Link, Click This
I will be posting video of the new Foot System and Adjustable Hip Pads later this week.
Shane

Thứ Hai, 30 tháng 1, 2006

Planning Ahead

I need to start thinking about how much epoxy and fiberglass to get. The recommended quantity of epoxy according to Nick's book is 1.1 gallons. Other places I've seen recommend getting 2 gallons of epoxy and I will probably do this, hoping I don't actually use much of that second gallon (not only is it very expensive, it's also heavy). It would be kinda crappy to run out at a critical point and I won't have the option of running down the street to Churchill Hardware to pick up some more, so I guess I'll have to bite the bullet and get the larger quantity. To get 1 gallon plus 1 litre would still be cutting it too close, and the larger volume is a better value. Plus, by all accounts, first time builders use too much epoxy. I'll be using the West Systems 105 resin with the 207 hardener.

The second thing I need to figure out the quantity of is the glass cloth. It comes in a 60" width and I can lay it at an angle to get the best economy out of the cloth. I did some cutting and pasting to come up with the following diagram to help me decide how much cloth I need: 
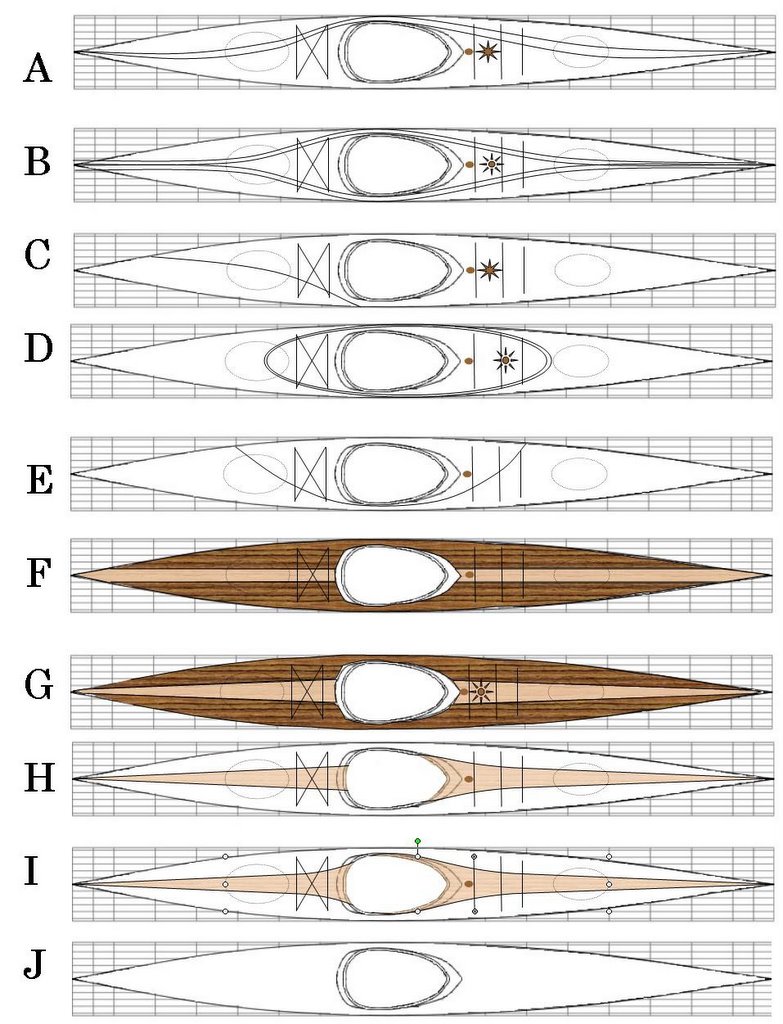
The above layout uses 1 layer on the inside and one on the outside with an extra layer on the bottom. The cutoffs should give me enough to work with for the other areas that need to be glassed. By my figuring, the above layout tells me that I need to get ~17 yards. I'll probably just round it up to 20 yards to make certain there is enough and keep the extra (assuming there is much extra) to go along with the extra epoxy so that I have a head start on the next boat! (Or all the other little things that one can build out of epoxy & fiberglass, such as a side view mirror for the car after my wife drops another boat on it.)

Chủ Nhật, 29 tháng 1, 2006

The Lee Valley/Canada Post Problem

The Lee Valley/Canada Post Problem

Some interesting reading regarding Lee Valley versus Canada Post.

Deck Half Done

I got nearly 4 hours of work done last night so I am now about half done stripping the deck.
Please excuse the frankensteinian cut & paste panorama.

Thứ Hai, 23 tháng 1, 2006

Rick Mercer's Blog

Rick Mercer's Blog. Very funny satire, good election day noon-hour reading, nothing to do with boatbuilding.

It's Election Night in Canada! - Go vote!

The image at right was posted on the aforementioned Rick Mercer blog, credited to Doug Webber, and was used without permission.

First River Run in the Cross RIvers

I have been blabbing the last few posts about getting the CRs into production at the factory. Now its time to start showing them on the river.
Woody, Rob and I took off the for the Nolichucky the day I got back with the first production CRs. The level was a nice 3500 and it was 50 degrees in January. Can't beat that.


You all know Woody, but you might not know Rob. He is the brother of our president at Liquidlogic. He just recently moved to Asheville from Rhode Island so he could do some more paddling. Rob has been doing a bunch of creeking down here but hasn't ever been in a playboat so it was cool to see that the CR 125 was easy to handle for him.
Woody - 6'4", 240, 34" inseam, size 12 dogs. CR 250
Rob - 6'1", 175, 33" inseam, size 11 feet. CR 125


It was really nice to get in the production boat and know that we put together an awesome boat. The new foot cone and foot foam were super comfy. Hell Woody paddled the whole river barefoot just because he could. He kept saying, "dude my feet are even warm". The new hip pads are awesome. A screw driver and you can adjust and secure your hip pads completely bomber. No more loose hip pads. They don't slide, lose air, come unglued, or only sit in one place. I am nearly as excited about the new outfitting as I am about the new boats.


Woody and I will get the final production stats on the CRs up on the web as soon as possible.
Here is the video of the day running the Noli.
Cross Rivers on the Noli Video Link, Click This
Later
Shane

Here is a link to more photos, videos, and words and stats about the CRs.
Cross River Page Link, Click It

Thứ Hai, 16 tháng 1, 2006

Yellow Cedar

The wood I am using for contrast is Yellow Cedar, Chamaecyparis nootkatensis. This wood is a pale yellow in colour, in contrast to the dark brown/red of the Western Red Cedar which makes up the rest of the hull. The name is a bit confusing as it is a cypress rather than a cedar (thanks to Rod for clearing that up for me). When I first started working with yellow cedar I was struck by the difference in smell and working characteristics as compared to the red cedar. I thought they were different varieties of the same thing so I expected some common ground in the wood characteristics. The yellow cedar has a more uniform appearance and texture, and is much less likely to split along the grain as I whittle a taper onto the end of a strip. The most striking difference though (other than appearance) is the smell. I expected something cedar-like in smell but being a cypress rather than cedar the smell is quite different.

The strips of yellow cedar I have (purchased from Orca Boats) are also of a much better quality than the red cedar strips (purchased from some guy off the net). The red cedar strips vary somewhat in thickness and width, and have places on most strips where the cove is not properly cut all the way, or where the bead is off center, or there are bumps along the bead. I gather that some of this is normal, and I did get a pretty good deal on the wood so I'm not dissapointed, but next time I may make my own strips or make use of the fancy new set up of the folks over at Kisseynew Canoe Co.

Bow Deck Stripped

Thanks to all who gave their input into the design for the deck. The design I decided on is something similar to "L" shown in a previous post. Below, I have stripped the deck so that the strips extend beyond what I have decided the border of the contrasting strips will be. To define a fair curve I am using a 1/4" piece of strip which is the bead cut off of one of the strips that was to become the center strips (the bead was cut off so that the strips could be laid on the deck cove outward in the same manner as the keel was stripped). This pattern by the way used up nearly all 114 feet of yellow cedar that I had. It was nip and tuck in the end with 6 feet or less left over.

Here I have roughly cut the strips back to the curving line. It still needs to be smoothed out. I might change the curve a little bit to make it a little more curvy but I need to sleep on it. Now that the bow is stripped, how about the addition of a figurehead?

Thứ Sáu, 13 tháng 1, 2006

The First Assembled Cross Rivers

I've been in the factory this week getting the CR molds broken in and ready to run boats this week and today we started assembling the boats, and here they are.


Here is a comparison shot of the two boats. The boats are comfy rides. Woody and I are super comfortable in the two different sizes.


This is the new hip pad system that is going into the whitewater boats now.
Up and Down adjustment. Forward and Back adjustment. In and Out, and a tilt if you want, sorry they aren't heated.


Here is a link to more photos, videos, and words and stats about the CRs.
Click Here
Later
Shane

Deck designs & exceeded bandwidth


Image troubles! In my previous post I linked to images hosted on my geocities.com site, which allows only 4mb of traffic per hour. That was promptly exceeded. (I think I'll be moving my web site soon.) So now I'll load those images directly to Blogger. The second set of photos were created using the kayak design tool found on the Action Fish Kayaks web site.

Thứ Tư, 11 tháng 1, 2006

CR Molds are in the Factory!


I love the smell of new alluminum. The new Cross River molds showed up at the factory the other day and I have been working on getting them ready for production. Its always awesome to see the new molds because they are so shiny and new. The 125 and the 250 are both up now. It usually takes a couple weeks to get the molds all broken in and running smoothly. Just like a good pair of shoes. Thats why we aren't promising to ship any boats until Feb. 1st.


If you haven't seen how boats are made you should look at these video links.
How Kayaks are Molded
How Kayaks are Built #1
How Kayaks are Built #2

Lots of folks have been asking about the CRs and when they were coming so I figured I would show you what is going on. I will try to post pictures of the first outfitted boat on Friday.
Later
Shane