Thứ Hai, 31 tháng 3, 2008

Masik

Based on the suggestions of other builders of the Sea Flea such as Marcel & Kelly, I have added material to the top of cross section #2. The top of this cross section would be called a masik in more traditional skin-on-frame kayak building. The masik is "a curved deck beam, often in the range of 6-7cm wide, that supports the front of the cockpit coaming" (http://www.qajaqusa.org/). Marcel had noted on his web site that the standard construction of cross section #2 could be improved by providing a "thicker surface for gripping with the tops of the thighs" (http://home.comcast.net/~marcel.rodriguez/kidsofv2.htm). To rectify this, Marcel added a 2x4 shaped to match the top of the cross section to the forward side. Marcel has built 5 kayaks for his daughter, McKinley so I figured his advice is worth considering (check out McKinley's rolling video). I had some 1x6 cedar shorts in the cutoff bin so I used two pieces of that to provide the extra support for bracing with the thighs and to strengthen the deck support.


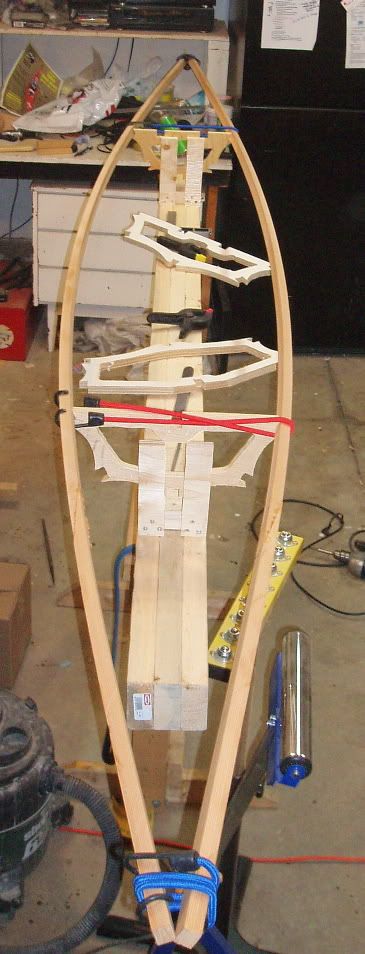
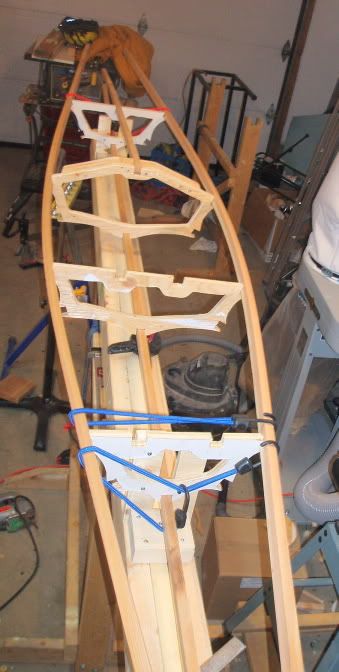
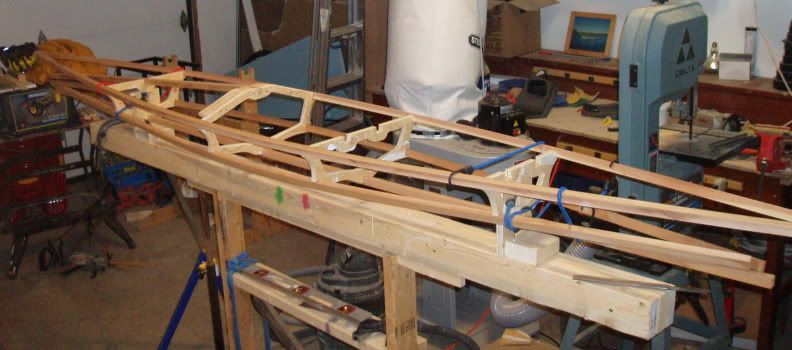
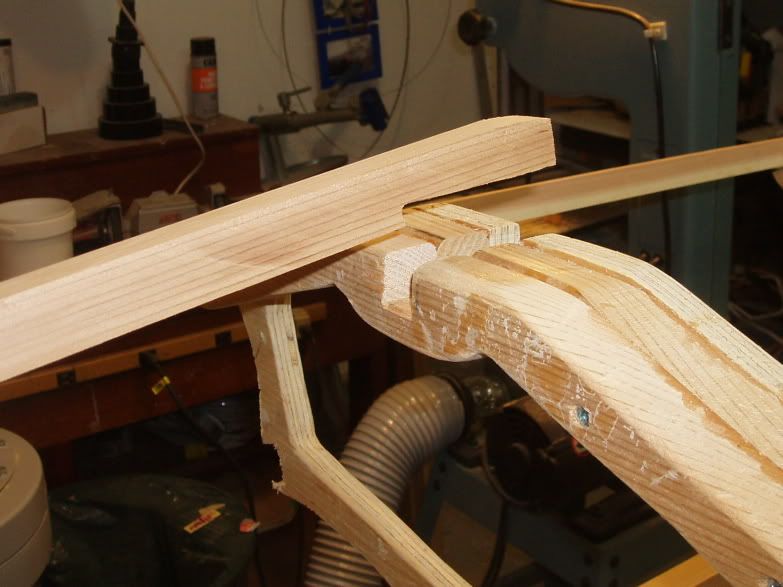
The fore deck stringer was notched to better fit into the groove in the top of the masik.
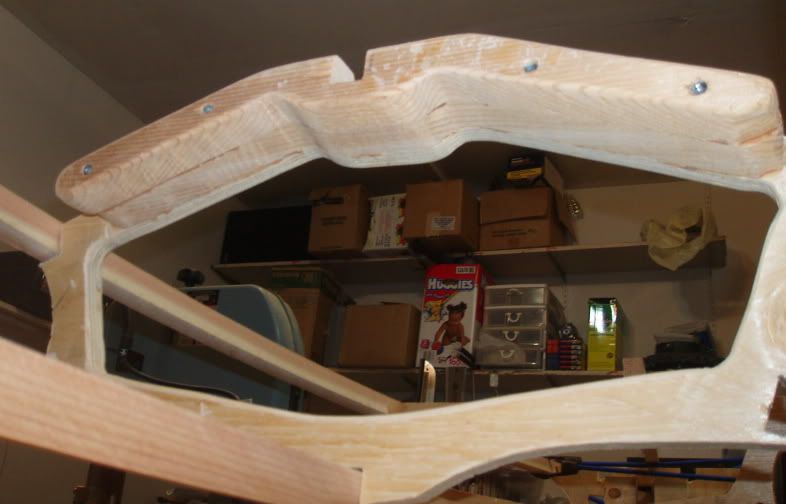
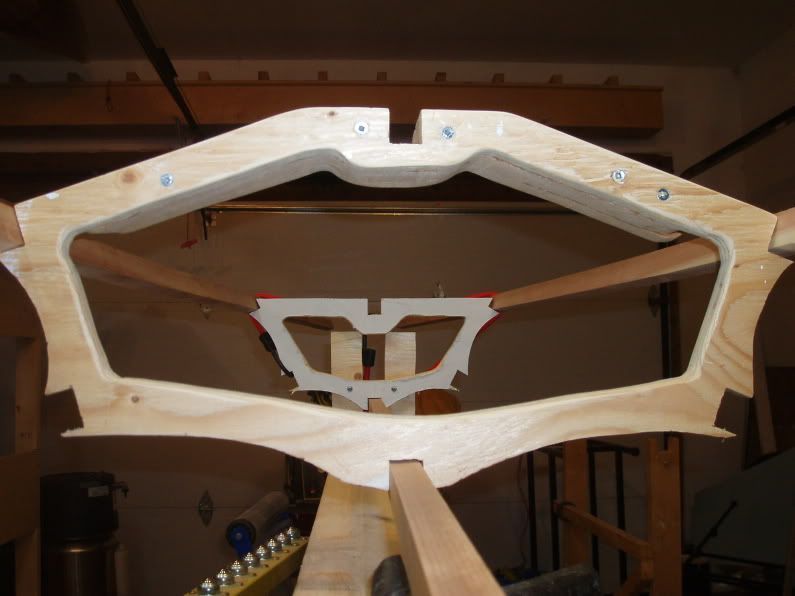
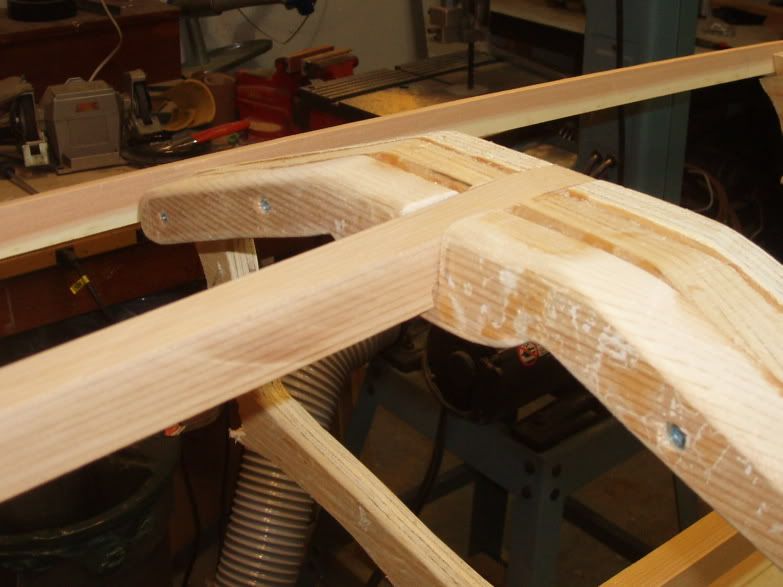
The masik and the rest of cross section #2 has had all edges rounded off and sanded smooth. The paddler's legs project through the opening in this cross section so it needs to be smooth & comfortable.

Gunwale Work

I have given the top outside corner of the gunwales a 1/4" radius rounded profile using a Veritas cornering tool. This handy little tool quickly rounds off the corners of the cedar gunwales.
Later, I will use the tool to take the sharp corners off of the keel and chines.

Skeleton of a Flea

Work on the Sea Flea kayak continues. The cross sections (a.k.a. stations) have been all cut out and sanded smooth. Cross sections #1 and #4 are attached to the strongback & aligned as seen in the photo below. In the photo the gunwales are being test-fit. (See the corresponding photo from yostwerks.com.)

Cross-section #2 is test fit between the gunwales. Only cross sections #1 & #4 are attached to the strongback during building. Cross sections #2 & #3 are positioned as seen below, held in place by the gunwales (and later the chines, keel & deck stringers).

Ready to determine the shape of the stems (I'm at about the same stage as Tom shows here).
I still need to cut & fit the aft deck stringers. Then I will double check the position of all cross-sections and ensure everything is level and straight before using tape to temporarily secure the positions in advance of gluing.

progeCAM 2008 Released by CADDIT.net

Machinists and designers alike will be interested in this affordable, scalable solution for mechanical design, drafting and CNC machining. progeCAM will be sold in two flavours:
  • progeCAM Basic: Will be sold worldwide. Bundles the "Professional Version" of the world's favorite IntelliCAD (statistically speaking) with the well-know PartMaster from Dolphin (Level 1).
  • progeCAM Professional: Will be sold and supported only in Australia, New Zealand and surrounding region. Bundles progeCAD Professional with the buyers choice of professional machinists multi-axis CNC/DNC milling, lathe turning or wire EDM.
progeCAM offers the economical "best of both worlds" to mechanical engineers: progeCAD's robust AutoCAD-like drafting framework with PartMaster industrial-strength CNC machinining software. progeCAM is sold and supported exclusively by CADDIT.net and their authorized resellers. Read the entire press release on CADDIT Australia.

Chủ Nhật, 30 tháng 3, 2008

Bike Advocacy in High Heels

Copenhagen Cycle Chic - Bike Advocacy in High Heels

Who doesn't like looking at pictures of women on bikes? Of course I realise that statement completely misses the point. A lot of interesting cyclist photos from Coppenhagen & around the world. Cool.

Thứ Bảy, 29 tháng 3, 2008

Making of a design entrepreneur: Learning from peers

Image: Pankaj Varma and Julie Bose talking to Foundations students about their business experience of setting up a new brand called “Namo”, a series of Devotional Accessories as a design offering in the Indian marketplace.

Learning about business processes and business models has a two fold role in the making of a designer in India. The knowledge will hold them in good stead when they actually start practicing design and some of them will become entrepreneurs in their own right, by getting involved in start-up businesses using their design skills and entrepreneurial urge just as many of our graduates have done in the past. Many of such businesses have grown over the past ten or fifteen years and in my recent reflections in conversation with colleagues and students in the DCC class at NID we have identified several classes of such businesses that have been set up by our young designers who have graduated from our institute. The second aspect of business is the understanding of the channel through which the design solutions developed during the design journey are delivered to the public in an extremely competitive space of the marketplace. Many a time great design solutions get sidelined due to some other factors that are usually beyond the control of the manufacturer, promoter or even the product creator. These could be factors in the legal space, the financial strategies employed or even in the layers of branding and positioning that may have been adopted by the marketing team. It is clear that even these offerings can be designed and explored to both reduce risk as well as to respond to current aspirations of users as well as conditions in the market that may call for a revision of the offering in line with the time and place in which it is being made.
Image: The Namo design collection launched by designer entrepreneurs Pankaj Verma and Julie Bose

Making of a design entrepreneur: Learning from peers
I have asked the Foundation students explore the field by contacting our graduates in the field in order to find role models for themselves to emulate when their time is ripe for action in the field. India has been a particularly hostile territory for young design aspirants since we have had a protected economy for so many years and design and the risk that it entails was far from the minds of the trader manufacturers who managed our industrial empires as well as the Government that was more interested in control through standards and laws and taxation and special privileges and subsidies rather innovation and market excellence. In my presentation at the Conference on Design Support at Design Wales in 2004 I had the occasion to reflect on the Indian Design landscape and offer a number of categories for design businesses in India. This conference paper (pdf 39kb) and visual presentation (pdf 573kb) show the categories and these can be downloaded from my website at the links provided here. In order to give our students a framework to do their own research about their peers in the design business in India I offer a broad set of categories below which is in no way exhaustive but can give them a head start to look at this space and fill in the details for themselves as we go forward with their education.

Design schools and their curriculum has been focused on the creation of skilled personal for industry but many of our products, our graduates from the design programmes, end up being self employed and very happy indeed in that self appointed space. The journey may be traumatic for some or just as easy for others, but the lessons of the street food vendors that was explored by the DCC class would I am sure give our young aspiring designers some insights about how they too can survive in a hostile business environment which is not too supportive of design and the design activity in India has been just that over the past fifty years since the modern design movement started at Ahmedabad with the writing of the Eames India Report in 1958 (pdf 359kb). Perhaps this has something to do with the nature of design itself and only time will tell. The National Design Policy too is perhaps barking up the wrong tree and trying to create designers to serve industry masters, but are they ready to listen? We need to look at other models where designers can work directly with people who need their support and the policy frameworks could be moulded to facilitate such a direction. Here I would draw the attention of my students to the experiments in the Northeast of England where the Design Council UK has carried out the DOTT07 initiatives with John Thackara of Doors of Perception fame as the design leader. Their book, publications link and online documentation pdf (5454kb) of this live one year long initiative is very exciting indeed and could be a model for decentralised design action in India as well. Design schools may need to reexamine their curriculum to ensure that entrepreneurship is included in their mandate and this may bode well for design profession in India going forward.

The broad categories that we identified for design action in India are listed below:
1. Design Consulting Offices (DCO’s) (a few names in each category)
Design Directions: Satish Gokhale and Falguni Patel (Product & Graphic Design)
Ray & Kesavan: Sujata Kesavan (Graphic Design & Branding)
Incubis: Amit Gulati and Sabyasachi Paldas (Product Design, Architecture and Branding)
Korjan Design Studio: Dinesh and Rashmi Korjan (Product Design)
Elephant Design: Sudhir Sharma and colleagues from NID (Graphic, Branding, Exhibition etc)
Idiom Design Studio: Sonia Manchanda, Jacob Mathew et al (Branding, Graphics, Retail)
Design Workshop: Devashis Bhattacharya (Graphics, Branding & Exhibitions)
Icarus Design: George Mathews (Product Design)
Whisper Design: Niladri Mukherjee (Product Design and Branding)
Lopez Design: Tony Lopez (Graphics, Branding)
Lokus Design: Chandrashekar Badve, Molond Risaildar & Siddharth Kabra (Design, Architecture and Branding)

2. Designer Producers (DPO’s)
Quetzel: Sandeep Mukherjee and Sarita Fernandez (Furniture and Architectural Accessories)
Dovetail: Sunder S and John Mathew: (Furniture and Architectural Accessories)
Bodhi: Mala and Pradeep Sinha (Textile and Fashion products)
Designwise: Mukul Goel (Hand Crafted Metal artifacts and accessories)
Namo: Pankaj Verma and Julie Bose (Devotional Accessories)
Curiosity Workshop: Mala and Bela Shodhan (Soft Toys and Furnishings)

3. Designer Producer with Retail outlets (DPR’s)
Abraham & Thakore: David Abraham and Rakesh Thakore (Textile and Fashion products)
Tulsi: Neeru Kumar (Textile and Home Furnishing)
Bandhej: Archana Shah (Textile, Fashion and Accessories)
The Design Store: S Sunder, John Matthew, Jacob Matthew & Anand Aurora (Furniture & Accessories)

4. Interior Design and Exhibit Design services (IED’s)
Design Habit: Amardeep Behl: (Exhibition Design)
Design Core & Design Laboratory: Vikram Sardesai and Surya Gowda (Exhibition Design)

5. Design Research Services (DRS’s)
Onio Design: Mahoj Kotari (Product Design and Trend Research)
Variations Art Gallery & Freedom Tree Design: Latika Puri Khosla (Colour Research Services)
Sonic Rim: Uday Dandavate (People oriented Trend Research)

6. Design Led Institutions / NGO Activists (DLI’s)
Riverside School: Kiran Bir Sethi (Primary and Secondary School)
Khumbam: K B Jinan (Craft Based Production of Terracota Murals)
Industree: Neelam Chibber (Grass based village and artisanal initiatives)
Daily Dump: Poonam Bir Kasturi (Organic Waste management system)
Vikalp Design: Laxmi Murthy (Communication for Rural Health)

7.Interaction and Interface Design (IID’s)
Codesign: Rajesh Dahiya (Interface Design and Graphics)
Edot Solutions: Sanjay Sarkar (Information Design Software)

8. Corporate Design Intrapreneurs (CDI’s)
Atmosphere & Himatsingka Design Studio: Jayshree Poddar (Silk Furnishing)

I am sure that we can think of many more such initiatives and see that these are not exhaustive in any way. However, with the creation of the Design Business Incubation Centre at NID with support from the DST perhaps more alternatives will be explored in the days ahead. Perhaps the practicing designers in India can share their experiences and disclose closely held business strategies to design students so that it would encourage several of them to think of taking the entrepreneurial route when the time is right. Data on their business turnover and what they do and how they operate is rarely available since the whole area of design journalism is so poorly operated and structured in India today. I hope that this too will change in the days ahead.

Thứ Sáu, 28 tháng 3, 2008

progeCAM CNC Software is Coming

CADDIT will soon release their own special progeCAD IntelliCAD CNC integration software for milling, lathe and wire EDM built on PartMaster technology from Dolphin.

Affordably priced and custom packaged, progeCAM will be released next week on CADDIT CAD CAM Australia. progeCAM will be a flexible solution with a starting price around $500, with more advanced bundles for industrial machinists requiring lathe, wire EDM, DNC and multi-axis CNC milling.

A formal announcement with complete information and links will be made at that time.

Thứ Ba, 25 tháng 3, 2008

PVC Fabric

I purchased the 18 ounce PVC fabric and the HH-66 glue for my daughter's Sea Flea. I looked around at a few places in town and found prices for fabric ranging from $23/m to $10.50/m. I asked on the KBBB about possible differences in fabric but didn't find any compelling reason to believe there was a drastic difference in quality that was reflected by the price. After having a close look and handling the material, I could see no reason not to go with the less expensive stuff. I purchased 4 meters of red & 2 meters of yellow from Denham Awning Makers, plus the 946 ml can of HH-66 glue (I would have gotten the 237 ml can but they were out). My daughter picked out red for her kayak, and I got the yellow to add some sort of design (probably something like Anton Olsen used) and to be used for other things (float bags perhaps. They also threw in some scrap pieces of blue & white fabric.

My fabric & glue costs:
6 meters of fabric @ $10.50/m = $63.00
946 ml HH-66 glue = $18.75
So for about $90 ($81.75 + taxes) I have way more glue & fabric than I need. That brings the total cost spent on the kayak so far to about $110 including the cedar 2x6 that I purchased for $20. I don't anticipate much else in material costs as most everything else needed I should have on hand.

VariCAD 2008 1.03 3D CAD for Linux and Windows Released

CADDIT will continue carrying the VariCAD 3D product on the CADstore. A few weeks ago VariCAD announced the release of VariCAD 2008. The new features for 2008 include:

  • support for 3D threads (threads at bolts, screws and nuts, including library parts; threaded holes, etc.)
  • improvements in shells and surface development
  • new 3D kernel capabilities (e.g. Boolean intersection, improved 3D chamfer tool)
    a new tool for spherical solids
  • new BOM and title blocks' features
  • further impoved STEP file compatibility
  • a possibility of setting antialiasing for better display in 3D (graphic card settings)
    and more.

VariCAD can be downloaded for free and used for 30 days before buying a license. VariCAD is ideal for small 3D sheet metal, industrial jig and fixture design, as well as more general drafting projects. There are a number of tutorial videos online to help users learn CAD design with VariCAD.

Chủ Nhật, 23 tháng 3, 2008

Small Progress

I got a bit more done this past weekend on the Sea Flea I am building for my daughter. I ripped my 10' cedar 2x6 (1.5" x 5.5") into pieces 11/16" x 3/4", then scarf-jointed two of these to make two 12' long boards for the gunwales. The first step was to rip the 2x6 into 3/4" x 1.5" pieces on my table saw. These were then cut again to yield the final dimensions (11/16" x 3/4") for the gunwales, keel & stringers to be used on this kayak. These cuts were made easier, safer & better through the use of a very basic feather board I made. I can't believe I've gone so long without one! With boards that long my roller stands also came in handy. By the way, I have a $50 roller stand from Lee Valley with roller balls, and a $18 stand from Peavey Mart with a single roller. I prefer the cheap one. Last fall in anticipation of fixing the gunwales on Jay's derelict canoe, I built a scarfing sled for the table saw. This sled did a pretty decent job of cutting my 8:1 angle and the scarfed boards matched nicely. With the angles cut, the boards were glued up in the kitchen and voila, 12 foot lumber was created.

I also glued the form patterns onto my 1/2" plywood (using spray glue that allows it to be removed later) and began cutting the forms out on the band saw. I then realised that I still needed to do 2 things: 1) mark the positions of all of the stringers and 2) mark the curve that allows the fabric to push inward without hitting the cross sections. Marking these would have been easier to do before the paper was attached to the wood and before things were cut up. Oh well, it's done now.

I was confused for a time regarding what to do with the deck stringers. Looking at some of the Sea Fleas built by others eventually answered that for me. I will have one deck stringer that runs down the centerline of station 2 to station 1, and two deck stringers on the aft deck running from station 3 to station 4, pretty much just like this guy did.

The next step is to finish cutting out all the cross sections (stations) using the band saw and a jig saw, outside & inside. Then I will mount cross sections 1 & 4 onto the strongback and temporarily attach the stringers.

A Good Friday

The Good Friday holiday turned out to be a pretty good one. Among other things, I stopped in to Kisseynew Canoe Company to see what was happening there. Mark was working on his new canoe and it was looking pretty good. When I arrived, he had been shaping a yoke of ash & walnut using a power carving wheel on a disc grinder.

I then headed down to the river for a paddle, my first paddle of 2008. I used the Saskatoon Canoe Club's relatively new Swift Osprey. This solo canoe is one I've been wanting to try for some time now, particularly since it is a canoe I think might be a good one to build someday (although probably I need something with greater capacity for tripping use). The first thing I noticed is that it is light, certainly the lightest canoe I have paddled (my experience in actual solo canoes is limited to 2, and the other one is Royalex). I found that for me it paddled the most comfortably in a heeled over position using my voyageur paddle and a "canadian" paddling style which has the paddle slicing forward through the water. The canoe felt a bit "tender" at first, particularly in the heeled over position which kept it interesting whenever the dog would move around. This instability was quite manageable as the dog & I both became accustomed to it. At first I had Kaya in the stern because there is more room but I realised later that the bow would keep her closer to the centerline and not give her room to roam. The sliding seat made adjusting trim a pretty simple matter. There is a foot brace as well and I did try paddling with my bent shaft paddle but it just did not seem quite right.

The weather was cool and overcast but not bad at -3C with a light north wind (9-13 kph according to Environment Canada). The river was mostly frozen but for a span of 15 - 100 m along the east shore. The current in the open channel of water was swift, making me work for my upriver progress. I first headed upriver with no particular goal in mind. As I warmed up and my muscles got used to the task I kept picking points farther upriver to head to. Eventually I came to the end of the open water at the Queen Elizabeth II power plant. The power plant is the source of thermal pollution which keeps this stretch of river open much of the winter.

After a brief rest I turned back downriver and into the cool wind to return to the boathouse (note to self, don't let you wet gloves cool down to ambient during a rest stop then put them back on and expect warmth any time soon!). The total distance was about 6.6 km according to the Google MapsPedometer. SCC Marathon Division members Trevor & Viki were there and heading out on the water, Trevor for his 11th paddle of 2008.

The Wildlife seen was restricted to birds: mallards that have been there all winter, geese that have recently returned though they may only have come from the Diefenbaker Lake outflow (80 km), some gulls and magpies.

A software-generated version of one of my snapshots:

Forms and Strongback


I have completed the forms and the strong back. The forms were cut as described before. I have marked on the forms the center line as well as the waterline and the sheer line. I cut the forms with 1/2 inch plywood and the bow and stern pieces were done with a higher grade pine board so the edges could be shaped to accept the cedar strips angling in to the bow and stern.

For the strong back, I followed a suggestion from the author of the book in using a 16' 2x4 on two specially designed saw horses. The forms will be threaded on the strong back which allows easier access and less concern about fitting them on a more traditional ladder structure.
Since 2x4's are not always perfectly straight, I went through the stack at Home Depot to find the straightest one available. I checked the straightness of the board with a square and levels. The board still had some lateral bend which would make the keel line curve (port side). To fix this, I snapped a chalkline for a centerline on the top of the board. I will match my forms center line to this line on the board which I put permanently on the board with a straight edge and a sharpee following along the chalk line. I dry fit everything together to see how it worked.

The next step is to fix the forms on the board with cleats.

Thứ Bảy, 22 tháng 3, 2008

In the beginning...

My first step in building my own kayak was to do a little research. I read reviews of a number of books and techniques and settled on a cedar strip kayak. One of the books that a number of reviews recommended was the following which I settled on.

  • Nick Schade, The Strip-Built Sea Kayak: Three Rugged, Beautiful Boats You Can Build. Camden, Maine: Ragged Mountain Press, 1998. (See Amazon)

I found the author has clear instructions.

My Previous Experience

I built a canoe previously from a kit, the Sunset from Stillwater Boats. This was a good experience although there are some problems I had which effected the look of the canoe. The kit from Stillwater was excellent but I have a feeling the marine plywood design (where you wire the pieces together) is more difficult than the cedar strip. I had problems getting the pieces to fit together perfectly and I ended up using more epoxy in places than I should have because I got paranoid about the strength. In any case, this is my previous experience and I would like to say I have no training as a woodworker and everything I know is pretty much self taught.

Building the Kayak
Now, back to the kayak. I chose to build the Guillemot which is a higher performance sea kayak but also a little more difficult to build according to the author. I chose this because I have been kayaking a long time and wanted something that could handle the water I run into off of Rhode Island, Massachusetts, and Maine.

First Step

This was to create the designs for the forms. One of the really nice things about this book is the author gives you the offsets for the forms and explains how you can enter the data into a spreadsheet to create a printout for the shape of the forms. I entered mine in excel as the author instructed which creates a line graph I printed out. I then transferred the design to a large sheet of graph paper (by hand drawing) which I used to cut out the forms.
I'm in the process of getting everything set up which include:
  • mill the cedar strips (completed)
    • I also put a cove and bead on each side of strips
  • cut the forms (see my upcoming post for pictures)
  • build the strong back (see my upcoming post for pictures)
I'll continue to blog this as I progress.

Thứ Tư, 19 tháng 3, 2008

Paddle To Be Free


A video by Branden Kraiker, son of paddling gurus Rolf & Debra Kraiker. Watching this video makes me want to start saving up my money to take our family up to the Thelon River.

Thứ Hai, 17 tháng 3, 2008

Another Kayak To Build - The Sea Flea

I have started building another kayak. This time, it's for my daughter who turns 6 this summer. The kayak is a Tom Yost design called the Sea Flea and we are building the 11' version. Tom Yost has created a bunch of kayak designs and has made the plans and instructions available for free at yostwerks.com.

This kayak is a "skin on frame" which means that it is composed of a frame (plywood & cedar) covered in a skin (PVC fabric). Skin on frame is the method of building boats (qajak, umiak, etc.) used for thousands of years by the Inuit and other northern peoples where the frame would have been made from whatever wood and bone was available, and the skin was quite literally skin (seal, but others would have been used as well). The methods described in the online manual by Tom Yost are quite far removed from those traditional kayak building techniques. Yost's methods were originally described to build folding kayaks using HDPE stations and interlocking aluminum stringers. However, these methods have been modified to build non-folding kayaks with wood instead. The latter method allows the boat to be built at a lower cost (I'm using mostly scrap wood or what I had on hand) and more quickly. The Sea Flea frame consists of 4 cross sections together with several stringers that run lengthwise. The stringers include two gunwales, a keel, two chine stringers, a bow deck stringer and two stern deck stringers (that's a point I need to clarify).

The Sea Flea specs from the Yostwerks web site:
Length overall: 11'
Beam: 19"
Height: 8"
Coaming: 19" x 16"
Weight: 20 lbs.
The weight given is for the folding version built with aluminum and HDPE. The wood version should come out slightly less (maybe). I expect that this will be a kayak my daughter can play around with and develop some skills with. Initially, I'll use pool noodle pontoons or some such device to stabilize it. As she grows and develops, those training wheels can eventually be removed (in a couple of summers?) and she should be able to paddle on her own. I also expect to tow her a fair bit, or I might rig up something like what Mike Hanks arranged. In a few years when she starts to outgrow it (based on size or skills) it can be handed down to her sister and we'll have to build something bigger (assuming she doesn't hate it and wants another kayak of her own).

The first step I undertook was to convert all of the offsets from decimal feet to fractional inches (e.g. 0.745 = 8 15/16") and listed them in a table. Next, I plotted these offsets out onto a large piece of drawing paper, borrowed from my kids.
I then got my daughter involved by having her cut out the stations from the paper staying to the outside of the lines.

It looks like the stations will just barely fit on a scrap piece of 5/8" plywood I have. I also have some other wood that would work quite well (1/2" pine panels bought for some other project), but I thought I should use up this scrap first (now that I type it, I'm having second thoughts, the pine would be lighter and wouldn't need to be painted, but I suppose the glue could delaminate if water ever penetrated it).
I also have built the strongback which will support the stations during construction. My strongback was a bit different from that described by Tom Yost, being composed of scrap 2x4s, a length of 2x6, and no 1x6 top plate. The strongback is only 8 feet long, though for the 11' Sea Flea I could have gotten away with one that was 6' long (I decided not to cut up my lumber any more than I had to and I had 2 8' 2x4s on hand). The 2x6 was incorporated into it to allow it to sit nicely in one of my stands, manufactured for my guillemot build a couple years ago. The only problem I see with this set up is the working height as my stand is tall. That will be quite convenient for me, but not so much for my daughter who I hope to have help me.

The next steps are to rip some stringers from a 10' cedar 2x6 then to scarf some shorter pieces to make gunwales and chine stringers that are 11' long (10' may be enough for the keel?). I will also attach the paper station drawings to a sheet of 5/8" plywood and cut out the four stations (cross sections), then align stations 1 & 4 on the strongback (stations 2 & 3 are not attached to the strongback but are merely placed between the stringers with the correct spacing).

Unigraphics Pro-Engineeer and CATIA file translator for Australia

CADDIT recently announced their introduction of the TransMagic 3D CAD file translator suite to the Australian market. TransMagic not only translates CAD data - it can analyze, render, cut and even heal files from CATIA, Pro Engineer, Unigraphics, Solid Edge, SolidWorks, Autodesk Inventor and many other systems. The following five minute video demonstrates how Australian engineers read CAD files from multiple systems without buying another CAD system.


Chủ Nhật, 16 tháng 3, 2008

progeCAD Smart! at work? Piracy laws tighten...

The BSA offers a $5,000* reward for information that leads to a successful action against a business entity using unauthorised software. It is illegal and against the terms of Smart! EULA to use progeCAD Smart! freeware for commercial or business purposes of any sort.

But warnings don't always work.
Twenty-nine percent of software installed on PCs in Australia in 2006 was obtained illegally, according to a new study by analyst house IDC, sponsored by the Business Software Alliance (BSA) -- a two percent drop from 2005 levels.

Measures are underway to deal with illegal use of Smart. CADDIT has
temporarily lowered the price of progeCAD 2008 Professional and progeCAD Standard 2008 to encourage businesses to legalize the use of this great product.

Thứ Năm, 13 tháng 3, 2008

Anyone know what is happening with BricsCAD?

WorldCAD Access from upFront.eZine reported on Jul 26, 2007 that "Frustrated with the pace of development at the IntelliCAD Technology Consortium, Europe's Bricsys is working on its own development path".

Apparently they feel that they can do a better job? Reports are sketchy, but some indicate that BricsCAD plans to leave the ITC altogether. I can't help but wonder what next years BricsCAD "upgrade" will really be like. If anyone has more details about this, feel free to post them here.

Despite aggresive marketing, the BricsCAD version of
IntelliCAD has not been as successful as others, and this may contribute to the alleged decision. Meanwhile, the progeSOFT website enjoys the highest Alexa rating of any IntelliCAD brand, and Google consistently reports search interest in the name nearly matches all the other brands combined. progeSOFT investment in R&D has also doubled.

Thứ Năm, 6 tháng 3, 2008

Rainwater Harvesting: Furaat Systems Design addresses many levels

Furaat Systems addresses many levels of design in Rainwater Harvesting

Image: Poster from Furaat Earth Pvt Ltd showing the systems overview
Science is the search for knowledge that we all depend upon to tell us how nature works and it is also the vehicle through which this knowledge is refined and tested through a process of hypothesis creation and peer evaluation. Technology on the other hand includes the methods, procedures and tools employed to use this knowledge into shaping dependable and predictable results. However it is rarely understood that generic design which is a natural human activity usually precedes both these stages in the creation of imaginative new products and solutions which may be at first intuitively and creatively apprehended into a workable manifestation and then refined by a process of evolution through multiple cycles as in the case of our crafts and numerous traditional applications. In the case of water harvesting systems in India we have a long tradition of applications that have been evolved through the fertile use of local ingenuity and hard earned insights over centuries of evolution and refinement.

Modern design on the other hand contributes to both knowledge creation as well as in helping in the application of existing knowledge in systematic ways to create compelling new solutions that include the multiple dimensions of economic, technological, sociological as well as the aesthetic besides addressing the functional and emotional needs of the user and helps meet the requirements of the task at hand in an elegant manner. This multidisciplinary quality of synthesis is unique to design innovation since it is a framework that enables each contributing specialization and the knowledge held therein to be brought into a particular configuration that opens the huge potential and inherent value in a manner that it can be harvested by a number of stakeholders in a manner intended by the collaborators. Design as we know it today is therefore a negotiated space and an expert procedure that helps unlock the value potential that is found locked within the particular situation. This unfolding has been the subject of much recent research by world design thought leaders as seen in their books such as Tomas Maldonado, Nigel Cross, Harold Nelson, Bryan Lawson, Klaus Krippendorff, Peter Downton, Roger Martin, Don Norman and others who have written books on the subject dealing with design theory and action. Many of them are members of the Design Research Society, which is composed of members who work in the area of design research and who have contributed to shaping the field in recent times through their writing on the subject. I too have many papers on design theory which try to explain the field and these can be downloaded from my website. In this particular post I am looking at how design has helped unfold value in the specific area of rainwater harvesting system and I will expand on this a bit later. In future posts I wish to look at many other fields where the use of design has made a huge difference and these too will hopefully help us see how design can be used across fields, and in my considered view India needs this kind of design action across 230 sectors of our economy.

Many places in Western India, particularly in Gujarat and Rajasthan there are age old traditions of water harvesting that include both the significant forms in which this art is performed across the region. The balancing of the underground aquifers through the strategic location of small ponds and lakes near a village has served our villages well over the years in helping the people manage their water resources for a year round availability. However with a greater dependence on ground water utilization by pumping in both our rural as well as urban locations we have increasingly seen the water table receding year on year till we reach a crisis point of no return. Many of our regions still receive good precipitation during the monsoon season but due to rapid drain-offs from the catchment areas into the storm drains and rivers we see very little of this water being recharged into the underground aquifers since even the old lakes have now been filled up in the creeping habit of urbanization. Cities like Delhi and Chennai have been facing an acute shortage of drinking water and this crisis is being experienced in many other parts of India as well. The traditional wisdom of holding the rain water run off in shallow ponds near the village seems to be replaced by a new fangled dependence on the deep bore pump and the imbalance of the situation is now showing up in the water shortages in the near term and in climate change at the macro level. Sensitive activists have raised this issue in a number of public for a and some have gone further to use documentation and scientific arguments to show us the consequences of our continued use of ground water resources while not addressing the need for recharge both artificially as well as in the natural way as far as possible.

Great examples of traditional water harvesting systems exist all over Gujarat and Rajasthan. The best known and celebrated examples are the Step Wells of Gujarat in Patan and Adalaj near Ahmedabad. In Ahmedabad city, houses in the traditional Polls had used the underground tanks to hold clean rainwater for use through the year. Most traditional houses in the Polls were equipped with such a well-designed system of copper pipes and dark underground sumps sufficiently large to hold a full year’s rainwater supply for drinking needs. Gandhi’s house in Porbunder is a specific example of this kind of rainwater harvesting that was practiced in the Gujarat region. The Centre for Science and Environment (CSE) in New Delhi showed leadership in the awareness building activity through their book on traditional water harvesting systems called “Dying Wisdom: Rise, Fall and Potential of India’s Traditional Water Harvesting Systems” that was published in 1997 by Anil Agarwal. The CSE has sustained its efforts at this awareness and legislation provoking efforts and studies over the years. As a result, today we can see many parts of India have new laws in place that make it mandatory to implement water harvesting systems in all new constructions and in some cases even in existing buildings. The CSE has published a “Water Harvesting Manual” with case studies from Delhi that provides guidelines for public action. However the creation of guidelines and principle diagrams to manage the flow of rainwater from rooftops and catchment areas without contamination into filter beds and then on to the storage or recharge systems is not sufficient to make it happen in a functional and a high quality manner in the real world. Each site needs to be planned and designed to meet the volume of run off as well as the storage or recharge capacity that the system should address. Alternately this leaves a space for several design opportunities for the creation of new products and services that can be offered in a professional manner by an entrepreneurial intervention. It is in the creation of such dependable and efficient as well as elegant systems does design come into play and this can demonstrate the value that is inherent on the situation, much of which is not easily visible to the eye of the perceiver.

Image: Furaat System under installation by two persons team.
It is one such offering that has been made by the Furaat Water Harvesting system that has been designed for the Ahmedabad based company by an NID graduate of Product Design, Dinesh Sharma. The company, Furaat Earth Pvt Ltd, was set up by the entrepreneur brothers Habil and Yusuf Attarwala with the intention of reaching action on the ground with a small investment rather than just talking about the need for awareness and local action. In the last two years over 400 installations have been achieved and this year has seen a growth in both acceptance and in business with over 500 installations being considered, each costing approximately Rs 30,000 and their message is being heard due to the value that they bring by the use of their successful modular design. The Furaat system can be used for both kinds of applications, that is, storage type or ground water recharge type of application. In the first case the system on offer can form the first stage of the collection and filtration process while a variety of storage types can be used downstream, and in the second case the modular units can be installed in a variety of capacities to recharge deep ground water reservoirs using deep bore wells as the preferred route for the ground water recharge process. While there are so many traditional and scientifically developed systems why are we looking at one that is developed by an industrial designer using the principles of design? This will become clear when we compare the features as well as performance across a number of parameters at the same time and see which ones stand the test of the harsh reality check that is done in the marketplace without subsidies of any kind.

Image: Details of the Furaat Rainwater Harvesting System
The product will have to meet customer requirements across these multiple attributes if it is to become successful in the marketplace. It has to be cost effective and this is achieved by the modular construction that is on offer. Two key components are used in the product – an octagonal horizontal component and a rectangular vertical component – each with a simple locator detail that uses spherical glass beads in a patented configuration to lock the components in place. These are made in high quality concrete castings with precision and durability and in the long run these offer reuse and recycling possibilities in case the location is to be changed in the future due changes in the underground water table characteristics or in new structures on the surface as the site is developed. This is a hidden feature that protects the investment and also significant is the ease with which the well components can be assembled, maintained and cleaned after a few monsoons. All water handling accessories too are made of industrial grade metals of high quality that provides durability, performance and filtration standards that are extremely high and the sand and gravel beds at the first and the last stage too can be cleaned with ease since the design affords easy access as it is like a step-well with the dimensions matched to human proportions for lifting, access and climbing as well as being secure in the quality of filter performance that is guaranteed by the company. The pdf file available at their website gives a poster showing areas of application and more details of the construction and the features can be downloaded from their site here. The modular construction gives the user and the planner flexibility in making the particular unit to suit the needs of the site condition as well as the available budget since a one level, two level or three level or even a multi-level unit can be made with the same basic components in a very short time. Installation can be completed in less than a day by one or two semi-skilled masons without the use of hoists or cranes to erect the well components. Ground water recharge if done carelessly can be quite damaging for the aquifer since it is easy to use artificial recharge to help introduce contaminants and surface pollution into an aquifer if the filtration process is carelessly handled.

Image: Postcards designed to reach the message of rainwater harvesting to school children
Water is serious commodity that needs great care and attention and we need a variety of systems that can take care of local variants from the point of view of precipitation, terrain, geological attributes as well as population stress and other factors. Design can play a great role in examining and building imaginative solutions that are economic, appropriate and culturally suitable for the particular location. John Thackara in his recent book review has strongly recommended a book on water management titled “Dam Nation: Dispatches From the Water Underground” by Editors Cleo Woelfle-Erskine, July Oskar Cole , Laura Allen, and Illustrator Annie Danger. This brings up another point for us since design need not end with the product in need but can extend to the graphic and systems devices and methods that are used to promote and build awareness about these systems in our wider population. Here the communications too could be designed and the Furaat team has produced posters, flash cards and other communications that can help bring awareness to local schools as well as to parents through their children so that eventually the action on the ground is both significant and effective. Water and its effective management is definitely one major sector that can benefit from design thought and action I would like to see that the Government to include it in the National Design Policy initiatives and just like this one neglected sector (from a design opportunity perspective) we have another 230 sectors that too need urgent public funding and design attention. John Thackara has called for a movement to be put in place to support "collaborative innovation in all public investment in the UK and we can certainly benefit if we can bring these actions to India across our vast landscape with its huge diversity of regional, climatic, biotic, cultural and geological variables that renders central planning so ineffective. The National Design Policy could take a leaf out of the DOTT07 initiatives of the Design Council UK and now the DOTT07 Manual is available online in part as a digital file and as a print product it is available at cost.

Chủ Nhật, 2 tháng 3, 2008

progeCAD video: demo and how to buy

Youtube is hosting this video trailer for our upcoming "progeCAD Action" video series. These videos should answer many of the questions our new users have had about CAD drafting, as well as indroducing someof us to advanced functionality like Etrack (Otrack), XREFs, VBA, AutoLISP customization and more. Visit the CADDIT CADCAM3D Youtube page and add your comments.


Jeff Healey

Just a couple weeks after the death of Canadian folk music great, Willie P. Bennett, Jeff Healey passed away this evening due to cancer.

It's a very sad day. Although Healey was well known for a couple of hit singles, his real benefit to the musical culture of this country was his work as a jazz musician with his band the Jazz Wizards and his vinyl-spinning appearances on CBC radio (which is the venue that made me most familar with him).