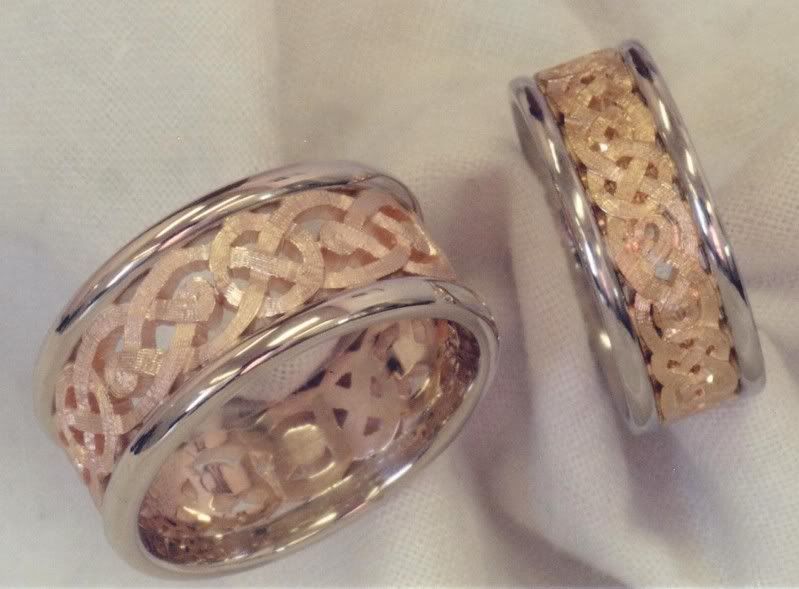
Thứ Tư, 29 tháng 8, 2007

Nathan Rogers House Concert

I just found out today that Nathan Rogers is coming to my house in September! How cool is that!?!


Sorry, the player has now been disabled since it slows things down and can be somewhat annoying when it comes on too loud. Click the image to follow a link that will let you hear more of Nathan's great music.

Nathan Rogers is a folk rock musician out of Winnipeg. Recognise the voice? Nathan is son of Stan Rogers, nephew of Garnet Rogers.

Speaking of cool, if the embedded player, courtesy of CBC Radio 3, actually works, now that would be cool. (That seems like a few too many comma's for one sentence, no?) Let me know if it works for you, & if you hate the player or like it.

Edited to remove the embedded player on October 3, '07.

Thứ Sáu, 24 tháng 8, 2007

Carving on Deck

A long, long time ago I proposed to my wife. She wasn't really into engagement rings, so I promised to get her a kayak instead. Well, that never really happened like we planned and the money went towards other things. So, when I built this kayak which was to be primarily for her use, I decided to do something different on the deck. When we got married we had a set of wedding bands custom-made by local goldsmith Ken Paulson. The pattern used was picked from a book of patterns and had no particular significance at the time. When thinking of a personalized touch to add to the kayak deck, I had the idea of turning the celtic knot pattern used on our wedding bands into a carving.

The only problems were I didn't know how to carve or even how to draw such a thing. Well I managed to figure out both challenges and eventually carved into a block of basswood a modified celtic knot in the same pattern as what's on our wedding bands. The first step was to come up with a drawing. For that I employed a bit of software. It took a lot of manipulation and playing with the software, but eventually it churned out something that was in generally the right pattern. Although it wasn't perfect, that software-produced drawing gave me the layout and showed me how the lines had to cross in order to work and be a complete circle. I then decided what diameter the inner and outer portions should be and with some trial and error, eventually drew something that looked acceptable and with proportions I was happy with. In fact I only drew just over a quarter of the circular pattern as it could be rotated 1/4 turn and the pattern repeated.

With a template pattern in hand, I then turned to wood. I had purchased some basswood and some simple carving tools, and began by practicing in a block of wood. Once I thought I had the general gist of how it works, I turned my attention to what was to become the real thing. I cut a piece of the bass about 6" x 6"x 2" thick, a bit over-sized to fit my pattern. I then determined where in the deck the carving was destined to reside. I used the adjacent form from the kayak to trace a profile of the deck onto my 2" thick block of wood. With a block plane I planed the block down to match the profile of the peak of the deck. The bottom of the block I left alone for the time being.

I drew reference lines onto the block and used a pin to mark the center through the template. I then used graphite paper to trace the pattern onto the shaped block, rotating the pattern for each quarter of the circle. I then began using the carving tools to remove all material that did not belong. I gave the pattern some relief where the lines of the knots go over and under each other, and made the background space deeper. Thankfully, the act of carving proved to be not overly difficult (I have a new found love of bass wood). Once I had a carving that I was happy with, I used wood burning to add further depth to the appearance of the carving, creating a bit of shadow where one line goes under another, and a stippling effect for the background spaces. After a few hours work, most of which was completed at the dining room table while my wife was at work, I had something that I thought wasn't too bad.

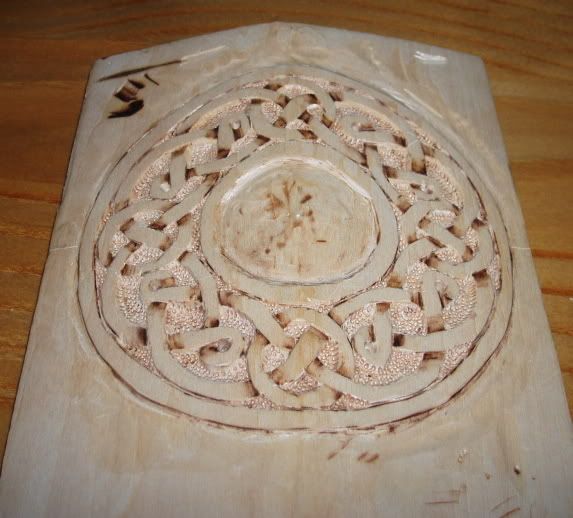
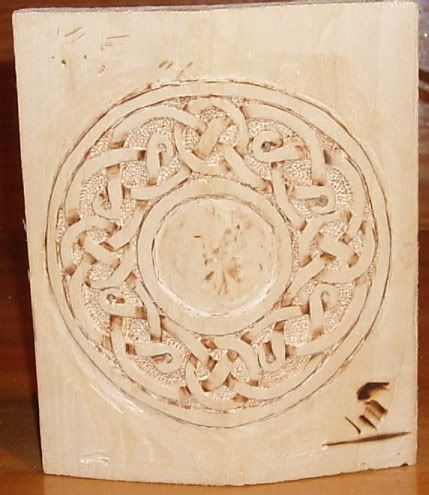
With the carving complete, I then prepared for insertion in the deck of the kayak. The bottom of the block of wood was planed down (bass is so nice to work with) until the overall thickness was just over 1/4". The carved disc was then cut from the block using a circle cutting jig on my Dremel. The center was also cut out of the carved disc (I may have used a hole saw for that one).
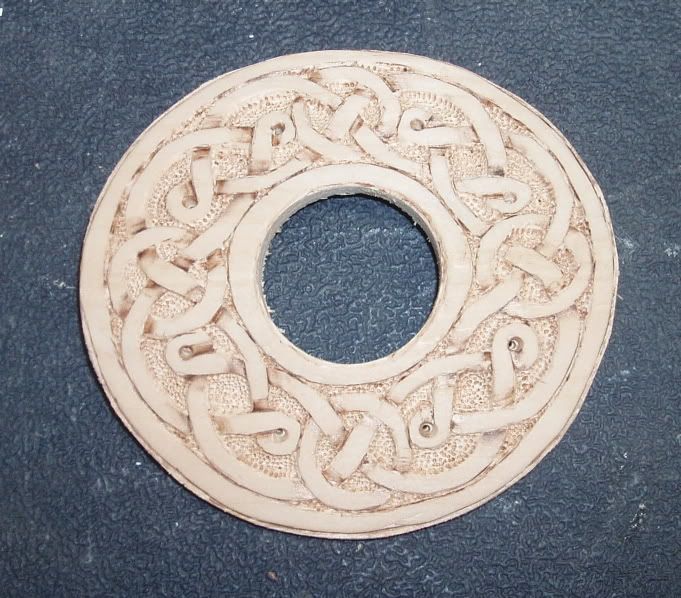
To this point, if things had not worked out or I made a major slip up, I could have started over on the carving or given up and nobody would ever have known about it. The next step required a much greater degree of commitment to proceed. I cut the matching hole in the deck of the kayak, again using the circle cutting jig on the Dremel.

If it all went wrong, I might have had a water bottle holder instead.


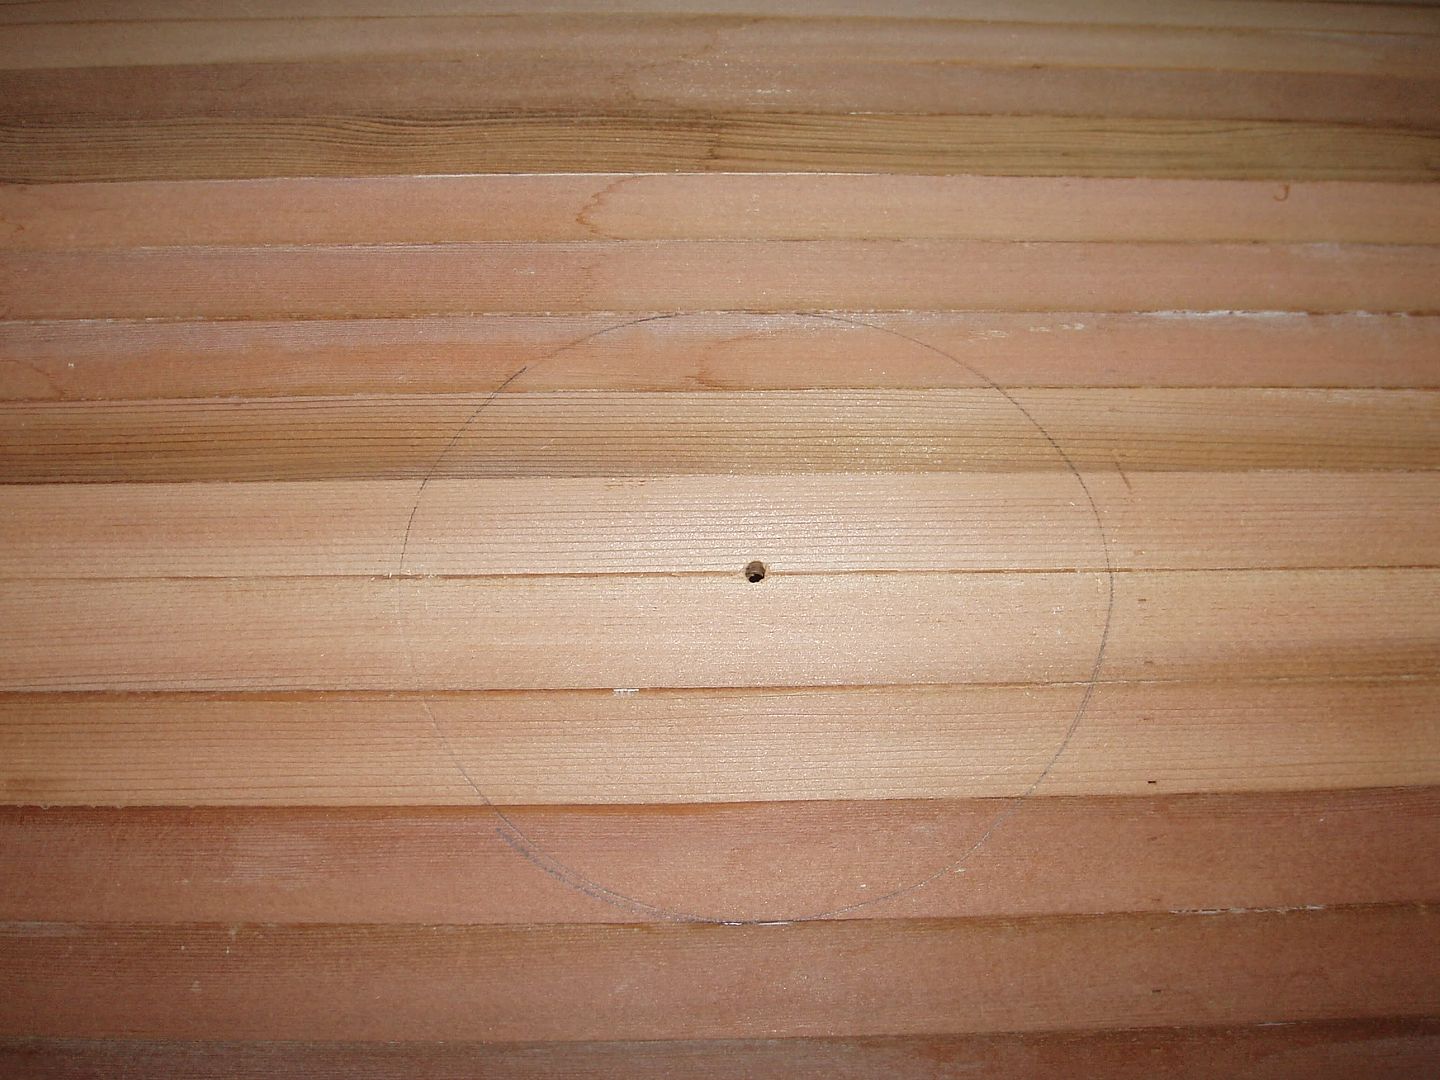
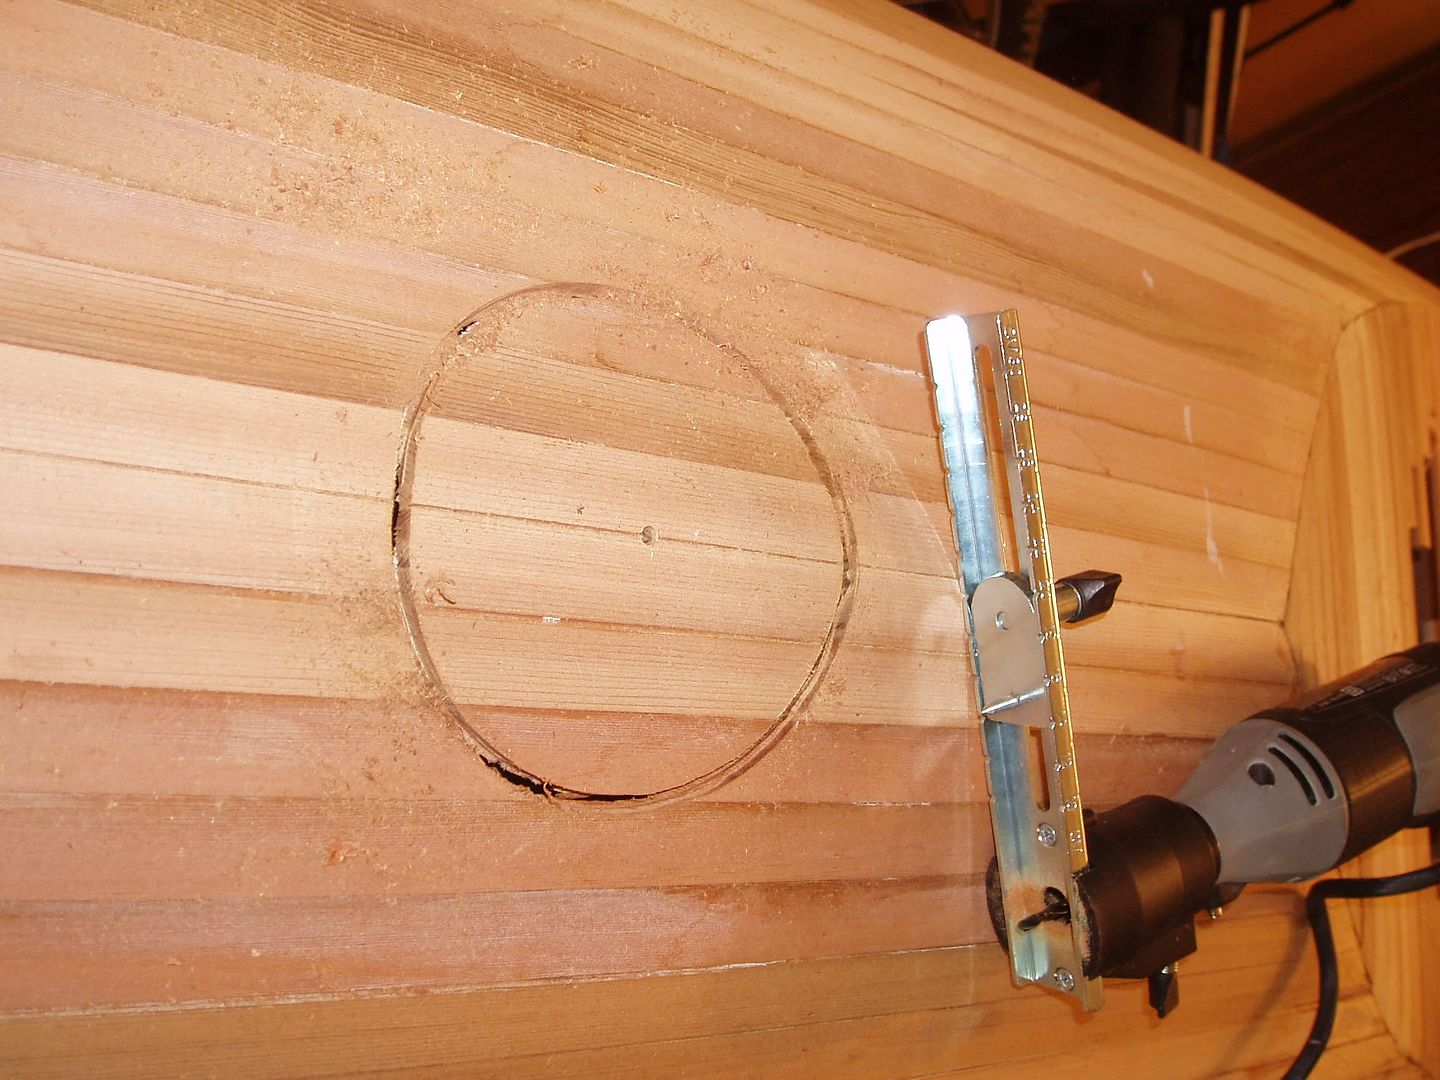
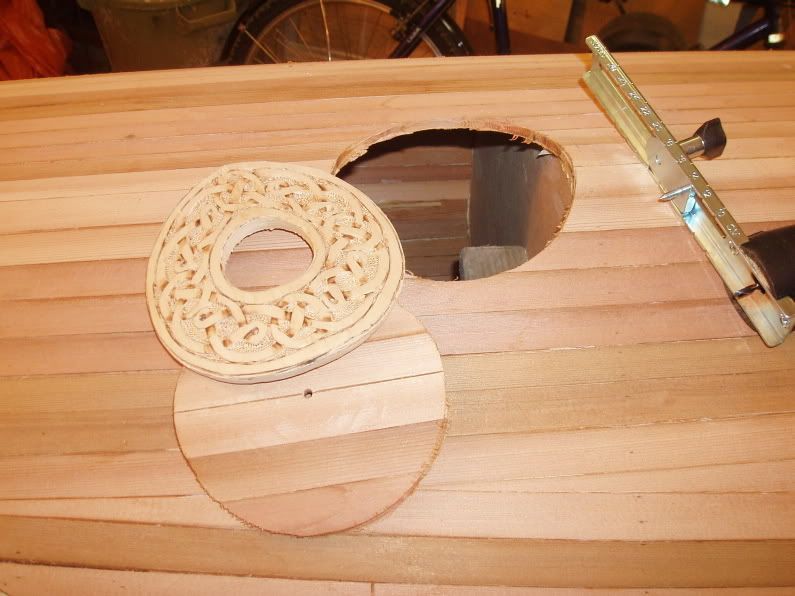
Using the jig and Dremel to cut the hole worked OK, but the resulting hole was a slight oval due to the peak of the deck.

Initially, I was going to use a center disc of cedar cut from the deck but this proved not to work very well. Instead I used a piece of walnut to fill the center. Thin strips of walnut were also used to fill the gap around the outside of the carving as the hole in the deck was cut slightly oversize. This was done on purpose since the carved disc did not perfectly match the deck hole. If left as shown in the above photo, the imperfections would have been very obvious. Instead, I removed material in order to make a fairly even gap all the way around. As it is, it now looks like a design feature of a contrasting walnut border edging the carving, which goes well with the walnut center.

The carving was glued into place, supported from underneath by temporary supports (ie sticks) hot-glued to the underside of the deck. The edges were eased and the carving gently sanded along with the rest of the deck in preparation for fiberglass. The carving received a pre-coat of epoxy in order to fill in some of the relief of the carving and then was glassed along with the rest of the deck. During the fiberglass wet-out, some bubbles were still trapped in the relief but their effect was minor. Prior to the fiberglassing the underside of the deck, the bottom of the carving was planed & sanded flush with the rest of the deck. Two or three extra layers of 4 ounce glass cloth were applied to the underside of the carving and the immediate area just to strengthen & protect this spot. The end result was an inlaid carving that is slightly raised above the deck but cannot even be felt from underneath.

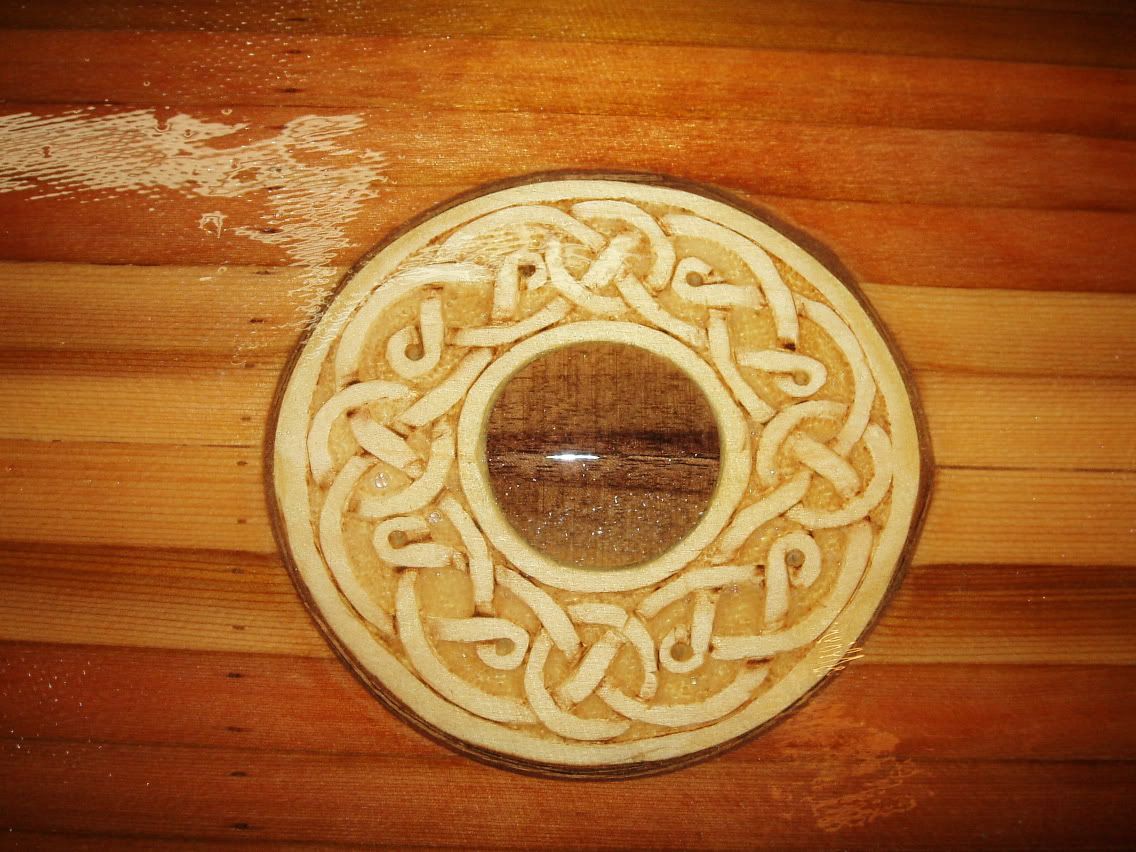
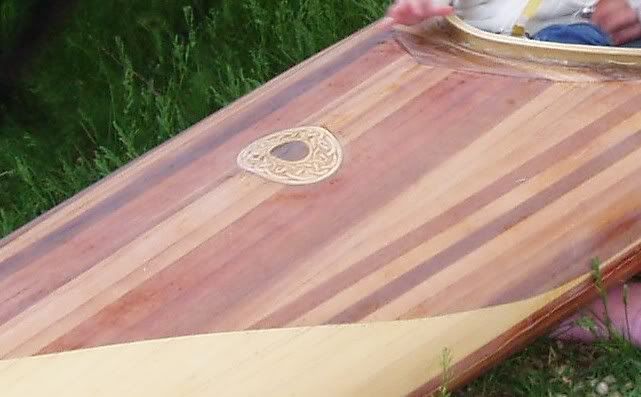
In the above photo, the carving along with the rest of the deck has been fiberglassed and the fiberglass sanded to a dull finish. The photos below were taken after another fill coat of epoxy was applied to the deck.
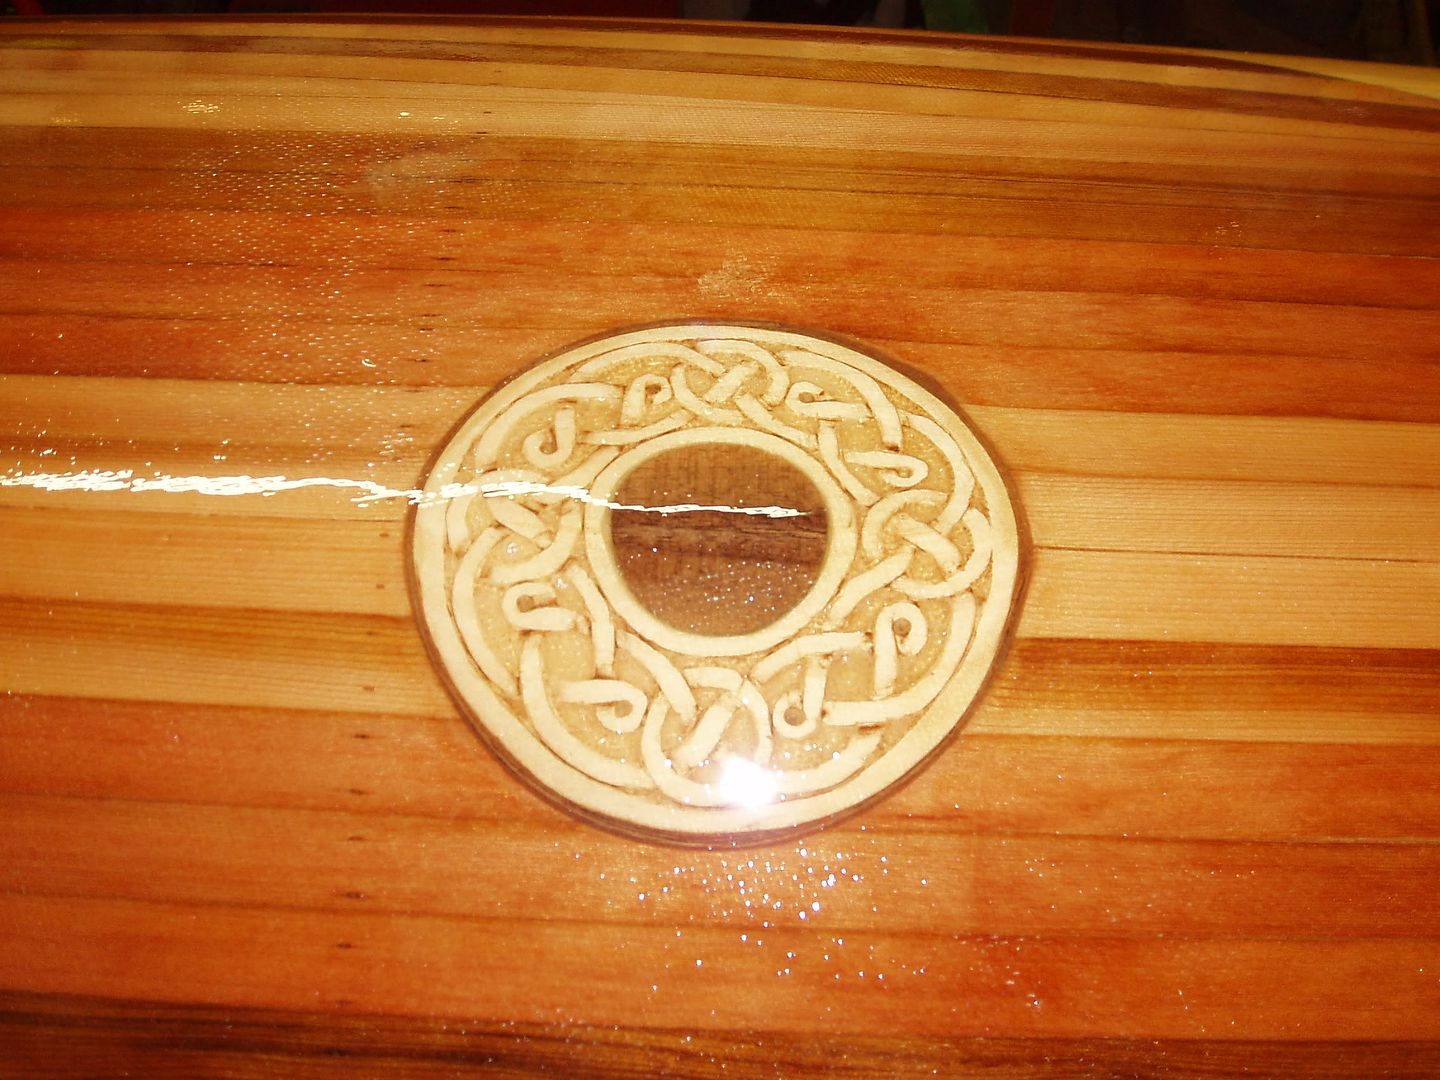
Finally, below is the finished product, dubbed the "engagement kayak."

Charles and Ray Eames: A legacy of durable impact on design thinking and action in India

Image: Eames Office Website
Eames Office website is a useful link for Indian design and designers since it holds the Eames Legacy which has had a major impact on the shaping of modern design education and practice in India over the past 50 years. From the establishment of the National Institute of Design in Ahmedabad through the legendary India Report of 1958 (pdf file 359 kb) drafted by the Charles and Ray Eames at the behest of the first Prime Minister of India, Jawaharlal Nehru, to the setting up of the permanent Nehru Exhibits first at New Delhi’s Pragati Maidan and then at Mumbai’s Nehru Centre at Worli in 1998 gave NID and its designers a direct access to the insights of that Eamses had gleaned in their prolific explorations into many dimensions of design. We will soon embark on the celebration of 50 years of Indian Design and this will be in part a celebration of the contribution of the Eamses as well as the dedication and sustained efforts of the pioneers of Indian design from the National Institute of Design in Ahmedabad. Further the philosophic insights captured in the classic diagram of the design process which can be seen here has been a source of inspiration for all those who have had contact with his work.

Image: Nehru Exhibition opens in New York: from the NID Documentation 64-69
My own contact with the Eames philosophy gave me a new world view and later their practical tips on design action which focused on the minutest details in a “nothing-matters-more-than-the-details” point of view came from my association as a team member on the Nehru Exhibition on a number of occasions. As a student of Furniture Design at NID in the Post Graduate Programme that was started in 1969 we already had a head start into the Eames philosophy since we had access to a number of Eames designed furniture originals in our prototype collection which had been gifted by the Museum of Modern Art, New York after the collection of great designs had traveled in India before finding a permanent place at NID, Ahmedabad. Analysing the Eames collection and watching the collection of Eames films from the NID library were a great source of inspiration for many generations of NID students and faculty as well as for me as well. While this was the source of inspiration for me from 1969 to 1972 as a student at NID I got to experience another dimension of the Eames legacy in November 1972 when I had the opportunity to work as a member of the team on the Nehru Exhibition that was being set up in New Delhi in a new building that was being specially designed to house the exhibit permanently.

Image: Nehru Exhibition: from NID Documentation 64-69
I got to know the exhibits of the Nehru exhibition like the back of my hand having spent many nights hanging around the exhibition team in the photography department, the letter press studio and the wood workshop where the various parts of the exhibit were being assembled at the NID campus in Paldi. My task was to help design an auditorium with informal seating for a proposed theatre at the exhibition that would show films about Nehru and in another room create a audio-review system that could be used to listen to the many speeches by Nehru while standing next to a set of panels that had some contextual information about each speech. While these were my specific tasks, I had hung around all the other work groups long enough to be aware of the details of all these exhibits as well in a deeply interested and informed manner, which was encouraged in those heady days of "learning by doing" at NID of the 70's and 80's. The Eames treatment of all the elements of the exhibit that was being re-interpreted by Vikas Satwalekar as the then project head was a wholesome learning experience for me. During this same period I was involved with Dashrat Patel and Sen Kapadia in another project being executed at the Pragati Maidan which was also to open in November 1972, the Our India Pavilion where my specific task was to design the ventilation system and the large circular ports that were stuck outside the building, a concept that was a visual feature of Sen’s architecture for the stark building that still stands today as Hall No 15 in the Exhibition grounds at New Delhi.

Image: Charles Eames on his last visit to NID
These two experiences brought me professionally closer to both Vikas and Dashrat. They had both worked with Eames in 1964 and they headed the respective projects at New Delhi. When the team for the Chile leg of the Nehru Exhibition was being decided through an emergency call from the Ministry of External Affairs in Delhi, I was selected to travel with Dashrat and B V Mistry to Santiago as a team member and a “crisis manager” to help set up the Nehru Exhibit in Santiago that was scheduled to open on the 26th of January 1973. Our team departed hurriedly on the 14th January 1973 along with 100 kg of excess baggage with photo prints, odds and ends, textiles and nails and adhesive, all that would be needed to set up the Nehru Exhibit in Santiago. Our task was to take the version of the exhibition that had arrived in Chile from Australia and make it ship-shape and presentable in an appropriate layout in the National Museum at Santiago. These experiences gave me a deep insight into the Eames sense of fine detailing and of their ability to handle both communication as well as material structures in one smoothly blended offering. The backs of panels were draped in fine Indian textiles as were the side structures on which the knock-down panels with large photographic exhibits were supported.

The structure itself was made stable using textile pouches that could be filled with sand locally so that a heavy base was not required to be transported across the world as the Nehru Exhibit was designed to travel to New York and later to many destinations across the globe. The system for typography and the method of building a history wall were some of the lasting contributions that many generations of NID exhibition and graphic designers perfected while working on the Nehru Exhibition with the Eames’s and their trusted colleagues who came to NID for the first such experience in the mid 60’s. Later the Eames History wall held sway on many NID exhibitions and the hierarchy of typography and the photo style and organization all had the Eames branding strongly embedded in the numerous outings and offerings from NID, be it the Agri-Expo in 1979, the Energy Exhibit in 1983 or the My Land My People in 1994, all mega exhibits handled by the NID teams following the Eames traditions. Quality was in high demand. Sensitivity was demanded from every team member and everyone contributed to the “menial tasks” of cutting and pasting hundreds of photographs and thousands of captions and labels, without a blemish, and here the learning about the finer aspects of design sensitivity were transferred from faculty to student and from carpenter to apprentice. The right-angle was the king, and the plumb-line informed the eye to see the vertical in all its perfection, the results were judged by the same standards that Eames had used for the first exhibition and the traditions of perfection were driven deep into the Indian design community at NID. The re-making of the Eames History Wall was an excellent introduction to information design and expressive visualization.

The other dimension of the Eames contribution was the India Report itself which can be downloaded from this link here. The Lota and the message about the Indian craft and culture of innovation and how it would need to be nurtured in a rapidly changing world order were all but lost to the Indian administration who did not seem to understand the role and purpose of design or NID. However having set up the NID and let it operate away from the harsh glare of daily politics in far away Ahmedabad, Indian Design could grow quietly, mature and take roots and build a whole generation of young practitioners who are the cream of Indian design profession and academia today in almost all fields of design education and action. The Eames contribution continued with their continuing interest in the Institute that they helped create in India and Charles visited NID in 1978, a few months before he passed away, and so did Ray, who came to NID to give away the Eames Award to Kamla Devi Chattopadhya in 1988, again a few months before she too passed away on the very same day and date as Charles, 21 August 1988, exactly 10 years apart. While this is a very personal tribute to the Eames legacy in India there are many of my colleagues who have worked directly with Eames as well as in their office in Los Angles at different times of their association with NID and through the amazing process of osmosis that happens when you are in their presence a great deal of learning about design has got transferred to Indian designers which will be mapped and evaluated in the years to come, I hope. The often repeated Eames quote at NID was – “do not say I will design a chair, rather say I will design something to sit on” – and the idea of broadening ones perception and including an open interpretation of the subject and the context were messages from the Eames that reverberated at NID and informed the education culture at the Institute over the years. The classic diagram that Charles offered when asked about the nature of the design process is another fine example of insight that has shaped the NID way in shaping the individual and their character through the value systems that were cherished in the NID’s education culture through the 70’s through the 90’s.

My most recent contact with the Eames legacy was when their grandson Eames Demetrios visited NID along with representatives of the Herman Miller group to reestablish contact with NID and to distribute his book “An Eames Primer” which I have a signed copy on my bookshelf. Soon after this I got online and obtained for myself a full set of Eames films being offered as a DVD set of six in a box at a very affordable price, much recommended for every design student and school as a source of inspiration and sensitization to be a thinking acting designer with feeling, which for me is the key message from the Eamses, Charles and Ray, thank you.

Image: Eames House: Modular from Industrial materials, much like the NID building system
The Eames connection continues to this day since one of my students, Sagarika Sundaram visited the Eames House this year and brought back the pictures that I use here and I am sure the Eames inspiration will mobilise many generations of young designers to come and the Eames Office on the web will be a much sought after destination for design students in their wanderings across the vast contours of the internet.

Image: NID building as envisaged in 1966 by the team led by Gautam and Gira Sarabhai and published in the NID Documentation 1964-69
NID too has now opened another chapter of the Eames Award and Fellowship set to begin this year which can be seen at this link here.

Thứ Ba, 21 tháng 8, 2007

Facts & Figures

  • Kayak Design: Guillemot
  • Kayak Designer: Nick Schade
  • Length: 17'
  • Beam: 21"
  • Waterline Length: 14.7'
  • Build Start: October 2005 - setting up strongback and forms.
  • First Strips On Forms: ~Nov 8, 2005.
  • Point I Thought I Was Practically Done: June 29, 2006 after joining the deck and hull from the outside.
  • Point I Realised I was Nowhere Near Done: December, 2006
  • Completion: June 2007.
  • Official Launch Date:June 16, 2007
  • Total Time: 20 months with some interruptions.
  • Woods Used: Western Red Cedar (hull & deck), Alaskan Yellow Cedar (bow of deck), Ash (stems), Walnut (accents on carved deck insert), Basswood (carved insert on deck), mahogany (hook for paddle park and inner stems), Pine dowel (grab loop holes), Birch plywood (bulkheads, cheek plates, coaming), unknown plywood that looks like mahogany (moby latches).
  • Finished Weight: 42lbs fully fitted out, according to the bathroom scale.
  • Amount of Epoxy Used: 1.5 gallons (approx.) West Systems
  • Biggest Challenge: Taping inside seams then getting them smooth all the way to the stems after the epoxy had fully cured.
  • Pleasant Surprise:Working with Alaskan Yellow cedar is very easy, and it smells nice too.
  • Things To Do Differently Next Time:
  1. Build internal and external stems a la Ted Moores
  2. Move the front bulkhead aft at least 4" to increase hatch volume and decrease cockpit volume & wasted space.
  3. Mill my own strips, or ensure the quality of the milling.
  4. Don't use duct tape on the edges of the forms to keep the strips from sticking to the forms (it doesn't)
  5. Don't use the waxed masking paper to prevent epoxy from sticking where you don't want it to (it doesn't).
  6. Use fiberglass tape for the inside seam rather than strips cut from the regular cloth.
  7. Make the moby latches stronger, there's a surprising amount of force on them when they snap closed.
  • Things I'd Do Again:
  1. Plywood coaming & riser. I wasn't sure the conventional method was best so I came up with a method using 1/8" birch ply that worked well for me.
  2. Create a design on the deck &/or the hull that breaks up the stripping a bit, reducing the number of finely tapered joints and making things easier in the long run.
  3. Carve an insert or inlay. I had never done it before and it turned out to be fairly easy & makes the boat totally unique.
  4. Use the internal strongback, mounted on an external strongback with wheels. Gives a secure and stable set-up. and creates a long narrow table which is a great place to keep tools handy.
  • Atypical Features: Carved deck feature in the same pattern as our wedding bands, birch plywood coaming, "swoop" pattern of light wood across the bow & pin stripe down port side, moby hatch lid hold-downs, built on a "schade-style" internal strongback, supported on a "Moore's-style" external strongback.
  • Tools Purchased For Kayak Building: Honing guide, glue bottle/spreader, saddle square, cornering tool, cabinet scrapers & case, carving knife, carving tool set, carver's saw (for cutting the cockpit hole, but a jigsaw with good blades worked better), fine cut jigsaw blades, rasp & blades (worked well), collapsible bottles for varnish, HEPA filter for shop vac (a very worthwhile purchase), latex gloves (turns out I might be allergic to latex now), many disposable brushes, radiant heater.
  • Best Cheap Tool: A tie - the paint scraper and a $2 stamped metal small plane bought at a garage sale. Once sharpened properly, the paint scraper worked wonderfully for removing high spots, bumps, drips, runs, edges and excess glass/epoxy. The little hand plane just fits so nicely in the palm of my hand and it works very well for trimming strips and all sorts of other things while stripping. If I had lots of money, I'd upgrade to a Veritas apron plane. The microplane rasp gets an honourable mention.
  • Tools To Buy Next: Better sharpening stones, dust collector with cyclone (but I probably won't). I'm sure I'll think of lots more when I start the next one.
  • Money Spent: Not sure. About $1200 for wood, forms, fiberglass cloth, epoxy, varnish, glue, staples, cordage, etc. An uncertain amount went to electricity to heat the shop, tools, sandpaper, and other incidentals. Plus there was the paddle float, paddle, cradles for the roof rack, etc.
  • People That Were a Big Help: Rob, Martin, my wife, Andy, Rod Tait (without whom I wouldn't have gotten the wood or the forms), Cory (my cousin that brought the lumber & forms from B.C. for me), and of course my daughters. Plus, everyone over at the Kayak Building Bulletin Board and the Bear Mountain Boats Forum for all the ideas, motivation, advice, feedback and problem solving.

Thứ Bảy, 18 tháng 8, 2007

The NextD Leadership Institute, New York: Can its message offer a direction for design thinking in India?

Image: Screen-shot of the NextD Website

NextD Leadership Institute and the lessons for India?

Design is changing and there is one organization that has perhaps contributed most in the past few years in mapping this change and in building tools to cope with the change that they call Design 1.0, Design 2.0 and now Design 3.0. This is the NextD Leadership Institute in New York and through the NextD Journal as well as the series of NextD Workshops they have been spreading the good word about the considerable change that is being seen by some of us today at the leading edge of design action across the world.

Their website, NextD.org and their inspiring online Journal and pdf download (all for free) has been a source of great strength for my students who were often perplexed when confronted by the complexities of their design challenges in India but having a resource that could be easily referred was a boon, the value of which only time will tell. Great resource, and we wish that there were more like this one around.

The NextD Leadership Institute was an outcome of some soul searching by GK VanPatter and Elizabeth Pastor as an experiment in innovation acceleration back in 2002. In their process of re-inventing design they set out to try and influence design education as well as how it is practiced as an cross-disciplinary activity to address the complex tasks that needed resolution in our society. With the marketplace having changed dramatically they were looking for directions and approaches to make design relevant at the leading edge of this change and one of their key offerings to explain this change was embodied in "Mindscapes" a series of examples, stories, diagrams and models that helped capture the contours of this changed landscape.

Recently, in response to the provocative article by Bruce Nussbaum – Are designers the enemy of design – on his blog at BusinessWeek online, the NetxD team quickly sought views from the design community around the world and from this came the rapidly compiled text titled "Beautiful Diversions" which set off another round of debates about design as it is understood today. For me the small NextD team were able to demonstrate the huge change which in the world of internet enabled communication gave equal reach to both small teams as well as established media moguls like the BusinessWeek and the other corporate giants alike. We are indeed heading towards a world that is shaped by the emergent creative economy of the future. The world is indeed changing and as we have seen the KaosPilots as a very small school with very few students making an indelible mark with their ideology and approach to using design, the NextD Leadership Institute too has made an impact in the design space with their Journal, Mindscapes and Workshops, besides other initiatives that have been offered from time to time over the past few years.

That we need to bring the message of the NetxD to India is a foregone conclusion. I have recommended their message to all the students in my classes, to my Institute and colleagues as well as to many corporate and design schools in India and many of them are actively using the NextD offerings having bookmarked their website or having subscribed to the regular journal offering which comes free for all those who are interested. Our efforts to find sponsors to get the NextD team over to India continues and we hope to see them soon in India so that the message that they offer can be used in all the 230 sectors of our economy in mission critical applications that are sadly missing in the design activities of the kind that are needed to bring about real transformation in our society as well as in our business offerings, both of which need design, but both seem to be blissfully unaware of this need, notwithstanding the announcement of the National Design Policy in the beginning of this year, on the 8th of February 2007 to be precise, by the Government of India. Just that day I was in downtown New York in a meeting with G K VanPatter along with my colleague Sudrshan Khanna in order to explore the possibility of some collaborations between our two Institutes. I do hope that we can move this forward quickly and that we can then move on to an application stage in the use of these ideas in transforming design education as well as practice in ways that are needed in India over the next few years. By the way, we were in New York to attend the "Design with India"event on the 5th February 2007 at the Asia Society, New York,which was spearheaded by one of our graduates Uday Dandavate founder of SonicRim, Columbus,Ohio.

It is not just I who is excited by the NextD it seems, if we are to assess their impact through the varied partners who have agreed to be interviewed by the NextD team for the NextD Journal using a unique format of conversations rather than bland interviews that are usually used in the traditional media or the other form of sage pronouncements by experts who are given space by the media to expand their ideas about the subject of their expertise. The procession of experts who have contributed to the NextD Journal make a literal who's who of design thinking and they come from many disciplines that have engaged with design and therefore have much to offer by way of insights about design that are unique as well as interesting. I have recommended the NextD Journal to all my students as a catch-up on the latest in design thinking that is both concise as well as insightful, take a look for yourself.

NextD website link
KaosPilot website link
NID website link

Thứ Sáu, 17 tháng 8, 2007

Launched!

Back in June we had the "official" launch of my wife's new kayak. We borrowed a cedar-strip voyageur "Sainte Anne" canoe from Martin Bernardin for the occasion and had some friends & my in-laws join us. The kids really enjoyed the voyageur canoe, and my wife & I really enjoyed taking turns in the kayak. It was a beautiful Saturday evening for our paddle. Our original plan was to paddle on Sunday after having brunch at the Berry Barn. However as Sunday approached the forecast got steadily worse (the forecast was correct and we received 4" of rain in the ensuing storms). Thus, we scrambled a bit and left Saturday late-afternoon instead. We started from Fred Heal canoe launch on the South Saskatchewan River, about 20 km south of Saskatoon and paddled back to the city with a supper stop on a sandbar island along the way.

The photos below are all courtesy of Rick.


Many hands make light work.

My wife takes the first turn in the kayak.


Kevin mugs for the camera.


Supper break.
My turn.

Rob took over duties in the stern while I took my turn in the kayak. The Sainte Anne canoe paddled beautifully. At 25' 10" long and a 51" maximum beam, we were expecting a bit more trouble. With an experienced paddler in the bow and stern it was very easy to control. We had some assistance from amidships but even without it, Rob & I had little trouble maintaining a good pace and maneuvering.
The girls certainly enjoyed themselves in the big canoe.

On the edge of town.

When I asked Martin about renting the canoe, I never gave the logistics of it much thought. I knew it had it's own trailer but I have no problems pulling a small trailer behind my car and thought this one would be the same. I was wrong. That is one heavy trailer (for Honda Accord anyway). In agreeing to loan me the canoe, Martin was also agreeing to loan the trailer and the van too! His only request of me was that the rig be made ready to go for his trip to the Yukon River Quest. Thanks Martin!

We've used the kayak a couple of times since the launch and are pretty happy but there are some bugs to work out, including a broken moby latch (there's a lot of power behind them so make 'em strong!) and some skill development.
As mentioned earlier in this post, we were had made plans to launch after a Father's Day brunch from the Berry Barn on Sunday. Originally I refused to alter the plan despite a bad forecast since the forecast is often wrong. However, as Sunday got closer, the forecast got worse. In our haste to change the plans to Saturday, I was unable to inform a fellow builder about the change. Thus, Andy (aka "Andy in SK") arrived at the Berry Barn despite the downpour. We had brought the kayak and our tandem canoe along because the weather didn't look too bad when we left home and don't mind paddling in a bit of rain, but the thunder and lightning followed by the torrential rain put a damper on those plans. At least I did get a chance to admire Andy's Razor Billed Auk. Like me, Andy built a guillemot first. Having established a list of things to differently on the next boat, he built the RBA designed by Nick Schade next. Wow, what a beauty. Loaded with features, it also sports an elaborate design in the wood. This long sleek boat looks like lightning just sitting on Andy's custom made cradles (a la Ross Leidy). After admiring the boat in a pounding downpour (the start of a 4"+ rain) we resolved to head out for a paddle together at a later date. We're running out of summer so we'll have to go for a paddle soon Andy!

p.s. I have a bit of a backlog of posts to add discussing certain aspects of the build including the carved inlay on the deck, the moby hatch latches, and the plywood coaming. The first of these (description of the carved inlay on the deck) should be ready to post within the week so check back once in a while.

Thứ Tư, 15 tháng 8, 2007

Design Concepts & Concerns Blog: An interactive platform for the DCC course at NID, India

Image: The Process of Design – The NID Way: As introduced in the Design Concepts & Concerns course

We have set up a new blog called "Design Concepts & Concerns" named after the course that I teach at NID, Ahmedabad over the past two decades now. This course was earlier called Design Methods and later Design Process but sometime in 1997-98 I changed the name to "Design Concepts & Concerns" (DCC as the students call it now) since I realised that designing is not just about techniques and about beating the competition with great market success, but that it is about human intentions that lead to thoughts and actions that create value – great value for all stakeholders – if the intentions are clear and these are followed by creative thoughts and committed actions. Setting goals has therefor become a part of this course and it is no longer about taking a client brief and getting on with the job, whatever the job may entail. There is an element of questioning and of taking positions and this makes the act and practice of design quite political and the design students would need to be equipped to assess the varied situations that they would face in the future, in most cases very difficult choices about an unknowable future, no matter how much experience the client or the designer may have had in the past.

As part of this course I have set up a multi author blog that includes several teachers who have been working with me as well as colleagues from near and far since they have volunteered to be accessible to students as well as contribute to the explorations taht would be part of each course as we move forward with it this semester at NID. Such an educational blog gives us the opportunity of maintaining a living document of the course as it unfolds each time and this is perhaps close to what Prof Bruce Archer had meant when he told us at NID that we would and should strive to maintain a contemporaneous documentation of design work if we are to build a body of knowledge about design which is otherwise very hard to come by. You may have noticed that designers are notorious for not publishing their insights and processes but most design journalism usually covers the outcomes of a design journey but rarely the process with all its warts and blemishes, which are many, and designers do not want to be seen as making mistakes since most administrators think that making mistakes is a sign of lack of expertise. However we now know that this is far from the truth, and IDEO, one the most successful design companies in recent times has as their slogan – “ to fail often to succeed sooner”, very insightful statement that is central to their design process.

This link to the "Design Concepts & Concerns" blog will take you there and show you the assignments and the details of the course as it unfolds this semester at NID. I am offering this course to many disciplines at NID this semester and the current course is at Gandhinagar campus for the Digital Design relaterd disciplines at the new campus that include New Media (NMD), Software and User Interface Design (SUID) and Information and Digital Design (IDD). This is a course of two weeks each and the next modules are offered at the Paldi campus (twice) and also at the Bangalore campus in October 2007 for the new discipline of Design for Retail Experience (DRE) that has started there from June this year.

This course has been documented, at least partly, at my website and two modules conducted in 2003 and 2004 can be seen at these links below. Each year we choose a theme for all the modules that are offered to the students and this year the theme is "The Design Opportunities for the Creative Economy in India" and in the course at Gandhinagar we are focussing on Digital Design Opportunities for design entrepreneurs in India across the 230 sectors of our economy.
Theme : Globalistaion and Impact on Indian economy – Link: Documentation of the course in 2004
Theme : Khadi as a way of life for India and the World – Link: Documentation of the course in 2003

I have published papers on this course as well as presented the work done by the students at a number of conferences. These papers and presentations can be downloaded from these links below:

Cactus Flowers Bloom in the Desert: National Design Summit 2001 Link: Paper 123 kb Link: Presentation part-1 (3.6 MB pdf) Link: Presentation part-2 (4.6 MB pdf)
The Avalanche Effect: on PhD-Design list in 2003 Link: Paper 55 kb pdf
Creating the Unknowable: EAD06 conference Bremen 2005 Link: Paper 50 kb pdf
EAD06 Bremen, Show. Link: Presentation 4.1 MB pdf

More about the ongoing course and its contemporaneous documentation at the link to the blog "Design Concepts & Concerns"