Chủ Nhật, 17 tháng 12, 2006
EPOXYWORKS - Fiberglassing a woodstrip hull
I just came across this article by Ted Moores on the West System's website from issue 16 of EPOXYWORKS magazine. It's a good review of the Moores method for applying epoxy and filling the weave as described in his books. Note that this method is quite different from that described by Nick Schade in his book - Schade advocates using a squeegee to apply very thin coats to fill the weave. Moores is more about applying thick coats of epoxy to build up a thick layer over the glass cloth.
Thứ Bảy, 16 tháng 12, 2006
Bubbles!
 No, not that one. Having saturated the glass with epoxy on the final seam between the hull and deck and monitored it for a period to ensure that no dry spots or bubbles developed, I left the seam to cure on it's own. As soon as I turned my back a bubble developed, lifting the glass cloth and forming a pocket about 1 3/4" long. Once the epoxy had partially cured I excised the cloth over the bubble, trimming away any loose glass. In the photo below you can see the piece of glass/epoxy which has been cut out
 I then scraped the edges in order to allow a smooth transition.
 Later, while adding a final fill-coat of epoxy to the hull, I epoxied a patch of glass in place. This time I baby sat it for a few hours in order to prevent the repeat of the bubble. The bubble did come back (the air seems to have been coming from the slight gap that is the seam between hull and deck) but at least I was able to minimize it by pushing out the air as it accumulated. In the end I had to be satisfied with a small bubble in the glass which was largely filled with a subsequent application of epoxy.
With the seam taken care of, I rolled on a final coat of epoxy onto the entire boat to completely fill the weave of the cloth and add a layer of protection for the underlying cloth. With the shop temperature stable at about 20C, I used a West Systems foam roller cover* which I cut in half and used on a small paint roller handle. After mixing the epoxy in small batches I poured it into a paint tray with a small disposable insert which has the added benefit of allowing heat from the exothermic curing epoxy to dissipate better than when it is pool into a mixing container. I started in the morning by rolling a coat of epoxy onto the hull. The foam roller applied the epoxy in a nice thin layer, but left a million tiny bubbles behind (it made little difference how much pressure I applied nor how much epoxy was loaded on the roller, and the epoxy was warm). Thus, I tipped off the epoxy coat as described on the West System web site. The strategy I used was to roll out a section of epoxy on the hull running the roller perpendicular to the boat, doing about 3 feet on one side, then going to the other side and doing another 3 foot section, reloading the roller as necessary. I would then go back over both with a dry foam brush and brush the epoxy parallel to the boat then start the process again on the next section. Once the coat was complete, this was allowed to cure for about 10 hours until late in the evening I repeated the process on the deck. Both coats overlapped at the seam so that the seams received two fill coats of epoxy. The boat now looks pretty good again with that nice wet look of fresh epoxy. At some point I will have to ruin it all by wet-sanding the whole thing to smooth out all the little bumps (the epoxy does not give a very smooth finish in my hands) and prepare it for the varnishing.
Here is what that bubble looked like after the repair and a fill coat of epoxy:

I may have to add another fill coat to this area, but otherwise it should be barely visible by the time everything gets smoothed out and eventually varnished.
I also set my daughter into the kayak so that she could try it out and to pose for a couple of photos. 

*I picked up a couple of WS roller covers at a local woodworking store which was having a closing out sale in June. I took the opportunity to purchase on sale some of the "800" polyurethane foam roller covers, a couple of the "804" mixing sticks, and a couple of the "808" plastic spreaders (squeegees). A couple of weeks later the rest of the inventory was auctioned. I had hoped to be able to pick up a number of items for a low price, including a dust collector, bench sander, etc. but everything went for way more than I could afford. I was getting rather annoyed at the fellow who kept bidding on everything I wanted and obviously had more money than me to spend (which isn't saying much, I was really only willing to spend a small amount of cash). I found out later that this fellow was starting a woodworking shop for inner city youth which produces custom furniture for sale. It seems the tools were being purchased for a very good cause. Everything I chose to bid on I was quickly outbid by others in the room. In fact, I usually didn't even get into the bidding before the price went beyond my limit (I believe some of the items went for more than retail price!). The one area where there was very limited interest was in the inventory of fiberglass related items. They had a couple of gallons of WS epoxy and hardener but this too went for more than I was willing to pay (I didn't really need more epoxy after all), but there was a roll of 6 ounce glass cloth on a large stand that I think only one other person bid on and they were not very enthusiastic about it. Thus, I was able to purchase about 10 yards of West Systems brand 6 oz cloth for $30. Now of course I'll have to build another boat in order to have a reason for using it.
Thứ Sáu, 15 tháng 12, 2006
Green Tape & An Unemployed Bum
I've started to work on the kayak once again with a bit more regularity. With recent warm temperatures I decided it was a good time to do some epoxy work over the past week before we get another cold snap (we have had unusual quantities of cold and snow so far this winter). You may recall that back in June I joined the two halves of the kayak, fiberglassing only the inside of the seam, then packed everything up because we moved to a new house. Well that move threw me off and I lost all momentum with my energy being directed first toward moving, then towards finishing up the renos I initiated during the move. Add in the parenting of two energetic girls and being busy at work and there was little time or energy to work on the kayak. However, at the end of November I was laid off from my job as a "Research Associate" and now I have a bit more time on my hands (not a lot mind you, I still have to take care of the kids - the youngest started walking this week - while my wife picks up extra shifts at her job). Thus, I moved the car out onto the driveway, warmed up the garage, and fiberglassed the outside seam. I used the technique of masking off the edges as described on the One Ocean Kayaks web site.

 In the picture above you can see that in addition to the green masking tape that I ran out of, I also used brown masking paper. This paper has a light adhesive on one edge (like a sticky note) and I turned to it because it was what I had available at the moment. However, I would advise against others using the same stuff - although waxed, the epoxy soaks through the paper and gets stuck to the kayak. Thankfully it scraped away fairly easily and at least the brown colour matches the boat so if I missed anything it should be inconspicuous (at least it's sufficiently inconspicuous that I couldn't find any more of it).


I laid down strips of masking tape to either side of the seam leaving about 3/4" to 1" on each side of the joint. I folded the edge of the tape to prevent drips from running away.
I then rolled on the 3" wide strips of glass cloth that I had cut for this purpose.
In the picture above you can see that in addition to the green masking tape that I ran out of, I also used brown masking paper. This paper has a light adhesive on one edge (like a sticky note) and I turned to it because it was what I had available at the moment. However, I would advise against others using the same stuff - although waxed, the epoxy soaks through the paper and gets stuck to the kayak. Thankfully it scraped away fairly easily and at least the brown colour matches the boat so if I missed anything it should be inconspicuous (at least it's sufficiently inconspicuous that I couldn't find any more of it). 

The fiberglassing of the seam went pretty much as the rest of the glass/epoxy work but on a smaller scale. Once sufficiently cured, I then trimmed away the masked tape. In the above close-up photo you can see that I went over top of the hole drilled for the grab loop; I trimmed the glass cloth from the holes while trimming the masked edges.

However, I sort of forgot one minor detail from Vaclav's instructions - I should have lifted the masking tape, pulling it away from the kayak and bending the glass right at the edge of the tape. As it was, on the first side I scored/cut the glass with the tape flat which didn't work all that well. On the other side I lifted the tape/glass as I was supposed to and it made trimming the excess much easier and in the end I was left a fairly nice edge which was easily scraped to a smooth transition. I now have about 70 feet of fiberglass reinforced masking tape - that's gotta be good for something right? I can see why people seem to always want to build another boat - next time the whole seam glassing process would go much more smoothly.
I have more on the subject of glassing the seam and addtional progress to report, but I'll address those in the next posting or two.
p.s. If you are in the Saskatoon area and would like to hire a molecular biology technician for generous sums of money, please let me know! ;-)
Thứ Năm, 16 tháng 11, 2006
Dawn Patrol Dreaming.

"Getting Geared Up"
Thanks to Raphael Thiebaut for the photos.
Over the two weeks before the Green Race this year I did more dawn patrols than I had ever done before combined. I really grew to like it. Sometimes I was useless during the day but there is something about getting down to the river as the sun is rising that is really a cool feeling. There aren't many things that can start your day off as well.

"Going Left Early"
The day usually started at 5:30am wake up. Meet at the take out at 6:30am. Makr sure the water is running at the takeout. Transfer all the gear to the vehicle going to the top. Be at the top by 7:00. Walking down by 10 after and putting on the water around 7:20ish. The sun was up but not iluminating very much. So you are paddling into Frankenstien in a pretty awesome morning light. Some days there would be fog on the water and other days not. You would have to wake yourself up before heading into Go Left just to make sure you were paying attention.

"Boofing in the Fall"
And then there you would be running the monkey before most people get to work, and before some have finished breakfast. If we hung out a little at Gorilla the sun would just peak over the ridge in the lowest point and shine in on the slides below Gorilla. Just a whole new way of looking at a river that most of the time you don't even try to get on before 10:30-11:00 o'clock. The paddle out was really spectacular because if it was clear, the morning sun was lit up the fall colors on the ridges over the river.

"Paddling into the Sun"
Here is a video I made of "Dawn Patroling.
Dawn Patrol Dreaming Video, Click This!
Take it easy.
Wish I could be out there with you all in the rain.
Shane
Thứ Hai, 23 tháng 10, 2006
It Rained! One New One, and the Raven's Fork.

Earning Our Turns on the Raven's Fork
All the photos are from the Raven's Fork by Raphael Thiebaut.
After the Moose Fest we didn't have a solid plan. We were thinking of going to the coast and doing some ocean surfing only problem was that there were no waves. None of the other rivers in New York or the surrounding area were running so that wasn't gonna work. We were thinking the New river in West Virginia but it was at an uninspiring level. The Gauley wasn't running so the options were getting thin. We finally decided to head down to Washington D.C. and mess around on the Potomac maybe run some new lines on Great Falls but as we were pulling into D.C. we got the news that North Carolina might have some rain on the way so the loose plan that we had started to change yet again. We stopped off at the Potomac to paddle a little bit, grab some dinner, and wait for rush hour traffic to die down then we started driving south.

First Drops
We woke up in the morning somewhere in N.C. within a few hours of Asheville. I started making phone calls as soon as I thought people would be up. The Asheville paddling hotlines were burning up. Everyone was calling around trying to figure out if anything was going to run because according to the rain gauges the western end of N.C. got anywhere from 1/10 to 3 inches of rain the night before but it was still coming down.

Toby in The Headless Horseman
The phone conversations that I had that morning were hilarious. It started out with people saying, "I don't know if anything is going to run it didn't rain much". I talked to several people all thinking that nothing was going to happen. An hour later the tune changed to, "well it looks like this might run and that might run we will just have to see". About a half hour after that it was," wow looks like we can run whatever we want". At this point I was getting really excited it looked like Raph and I had made a good choice to come all the way back south, but then the next call was, "Uh, oh it looks like everything might be too high". We rolled into to town and stopped off at Andrew Holcombes house to get a group together to go paddling and all the phone lines were hopping with activity. Who is going where, what is the level, what do you think the level is, is it good to go at that level. I heard so and so is going to run this with them and this group is going to do that.

Toby in Mortal Combat
Jeb called in and knew the thing to do. The Big East Fork of the Pigeon was probably running, he thought. You basically have to be there while its raining to get it, it takes a ton of water. We loaded up and went for it. When we rolled up to the take out to meet Jeb 3 other cars rolled in as well. In the end the group was 12 people. None of which had done the run before, except Jeb. The water was high. The group was nervous, but we decided to put on. It was the right decision. The river was, "On the high side of good" and it was amazing. At the put-in we ran into a guy named Garret who had been scoping the river out and gave us some great beta for the run. He has been mapping the river for a while but hadn't been able to get on it yet. Unfortunately he was working and couldn't jump on with us. We split our gang up into 3 groups and started working our way downstream. It was super continuous class 4 with some scouts thrown in to begin with. The eddies were small but manageable and the group did a great job of keeping spread apart enough. The first little bit of the run was sort of chunky, but maybe a half mile into it things became more structured and more bedrock like. I would guess that we scouted maybe 10 times total. There were probably 5 solid class 5 drops and no portages. It was a shitty rainy day but none of us cared at all. The run was fantastic. There is a very brief write up about it on the American Whitewater page. Its well worth it if you have a chance. For the most part it was super continuous class 3-4 with some good class 5 thrown in. The highlights of the day were, high water excitement, Philly Williams 21st birthday, The Three Tier Drop about half way down, A new run in the smokies, and not getting shut out on a big rain day. The only downside was that because it was raining all day we couldn't get any shots or footage. Which seems to be the case on this river. The only shots I have seen are shots of the river without any water in it.

Thats me in Mike Tyson's
When we got to the take out we paddled under the bridge just to check it out and found a gage on the bridge upstream, river right side. When we took out it said 1.8ish. I would guess that when we were at the take out at the beginning it was 2.5 but we didn't know the gage was there. At the put in it looked pushy but manageable.
Basically an awesome day.

What a day on the river!
The next day was a little more predictable. Most flows had dropped but there was one that was pretty much a sure thing. We got our little group together and headed up to the Raven's Fork. The water was a fair bit lower than I had seen but Toby and Andrew H. had both done it at this level so it was a go. The weather was unbelievable and the colors were starting to go off so it made for one of those perfect fall paddling days. Luckily Raphael was able to take photos on Raven's and I was able to get some great footage. The river was quite a bit different at 8 inches than it was at 12 that I had done before but it was still fantastic. The Raven's Fork is so much bang for the buck. Andrew ran Big Boy and super styled it. I wanted it bad but decided on the hike instead. Still not completely confident in the ribs I injured during the summer. Can't say enough about this run. At 8 inches it was super manageable, and much slower between drops. So if you haven't done it before I think this was an ideal level for your first time. A little higher might be better for Mike Tysons but everything was good to go at this level.
Enjoy the photos and video. Shane

"Later Emanuel"
Raven's Part 1 Video, Click This!
Raven's Part 2 Video, Click This!
Thứ Năm, 19 tháng 10, 2006
Back on the Water!
So its been two months since the last post. So its time to get back on the ball. A week ago Wednesday i picked Raphael Thiebaut up from the airport in Charlotte. I went paddling with Raph in the French Alps earlier this summer so it was my turn to take him on a tour. The original plan was to take him right from the plane to the
Charlotte Whitewater park but his baggage was lost so we had to deal with that. But from that point on things have been full on and super fun.

Tuxedo Hydro Station will be running...
While we were driving home from the airport I called the Green and it said it was running till midnight which usually means the river will run the next morning but it may shut off at 7 am. So you have to get on the water early to make sure you have water. We were walking down the trail before daylight for Raph's first trip down the Green. Everyone had good lines and Raph fired up the Monkey on his first trip down the river.
The next stage of for trip was driving all the way up to the Moose River Fest. Just a short 14 hour van ride with a stop over at the Syracuse airport to pick up Raph's lost bags and we were paddling on the Black River on Friday. The Black is a really crazy paddling experience because you can actually show up a little before the release and sit in your boat and wait for the water to come and sweep you away over the first rapid, a long mellow slide and then over a 8-10 foot drop. Its one of the craziest ways I have ever started a paddling trip.

Standing on the falls before the release

Sandy running the falls with water

Local boy bagel running the "Poop Chute"
After the Black we headed up into the mountains for Moose Fest. Which I think ever paddler should experience atleast once. If you get to Slickers Pub in Old Forge N.Y. before 5 o'clock its cheap Spicey Shrimp during happy hour, and that is where most of the kayakers hang out anyway. Oh and don't forget to try the French Dip sandwich also. Friday night of Moose Fest has become a sort of pub crawl type event with different folks throwing parties at different bars. There was an interesting mix going on at Slickers it was the Confluence party with a Pirate Theme with lots of those kids paddle ball thingys being smacked around. Then over at the Tow Bar it was the Pyranha Pimp and HO theme. I didn't get to any of the other events so I missed out on them it was an fun evening. This crew knows how to have a good time.

Slickers Bar

Saturday started off awesome we had clear skies and decent temperatures until about noon. Unfortunately we waited for the race to start to go paddling because we wanted to see the mass start over Agers Falls. As soon as the race went by the clouds came in and a breeze from the North Pole came down the river and the temperature dropped I kid you not 10-15 degrees. When we got to my van it was 32 degrees. We paddled the river and went back to Old Forge, to get ready for the Festival.

Agers Falls

Freddie Racing the Pisgah

Pat dropping into Fowlersville

Knifes Edge

The Alpine Line of Crystal

Raph running Magilla

Pat on Magilla
The party happens inside a big community building so that we can get out of the weather. There is always a band and drinks and folks showing off their cool stuff. There was an awesome crowd I don't really know how many folks were there. We set up our booth and showed boats and premiered LVM number 20 that was cool We have sort of started a tradition up there of serving Apple Jack which is Hot Apple Cider and Jack Daniels folks lined up for it. I would guess that there were over 200 people for sure and it could have been closer to 300. Just as things were getting started it started to snow huge snow flakes and by the time it ended we had a few inches on the ground. So far I have been to the Moose Fest 3 times and every time it has snowed.

Snowing again at Moose Fest

Watching LVM 20

Chris and Chris, the organizers of Moose Fest
There are three great reasons to go to the Moose Fest. One the river is awesome. Two Chris and Chris do a great job of putting on the event, and Three I think the cold paddling weather brings the group together. The Black and Moose paddling community are an awesome group of folks that love hanging out, paddling, and partying together.
Here is a link to the Video I took on Sunday on the Moose.
Moose River Video, Click This!
All these awesome photos were taken by Raphael Thiebaut. Well except the shot of him. His website is: http://photoraph.kayakblogs.com
Take it easy out there and get on the water.
more adventures with Raph coming soon.
Shane
Charlotte Whitewater park but his baggage was lost so we had to deal with that. But from that point on things have been full on and super fun.
Tuxedo Hydro Station will be running...
While we were driving home from the airport I called the Green and it said it was running till midnight which usually means the river will run the next morning but it may shut off at 7 am. So you have to get on the water early to make sure you have water. We were walking down the trail before daylight for Raph's first trip down the Green. Everyone had good lines and Raph fired up the Monkey on his first trip down the river.
The next stage of for trip was driving all the way up to the Moose River Fest. Just a short 14 hour van ride with a stop over at the Syracuse airport to pick up Raph's lost bags and we were paddling on the Black River on Friday. The Black is a really crazy paddling experience because you can actually show up a little before the release and sit in your boat and wait for the water to come and sweep you away over the first rapid, a long mellow slide and then over a 8-10 foot drop. Its one of the craziest ways I have ever started a paddling trip.
Standing on the falls before the release
Sandy running the falls with water
Local boy bagel running the "Poop Chute"
After the Black we headed up into the mountains for Moose Fest. Which I think ever paddler should experience atleast once. If you get to Slickers Pub in Old Forge N.Y. before 5 o'clock its cheap Spicey Shrimp during happy hour, and that is where most of the kayakers hang out anyway. Oh and don't forget to try the French Dip sandwich also. Friday night of Moose Fest has become a sort of pub crawl type event with different folks throwing parties at different bars. There was an interesting mix going on at Slickers it was the Confluence party with a Pirate Theme with lots of those kids paddle ball thingys being smacked around. Then over at the Tow Bar it was the Pyranha Pimp and HO theme. I didn't get to any of the other events so I missed out on them it was an fun evening. This crew knows how to have a good time.
Slickers Bar
Saturday started off awesome we had clear skies and decent temperatures until about noon. Unfortunately we waited for the race to start to go paddling because we wanted to see the mass start over Agers Falls. As soon as the race went by the clouds came in and a breeze from the North Pole came down the river and the temperature dropped I kid you not 10-15 degrees. When we got to my van it was 32 degrees. We paddled the river and went back to Old Forge, to get ready for the Festival.
Agers Falls
Freddie Racing the Pisgah
Pat dropping into Fowlersville
Knifes Edge
The Alpine Line of Crystal
Raph running Magilla
Pat on Magilla
The party happens inside a big community building so that we can get out of the weather. There is always a band and drinks and folks showing off their cool stuff. There was an awesome crowd I don't really know how many folks were there. We set up our booth and showed boats and premiered LVM number 20 that was cool We have sort of started a tradition up there of serving Apple Jack which is Hot Apple Cider and Jack Daniels folks lined up for it. I would guess that there were over 200 people for sure and it could have been closer to 300. Just as things were getting started it started to snow huge snow flakes and by the time it ended we had a few inches on the ground. So far I have been to the Moose Fest 3 times and every time it has snowed.
Snowing again at Moose Fest
Watching LVM 20
Chris and Chris, the organizers of Moose Fest
There are three great reasons to go to the Moose Fest. One the river is awesome. Two Chris and Chris do a great job of putting on the event, and Three I think the cold paddling weather brings the group together. The Black and Moose paddling community are an awesome group of folks that love hanging out, paddling, and partying together.
Here is a link to the Video I took on Sunday on the Moose.
Moose River Video, Click This!
All these awesome photos were taken by Raphael Thiebaut. Well except the shot of him. His website is: http://photoraph.kayakblogs.com
Take it easy out there and get on the water.
more adventures with Raph coming soon.
Shane
Thứ Sáu, 29 tháng 9, 2006
Bikes & Commuters
If I may change the subject for a moment....
A recent thread in the "Off Topic" section of a paddling forum I often read has gotten me thinking this week about cycle commuting. That thread was full of an awful lot of vitriol, especially from the anti-cyclists (not what I anticipated on a paddling forum). I think one of the cyclist advocates was writing at least a bit tongue-in-cheek, but it certainly wasn't taken that way by some of the other posters. Anyways, a couple of very interesting links to other blogs were posted and I thought I would share them here (since this website actually sees traffic and is much easier to add it to than my main site).
First was a blog posting by Crazy Biker Chick who wrote an article entitled "Things a non-cyclist might not understand Part I: An open letter to motorists who dislike cyclists." I liked this article thoroughly, it is well written, respectful, and in no way does it chide or goad the motorists she hopes to get the point across to. What she says reflects my feelings on the subject quite closely, though there was one point she made that I'm not sure I can agree with (not sure I entirely disagree with it either). She addressed the issue in her most recent post. For more on my feelings on the matter, you can see the rants section of my other web page.
Another blog posting that was linked to was regarding the pro-cycle commuting movement, Critical Mass, and was written by the Accordian Guy in his article Critical Massholes (or: Why I No Longer Ride with Critical Mass). While I appreciate the message they attempt to convey, I've never quite understood how obstructing other vehicles on the road was the best way to get the message across. Let see, piss off a whole bunch of motorists in an effort to get them to afford us more respect? Apparently I wasn't the only person that this has occurred to as evidenced by the aforementioned article.
Now back to kayaks - I gotta go work on the boat (I think I'll glass the outside seams tonight). Ciao.
Thứ Tư, 20 tháng 9, 2006
Back Adder
As of this week I'm back at it, continuing my slow progress on the boat. The other night I sanded the outside seam smooth, taking the edge off a fair bit in a few places where the deck did not quite conform to the hull. This left some bare wood in places and may in the end be visible but I'm not too worried about it. This area will be soon covered in a strip of fiberglass.
Inspired by a photo in Dan Millsip's journal detailing the building of his kayak, I decided to build a device to help me scrape/sand smooth the inside seam in those hard to reach and curved portions of the kayak. Dan credits Daren Neufeld with the pole sanding device.
Here is the problem I'm trying to fix:
 In the photo above, the boat is upside down. The tip of the bow curves down and away from the camera (and the guy trying to work in the confined space). The seams are to the sides of the photo. Below are a couple of the closeups of the bumps and glass fibers which stick up (cropped from the right side of the above photo). The whole thing is a big mess of epoxy and fiberglass.
 I stopped by the local Co-Op hardware store on my way home to look for the highly & repeatedly recommended sureform rasp. Not finding one, I picked up some other rasp thing, designed for drywall but the package says it can be used for autobody work. It was cheap so I figured what the hell. I also picked up a couple of small hinges. Here is the first version of my inside seam tool, Inside Seam Tool, MKI:

 I fitted the rasp blade to a block of wood which was then attached via a small hinge to a 3 foot length of scrap spruce. This first version did not work very well for 2 reasons - the sole was too flat, and the rasp did not cut the fully cured epoxy very well. I fully expected both of these to be a problem so there were no suprises there. I attempted to curve the rasp but was not very successful and quickly tossed the rasp aside. It was a good thing I sharpened my plane blade last night because I put it to good use by planing down the sole of my block of wood to form a nicely curved surface. While I was at it, I planed down the square corners of the handle to give a handle that I can comfortably grip without fear of gaining a mitt full of splinters (working with a plane and a piece of wood is so much nicer than scraping cured epoxy & fiberglass). I then stapled a piece of 80 grit automotive sandpaper (from a Princess Auto variety pack) to the bottom and voila, Inside Seam Tool, MKII:
 Thankfully, the rounded sanding version works much better. It's still gonna be a lot of work and rather slow, reaching with one arm in through the hatch with your head crammed in there too so you can see what you're doing, but my wife has indicated that she'd like to help with the kayak so maybe I can get her to do it.
Inspired by a photo in Dan Millsip's journal detailing the building of his kayak, I decided to build a device to help me scrape/sand smooth the inside seam in those hard to reach and curved portions of the kayak. Dan credits Daren Neufeld with the pole sanding device.
Here is the problem I'm trying to fix:
 In the photo above, the boat is upside down. The tip of the bow curves down and away from the camera (and the guy trying to work in the confined space). The seams are to the sides of the photo. Below are a couple of the closeups of the bumps and glass fibers which stick up (cropped from the right side of the above photo). The whole thing is a big mess of epoxy and fiberglass.
 I stopped by the local Co-Op hardware store on my way home to look for the highly & repeatedly recommended sureform rasp. Not finding one, I picked up some other rasp thing, designed for drywall but the package says it can be used for autobody work. It was cheap so I figured what the hell. I also picked up a couple of small hinges. Here is the first version of my inside seam tool, Inside Seam Tool, MKI:
 I fitted the rasp blade to a block of wood which was then attached via a small hinge to a 3 foot length of scrap spruce. This first version did not work very well for 2 reasons - the sole was too flat, and the rasp did not cut the fully cured epoxy very well. I fully expected both of these to be a problem so there were no suprises there. I attempted to curve the rasp but was not very successful and quickly tossed the rasp aside. It was a good thing I sharpened my plane blade last night because I put it to good use by planing down the sole of my block of wood to form a nicely curved surface. While I was at it, I planed down the square corners of the handle to give a handle that I can comfortably grip without fear of gaining a mitt full of splinters (working with a plane and a piece of wood is so much nicer than scraping cured epoxy & fiberglass). I then stapled a piece of 80 grit automotive sandpaper (from a Princess Auto variety pack) to the bottom and voila, Inside Seam Tool, MKII:
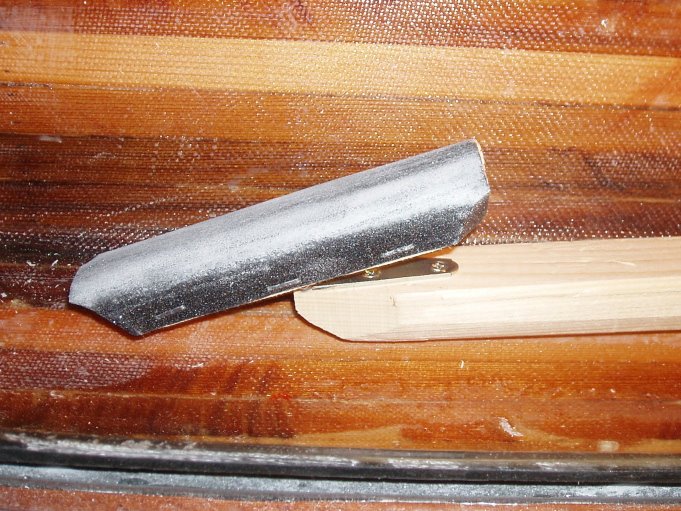 Thankfully, the rounded sanding version works much better. It's still gonna be a lot of work and rather slow, reaching with one arm in through the hatch with your head crammed in there too so you can see what you're doing, but my wife has indicated that she'd like to help with the kayak so maybe I can get her to do it.
Some Good Ideas from Dan Millsip
Dan Millsip has recently completed building a Pygmy Coho and has posted a gallery and journal of the build at West Coast Paddler at the above link. Dan has some pretty good ideas which I would like to keep in mind in order to finish off this kayak, or maybe for the next one.
* The hinged pole sander for the inside seam (maybe I'll work on that tonight and finally get those jagged edges cleaned up).
* The laminate trimmer slot cutting template - The way I did it by drilling and filing has been less than perfect and now some of those slots are partially filled with epoxy and I have to figure out how to clean them up (maybe I'll grind a file down to the correct thickness).
* Making finger pulls from dowel.
* Making bulkhead templates.
p.s. After about 2 1/2 months away from the kayak I'm getting back at it!
Thứ Ba, 12 tháng 9, 2006
Night Session on Garburator

Its been a while. Back on the blog with style.
Just did an awesome trip up to the Ottawa to help out with US team trials and Canadian Team Trials and the first two legs of the World Cup of Freestyle. The highlight of the whole trip was getting a gang together to go do a night session paddle on the Garburator wave on the Ottawa river. It was very cool. A little wierd at first but super cool. Here are some photos and a 10mb video that needs Quicktime 7 to run.
I hope you enjoy it.
Shane


For Video of the Night Garb Session, Click This!
Đăng ký:
Bài đăng (Atom)