Shared coordinates seems to be one of those subject areas which causes a mental block. Not actually sure why, but it does. I know others including Steve Stafford having documented & shared this with people time & time again. I even posted something a few years back which defined the process. Anyway, this is my quick step guide to setting up shared coordinates by “specifying a coordinate” at a point. I am 100% confident with this process, a bold statement I know, but I have helped setup some mega projects using these steps & it works every time for me.
Start by opening the survey drawing in AutoCAD; as good practise check the unit of the DWG, this is achieved by select or typing “DDUNITS”. It’s also worth Auditing the DWG for any errors using the “AUDIT” command in AutoCAD. Next using the “ID” command, ID a point, this may be a benchmark or a survey pin on the survey plan. In the example below, it is an Easting & Northing of 100000,100000, with the units of the DWG set to millimetres.
In Revit, start a new project. Next go to the Site view & notice the Survey Base Point & the Project Base Point. Do not move them right now.
Next import the DWG survey, but it is essential to import “centre to centre”. Do this by going to the Insert tab > link CAD this will open up the Import CAD dialogue. Locate the DWG & ensure the units are set & that you are importing centre to centre.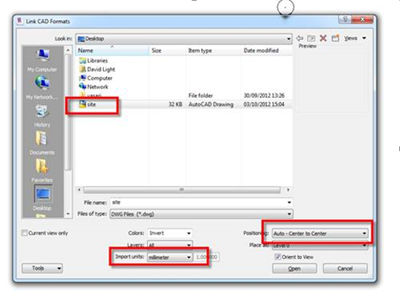
Once you have everything setup, click the Open button & the DWG will be imported. If you zoom all, you should see the DWG imported & the elevation symbols, very small. Resolve this by changing the scale of the view. If for any reason the DWG is not imported centre to centre, you need to go back into AutoCAD & check the DWG file as there may be an ordinate dimensions setup which can mess with the result. Remove the ordinate dimensions from the CAD file & go back a step to import again.
Next we need to align the coordinate system of Revit with the imported DWG file. Start by upclipping both the Survey Base Point & the Project Base Point.
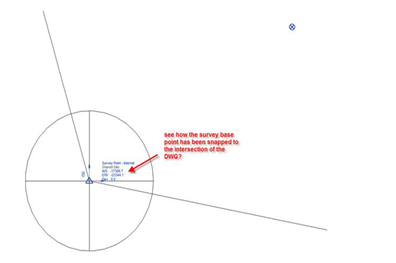
Next we will move them to a location of 100000,100000 which is on the bottom left hand corner of the DWG. You may want to put the view into thin line mode to help with the line weights, as this can be distracting. Ignore the Northings & Eastings, we will resolve this in a moment. Place the Survey Base Point as below. Do NOT clip the Survey Base Point yet.
Next go to the Manage tab & the Coordinates. Choose the Specify Coordinates at Point command.
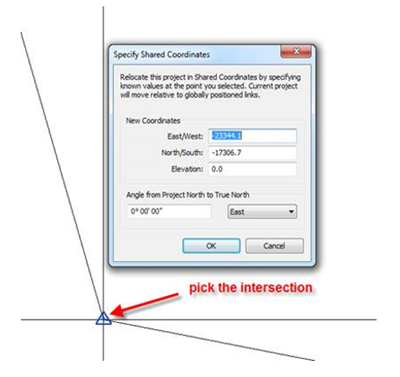
Pick the intersection. If this is problematic, draw a model line from the intersection & pick the end of the line where it intersects with the DWG.
In the Specify Shared Coordinates, type in the Northing & Easting to match the DWG file. You may also want to address the elevation level if you know this.
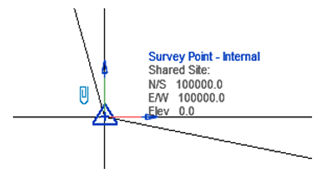
Once you have done this, click OK, to set the shared coordinates. Select the Survey Base Point & now click the paper clip, this will lock the Survey Base Point in place.
With the Project Base Point still unclipped you can then move this either to the Survey Point or to another reference location on the linked CAD file, if you know another survey coordinate or even a grid intersection, place it there. Once you have chosen a suitable location, clip the Project Base Point.
So as a double check, its good practice to save the file & then export the survey view as a DWG by shared coordinates back to CAD to see if everything has been setup correctly. To do this, go to Application Menu, big R>Export>CAD Formats> DWG files
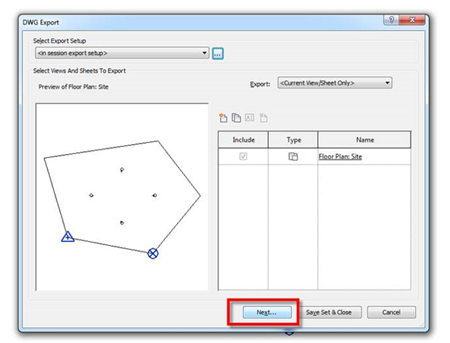
This will open the export DWG dialogue; next go to button with 3 dots which is the Modify Export Setup.
Go to Units & Coordinates & ensure the Coordinate system basis is set to Shared. Select OK.
This will return you to the export dialogue, choose Next.
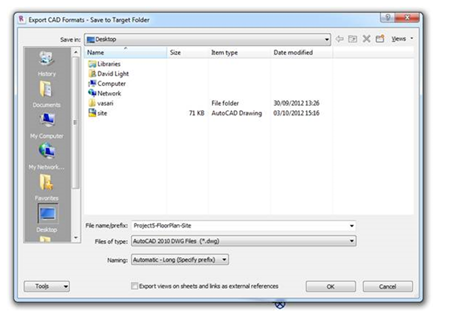
Name the export ; then Export the DWG to a suitable location. Ensure Export views & sheet links as external references is NOT ticked.
Next open the resulting DWG in AutoCAD. Use the ID command to double check the coordinates have been passed back correctly.
In this example we have zoomed into the location of the Survey base point & used ID in AutoCAD to check the coordinates. We can see from the example that they are spot on in the resulting DWG export.
As an extra check, you can always Xref in the original Survey CAD plan. If they drop in correctly on top of one another, you can be confident that the shared coordinates between AutoCAD & anything you export from Revit are correct.








Không có nhận xét nào:
Đăng nhận xét