This summer I had the privilege of paddling with a fellow that is a c5-6 quadriplegic. It was a 2 hour parent + kid class and he was there along with his wife and daughter. I surely learned more that day from that family than they did for me. I look forward to continuing that learning for both of us and hope that we get to paddle together again.
He had a kayak that was adapted with a seat and outriggers much like the one that is shown in this video. In addition, he had special connectors that connected his hands (wrists, actually) to the paddle. He mentioned that the new connectors he was using were a great improvement over what he used to do, which was to duct tape his hands to the paddle.
The video, featuring a paraplegic paddler and his adapted cedar-strip kayak is very inspiring.
Enjoy!
Hiển thị các bài đăng có nhãn Boat Outfitting. Hiển thị tất cả bài đăng
Hiển thị các bài đăng có nhãn Boat Outfitting. Hiển thị tất cả bài đăng
Thứ Sáu, 17 tháng 8, 2012
Thứ Tư, 3 tháng 6, 2009
The Mobies Are Coming! The Mobies Are Coming!
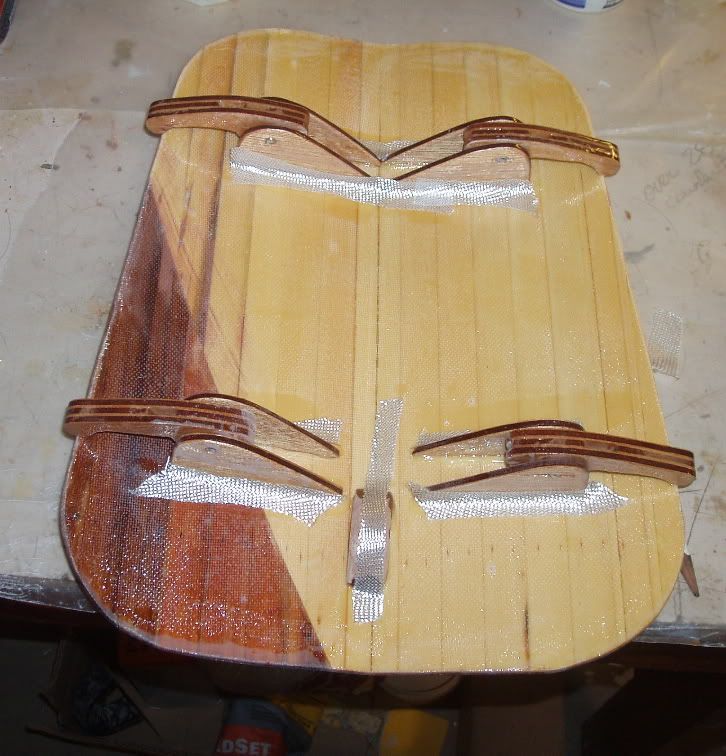
So, "what's a moby" you might ask. A moby (plural, mobies) is a hidden latch mechanism for the purpose of keeping the hatch of a kayak closed. The moby, is a lever attached to the underside of the hatch cover that under the tension of bungie cords presses against the underside of the kayak deck and holds the hatch securely closed. I added mobies to the kayak when I built the kayak 2 years ago, but I built them using 1/8" recycled mahogany plywood. That proved too weak and 2 of 8 of them have broken. So, I am rebuilding the mobies. This time I have made them much beefier. They are being constructed of 1/4" poplar wood, with the grain in the direction of required strength. The poplar was reinforced before cutting out the pieces by adding a layer of fiberglass on each side. They are also larger in every dimension than the older version, which will make them stronger again.
This post was just intended to be a quick update. I have been taking pictures along the way in preparation for a future comprehensive Moby post, perhaps a "how to". So far, I have fiberglass-reinforced 1/4" poplar, drawn a new and enlarged moby template, cut out all the pieces, and cut off the old mobies and cleaned up the hatch lids. This evening, I glued the mobie components together with thickened epoxy and added another layer of glass to the underside of the hatch lids.
In the meantime, here are a couple of pictures from when I made the Mobies, Mark I.
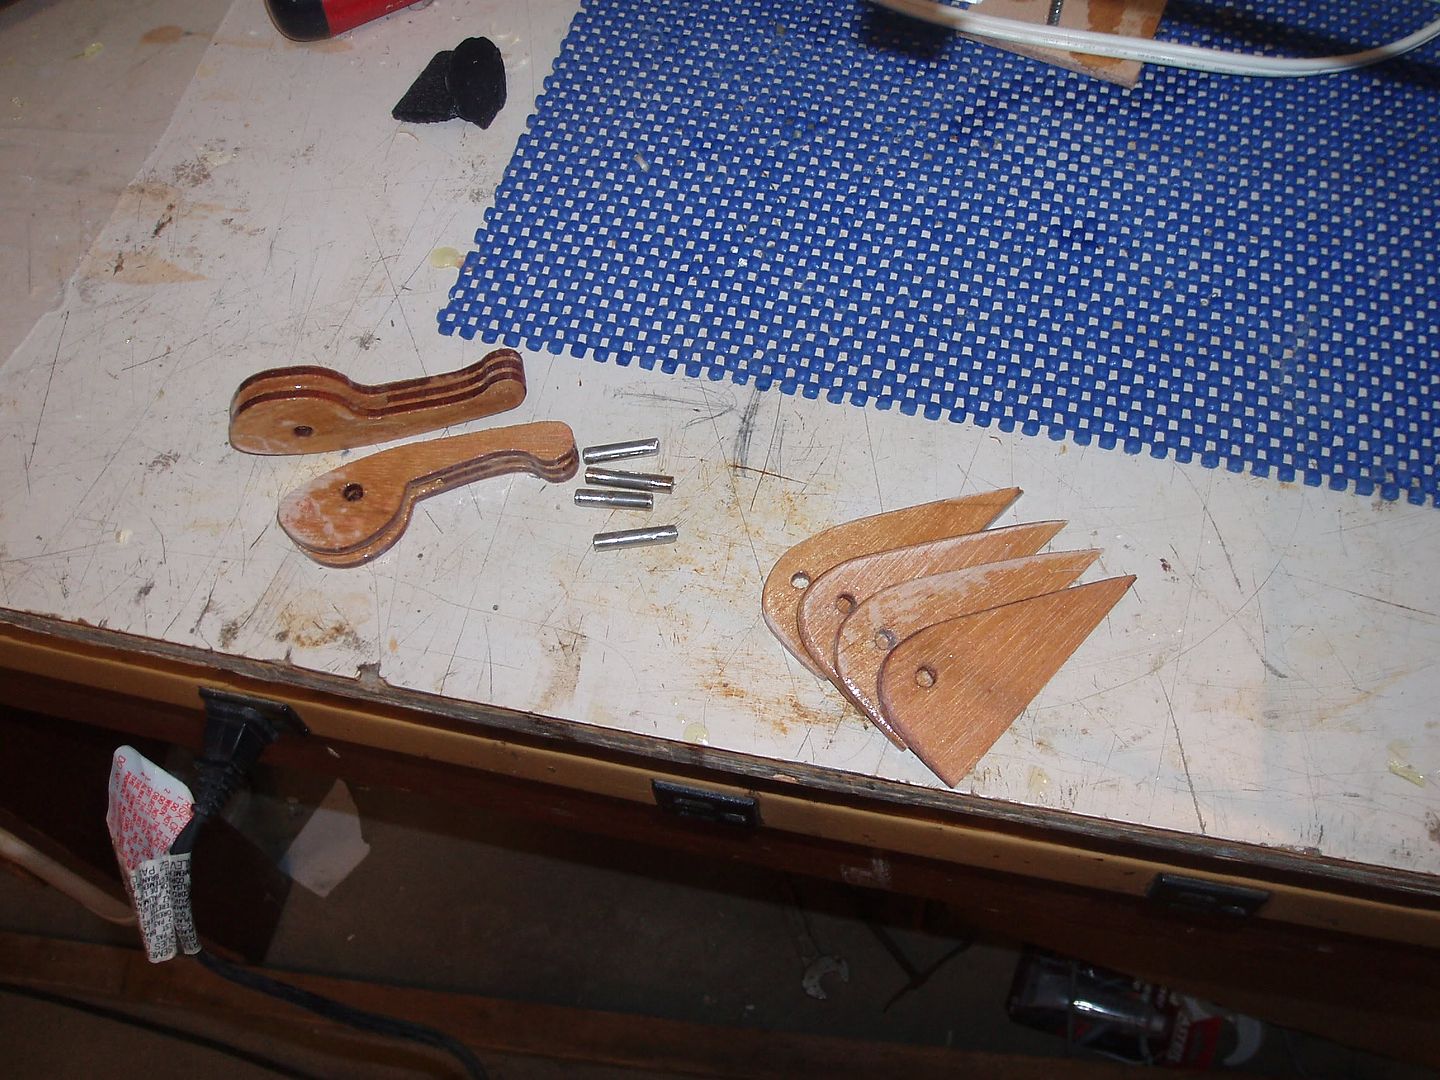 A pod of mobies ready for installation.
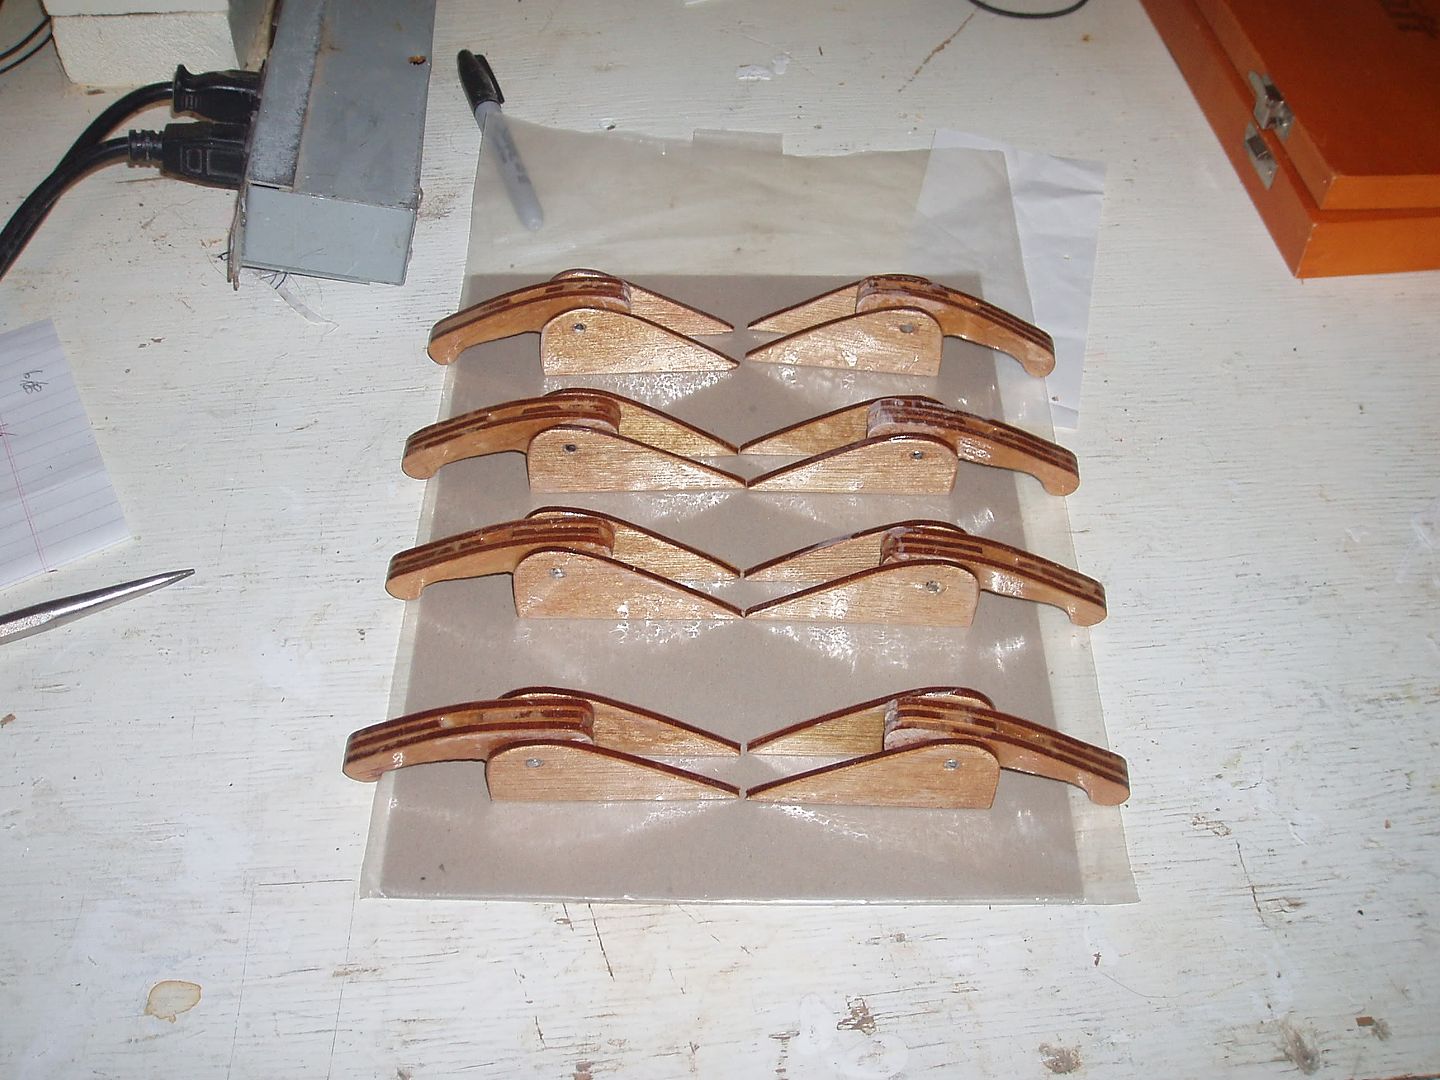 Mobies on hatches.
This post was just intended to be a quick update. I have been taking pictures along the way in preparation for a future comprehensive Moby post, perhaps a "how to". So far, I have fiberglass-reinforced 1/4" poplar, drawn a new and enlarged moby template, cut out all the pieces, and cut off the old mobies and cleaned up the hatch lids. This evening, I glued the mobie components together with thickened epoxy and added another layer of glass to the underside of the hatch lids.
In the meantime, here are a couple of pictures from when I made the Mobies, Mark I.
Partially assembled pieces.
A pod of mobies ready for installation.Mobies on hatches.
Thứ Hai, 7 tháng 5, 2007
See Andy, I Told You It Would Work!
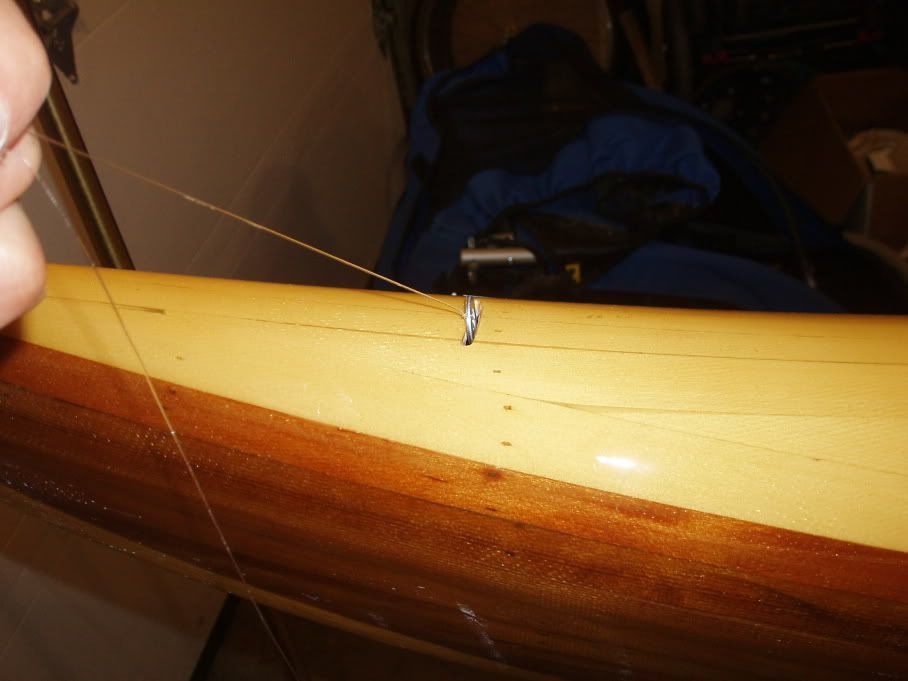
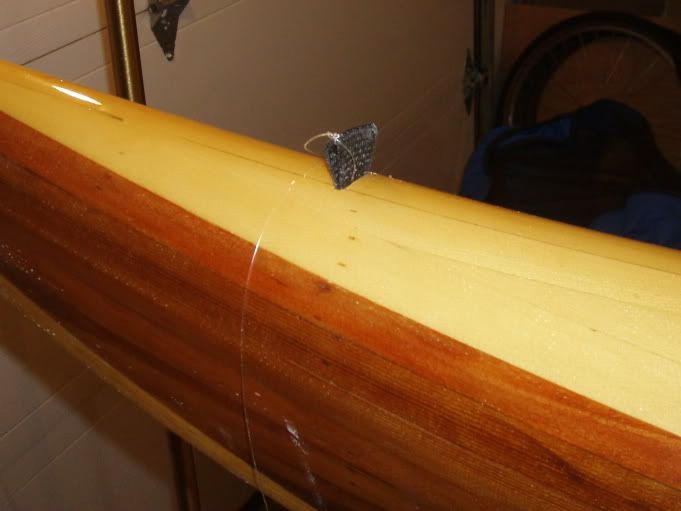
I installed the soft padyeyes this weekend without incident. The padeyes are made of a loop of weebing, with the ends melted to form a flat base. The webbing loops were then inserted through tight slots cut into the deck, allowing a place for the deck lines & bungee cords to be anchored. A couple of months ago at the boat building workshop I organised, Andy asked how I was going to manage to install the padeyes at bow & stern extremities. He seemed bemused when I told him I had some ideas and said to let him know how it went. As it turned out, it went very well. My method involved a small washer, some fishing line, a needle, and a magnet. I tied a length of fishing line and dropped it through the slot cut into the deck of the kayak near the tip of the bow. I then used the magnet on a pole to retrieve the washer and bring it to the hatch opening (I could have tipped the boat up to allow the washer to slide down, but the magnet proved handy). I tied a second length of fishing line to the washer, and used a needle to stitch the fishing line through the corner of the padeye. I then coated the base of the padeye with silicone in order to seal the hole once the padeye is in place to prevent water from leaking into the hatches. The fishing line, washer, and padeye were then pulled through the slot until the corner of the padeye could be gripped with a pliers and pulled into place. The whole process was very easy.
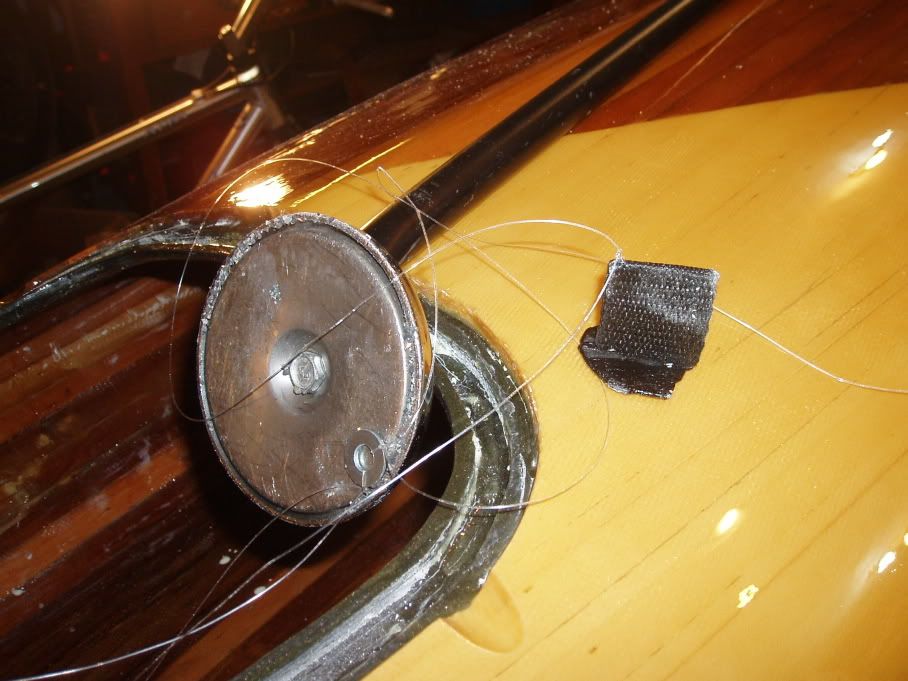


14/05/07 - Update: We noticed this weekend that a robin had incorporated my padeye installation system into it's nest. The length of fishing line & washer must have gotten caught on our shoes and dragged out into the yard. While sitting on our deck on Sunday we noticed that there was a length of fishing line hanging from a newly built robin's nest above our heads, complete with washer. I guess it has offically been recycled.
Thứ Sáu, 13 tháng 4, 2007
Anybody Want To Go Together On a Spool of Deck Line?

Neocorp.com - These guys have cord with 3M Scothchlite woven into it. Their Neoflect®Reflective Cord 3/16" would make a good deckline for the kayak with the added benefit that when you shine a light on it , it should light up like a christmas tree (albeit one that is poorly decorated with tiny silver lights). However, the stuff only comes in 150' rolls. So, should I order a whole spool which amounts to a significant outlay of cash, especially with shipping from the US added on?
That amount of cord should be enough for several kayaks. Anybody want to go together on this, or buy a portion of the cord off of me to help defray the costs?
I suppose I'll probably head down to Eb's and see what they have in more standard black deck line. I'd prefer to buy locally anyway, but they don't carry the reflective stuff (at least not the last time I checked).
Thứ Ba, 3 tháng 4, 2007
A Place To Sit, Part 1
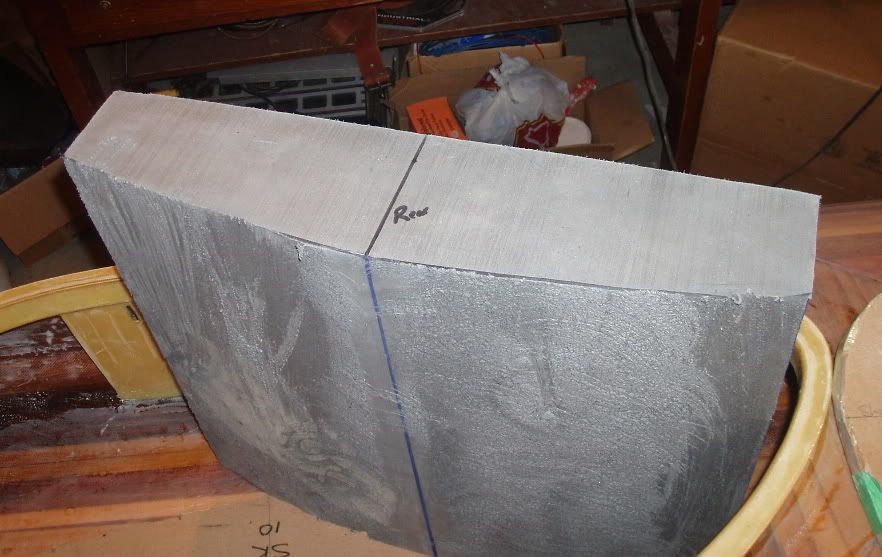
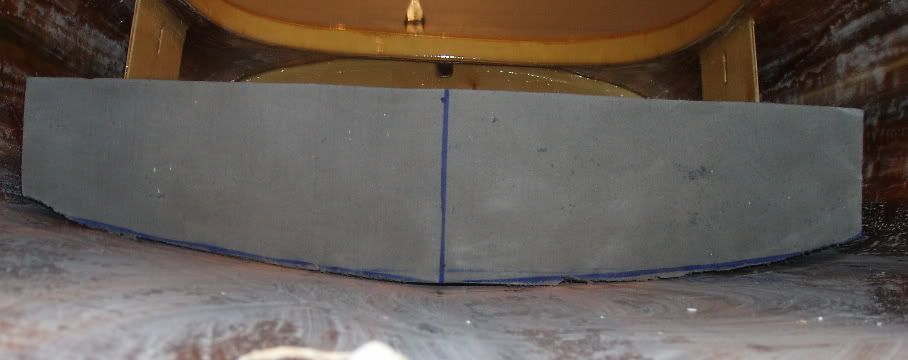
I began shaping a large block of minicell foam to create a seat for the kayak. Custom-made seats of minicell are reputed to be extremely comfortable and to provide a good fit for excellent boat control. Last year I ordered a supply of minicell foam for fitting out the kayak from Joe at Redfish Kayaks in the US, including a 4" x 16" x 24" block for the seat. Comparing the prices locally and from suppliers across Canada & the USA, Joe's price was best after the consideration of shipping charges.
My first step was to cut the block to length in order to fit snugly between the hip braces, trimming it to 18.5" on the band saw. I then traced the shape of the bottom of the hull onto the front and back of the seat block, using form #9 for the front and form #10 for the rear. I then connected the lines on the side edge and added a line down the center of the bottom for reference.

I next used my japanese saw to cut a wedge off of each side of the bottom to get a shape that closely matched the profile of the bottom of the kayak. Note that this is different from the method described by Vaclav at One Ocean Kayaks.
Since I cut a bit outside the lines with the saw, I used a wheel in my drill designed for stripping paint (about 5-6" in diameter, found at the local Canadian Tire). This wheel seems to work well for the task and I think it will do the job of shaping the top to fit a bum. One has to be careful in using it though because it does tend to catch and want to gouge if the angle is held too high (this is why I practiced with it on the bottom!). My next steps will be to follow the seat carving instructions laid out on the Shop Tips section of the One Ocean Kayaks web site.
Thứ Hai, 26 tháng 3, 2007
Waterwalker Film Festival, Bulkheads & Mobies
The Waterwalker Film Festival this weekend was great. We had three fantastic guest speakers and many great videos. Thankfully, there were only minor glitches in my area of responsibility - the A/V aspects (thanks Rob!), such as a DVD that refused to play the portion we wanted to watch (we receive burned copies of the films from Paddle Canada). Lynda Holland told us about her travels in far northern Saskatchewan, NWT & Nunavut, and stories of the Dene that historically inhabited the region. Laurel Archer presented photos and told us about paddling the rivers of northern B.C. Paul Lapointe gave us a totally unique version of a trip report slide show wherein rather than photos of the trip, he showed us 48 of the paintings he produced while on the Fond du Lac River. The Waterwalker Film Festival this weekend did have a boatbuilding connection - Martin & Heather of Kisseynew Canoe Company rented a display table at the event and had a very nicely done strip canoe on display.
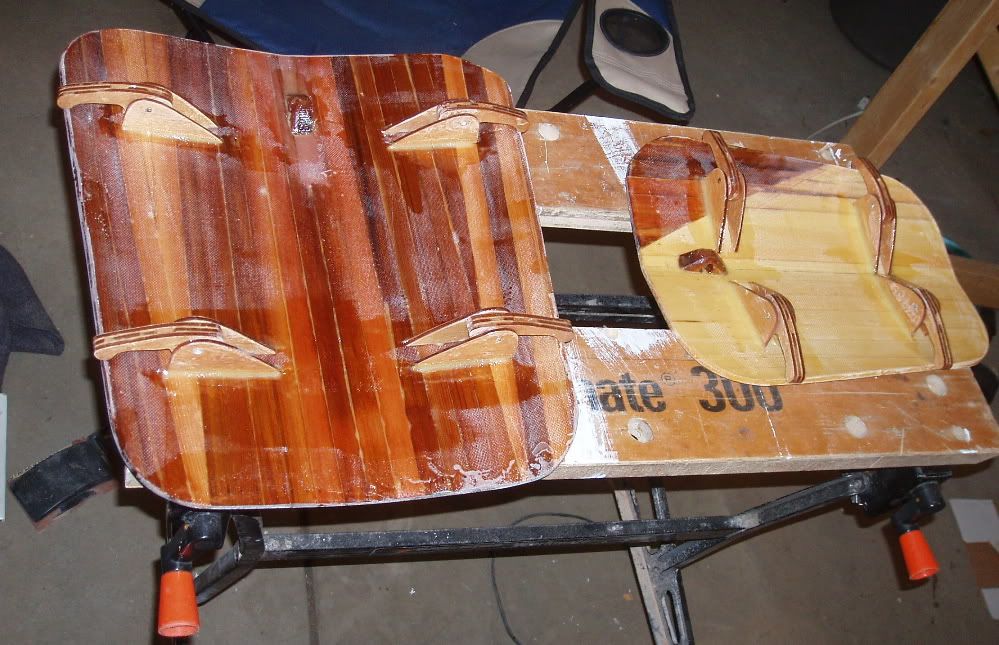
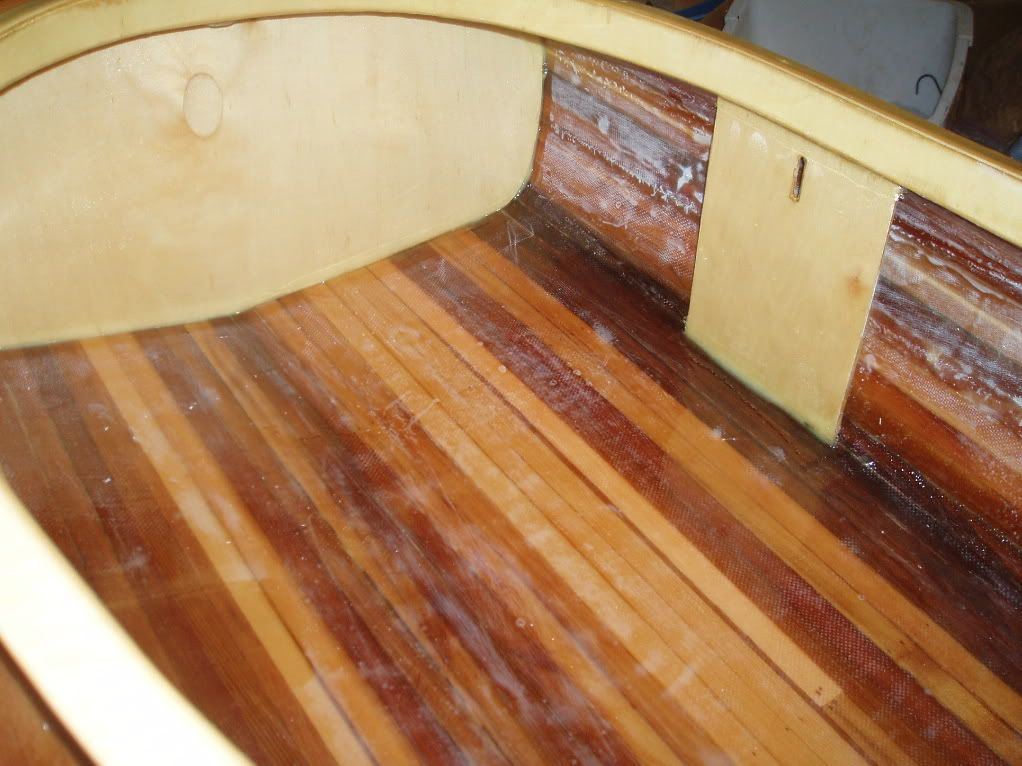
I also managed to make some progress on the kayak over the past few evenings. The cheek plates have been glassed (4 oz) both sides with a fill coat of epoxy on each side. The bulkheads have been similarly treated but the front bulkhead (support for the footbrace) received 2 layers of 4 ounce glass on one side and one layer on the other. The bulkheads were trimmed and installed into place using a fillet of epoxy. For the record, epoxying bulkheads into place on a fully decked boat is a real PITA. The fore bulkhead was some distance (18"?) from the hatch opening so in order to get in there and apply my fillet, I turned the boat upside down on the stands then crawled underneath and poked my head in through the hatch opening. However, there was no room in the small opening for both my head and my arm, so the actual applying of the fillet (and associated clean up of gobs of epoxy) was done mostly blind. I used a 20 ml (?) syringe with the tip bored out to 1/16" to apply the thickened (WS 406 colloidal silica) epoxy then smeared it smooth with a gloved finger. The same thing was done from the other side but, thankfully, the cockpit opening is a bit larger than the fore hatch and the space less cramped (though the bulkhead is farther from the opening). The rear bulkhead was a much easier beast to tackle, though it too involved reaching into cramped quarters through the nearby hatch opening. The much, much easier to tackle cheekplates were installed with a fillet covered with a strip of 4 oz glass cloth for strength.
It was nice to also get the "mobies" installed on the underside of the hatches this weekend. They too were filleted in place using epoxy thickened with WS 406 colloidal silica, overlaid with a strip of 4 oz glass. The bungee cords that provide the tension can be installed after I double check that all wood is sealed with epoxy (I think I can probably use varnish on the spots that may have been sanded through to wood during their manufacture). I will create a separate blog posting (with photos) about manufacturing the Moby Latch System someday soon.
 Now I have a couple of small sections along the seam to better fill the weave on (I started on this yesterday but I have to have a close look to see if there are more spots). Once that cures I will need to do final sanding on the whole kayak. Then it's time to get ready to varnish this boat! (Yay!) Once varnished, I will install the deck padeyes & lines and head out for a paddle. (I guess I should also make a seat, make the footbraces, and complete then install the backband.)
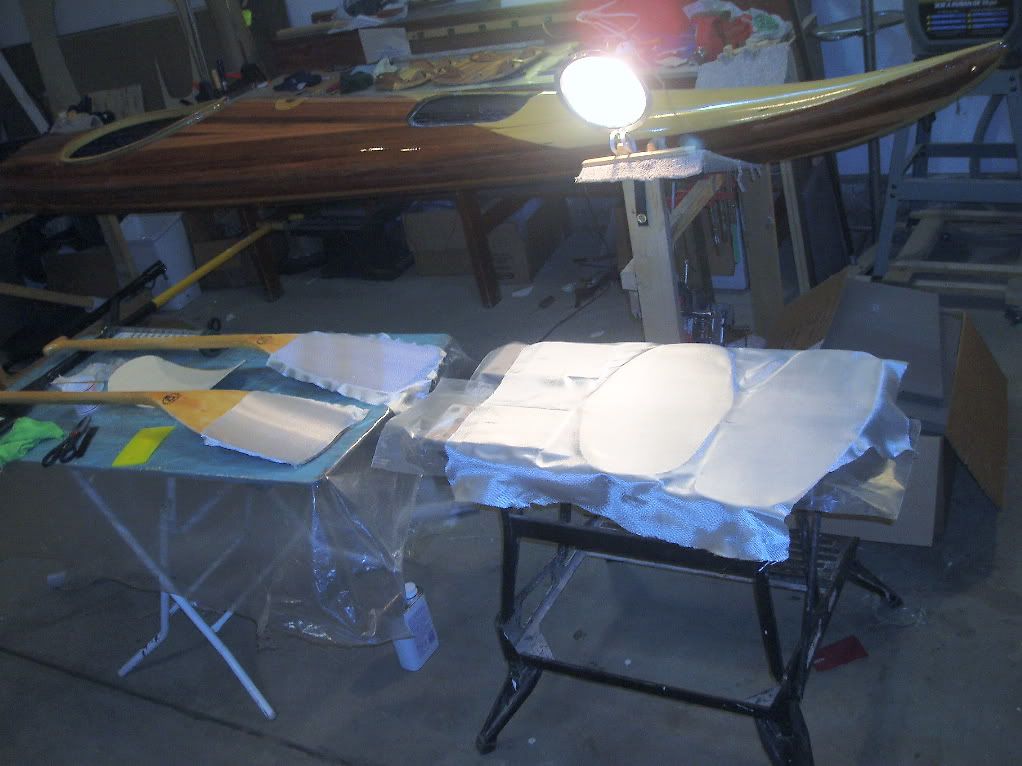
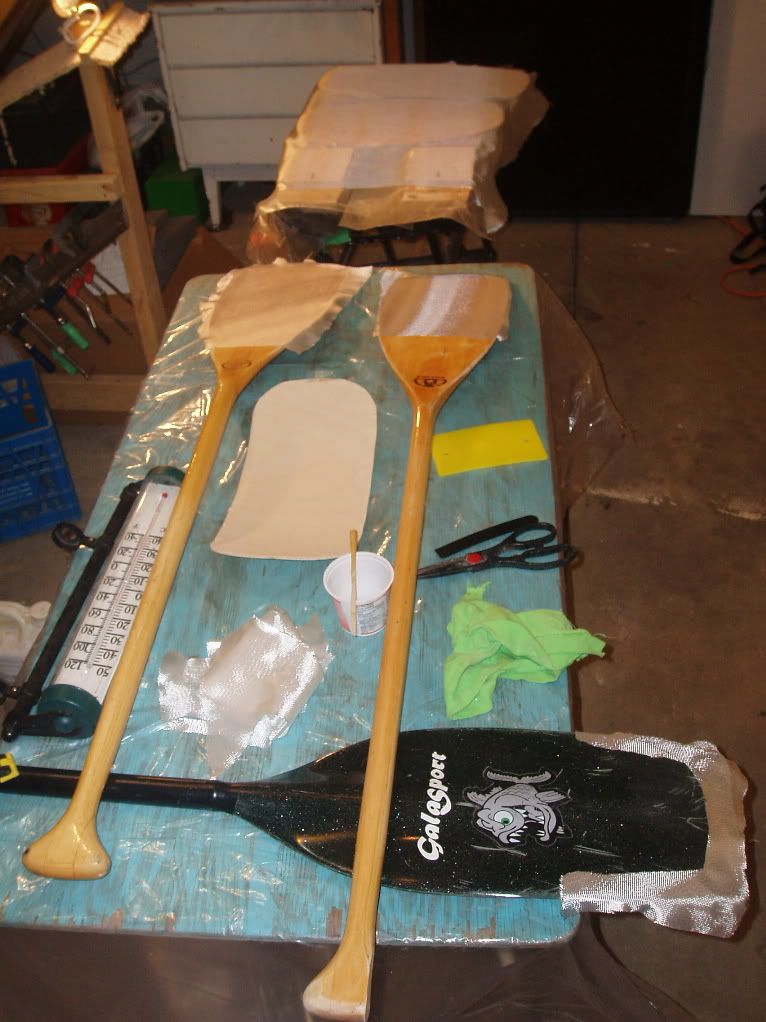
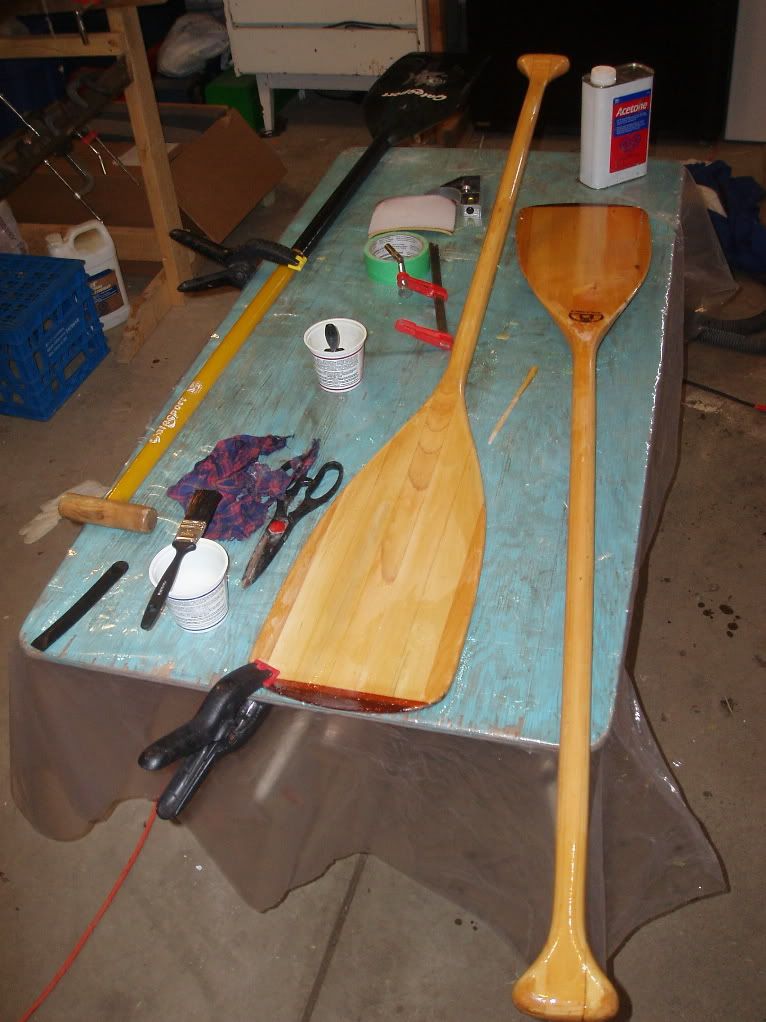
I have also been working on getting some paddles ready for the season and they too are now just about ready for varnish. Last fall on a trip I suffered two broken canoe paddles. For some unknown reason the blade of my wife's bent shaft paddle split (which is a problem since she wasn't even on the trip). Also, my own bent shaft suffered a broken grip when one of our esteemed members of North Star Expeditions used it to put a nice walleye out of it's misery and hit a rock instead. This paddle too had cracks beginning to develop on the blade. Thus, both paddles received 4 oz glass cloth patches at the cracks on one side (non-power face) while the lower 75% of the other side was covered in sheath of 4oz glass and the weave filled by squeegeeing very thin coats of epoxy on. The handle of my wife's paddle was also wearing from abrasion so it received a coating of epoxy (something I had done to my own paddle years ago and as a result of which has not deteriorated at all since). The third paddle I'm repairing is a fiberglass whitewater canoe paddle, recently purchased used from Jimmy MacDonald (he sells new paddles and other paddling stuff so get in touch with him if you need something). As this is a used paddle, it has seen the occasional rock and there was some damage to the edge. I repaired the damage and reinforced the rest of the edges by adding a strip of 4oz cloth to both sides. Both of the wood bent-shaft paddles will receive full varnish, while the whitewater paddle will receive varnish on the repaired areas of the blade to protect it from UV. At the same time I will also add a finish to the greenland paddle I built some time ago. I think I will give that one a tung oil finish.
I also managed to make some progress on the kayak over the past few evenings. The cheek plates have been glassed (4 oz) both sides with a fill coat of epoxy on each side. The bulkheads have been similarly treated but the front bulkhead (support for the footbrace) received 2 layers of 4 ounce glass on one side and one layer on the other. The bulkheads were trimmed and installed into place using a fillet of epoxy. For the record, epoxying bulkheads into place on a fully decked boat is a real PITA. The fore bulkhead was some distance (18"?) from the hatch opening so in order to get in there and apply my fillet, I turned the boat upside down on the stands then crawled underneath and poked my head in through the hatch opening. However, there was no room in the small opening for both my head and my arm, so the actual applying of the fillet (and associated clean up of gobs of epoxy) was done mostly blind. I used a 20 ml (?) syringe with the tip bored out to 1/16" to apply the thickened (WS 406 colloidal silica) epoxy then smeared it smooth with a gloved finger. The same thing was done from the other side but, thankfully, the cockpit opening is a bit larger than the fore hatch and the space less cramped (though the bulkhead is farther from the opening). The rear bulkhead was a much easier beast to tackle, though it too involved reaching into cramped quarters through the nearby hatch opening. The much, much easier to tackle cheekplates were installed with a fillet covered with a strip of 4 oz glass cloth for strength.
It was nice to also get the "mobies" installed on the underside of the hatches this weekend. They too were filleted in place using epoxy thickened with WS 406 colloidal silica, overlaid with a strip of 4 oz glass. The bungee cords that provide the tension can be installed after I double check that all wood is sealed with epoxy (I think I can probably use varnish on the spots that may have been sanded through to wood during their manufacture). I will create a separate blog posting (with photos) about manufacturing the Moby Latch System someday soon.
Now I have a couple of small sections along the seam to better fill the weave on (I started on this yesterday but I have to have a close look to see if there are more spots). Once that cures I will need to do final sanding on the whole kayak. Then it's time to get ready to varnish this boat! (Yay!) Once varnished, I will install the deck padeyes & lines and head out for a paddle. (I guess I should also make a seat, make the footbraces, and complete then install the backband.)I have also been working on getting some paddles ready for the season and they too are now just about ready for varnish. Last fall on a trip I suffered two broken canoe paddles. For some unknown reason the blade of my wife's bent shaft paddle split (which is a problem since she wasn't even on the trip). Also, my own bent shaft suffered a broken grip when one of our esteemed members of North Star Expeditions used it to put a nice walleye out of it's misery and hit a rock instead. This paddle too had cracks beginning to develop on the blade. Thus, both paddles received 4 oz glass cloth patches at the cracks on one side (non-power face) while the lower 75% of the other side was covered in sheath of 4oz glass and the weave filled by squeegeeing very thin coats of epoxy on. The handle of my wife's paddle was also wearing from abrasion so it received a coating of epoxy (something I had done to my own paddle years ago and as a result of which has not deteriorated at all since). The third paddle I'm repairing is a fiberglass whitewater canoe paddle, recently purchased used from Jimmy MacDonald (he sells new paddles and other paddling stuff so get in touch with him if you need something). As this is a used paddle, it has seen the occasional rock and there was some damage to the edge. I repaired the damage and reinforced the rest of the edges by adding a strip of 4oz cloth to both sides. Both of the wood bent-shaft paddles will receive full varnish, while the whitewater paddle will receive varnish on the repaired areas of the blade to protect it from UV. At the same time I will also add a finish to the greenland paddle I built some time ago. I think I will give that one a tung oil finish.
Chủ Nhật, 18 tháng 3, 2007
Decisive
Well, after consulting with the online kayak building community I went ahead and got to work. With respect to bulkheads I decided on ......
Cardboard!
Cardboard!

OK, not really. The above is a cardboard template being used to determine the exact size and shape needed for the rear bulkhead. The bulkhead position falls between forms 10 & 11 so just using either of those wouldn't quite be right, especially since the shape of the boat changes markedly between those two forms. In order to get the right shape I traced both forms onto a piece of cardboard, ensuring they were precisely aligned. I then cut out the cardboard template to the widest set of lines. Then, by testing the fit in the boat, I kept trimming until it fit well in the space. I then traced that shape onto a piece of 1/8 birch plywood and cut that out with a jig saw then checked it for fit in the boat. It had to be trimmed somewhat but eventually I ended up with a good fit. The same basic process was done for the front bulkhead except in that case the location is close to a form so that became my starting point for the template.
Again, cardboard templates were used to determine the size & shape of the cheekplates (another decision I made since last post - I decided that putting them in was just as easy as making and installing the padeyes that would be needed to hold the backband up). In this case, two overlapping pieces of cardboard were cut and put into position, then held together with a spring clamp. Thus, not only is the proper length determined but also the precise top and bottom angles required to fit the space. Once cut out of the plywood, a 1/4" x 1" slot was cut (by drilling a series of 1/4" holes and filing out the rest) into the cheekplate for the backband webbing to pass through.
I then laid out the newly cut pieces and glassed them before calling it quits for the night.
Thứ Sáu, 16 tháng 3, 2007
Decision, Decisions
Minicell foam for rear bulkhead, or a panel of strips, or a piece of plywood?
Minicell is easy & flexes so avoids creating a rigid spot in the hull. Minicell is expensive and the stuff I have on hand could perhaps be put to better use elsewhere. A panel of strips would look good to match the rest of the kayak, but needs to be glued up from leftover strips & glassed both sides then cut to just the right size & shape to install. Plywood (1/8" birch is what I have on hand) would look OK, matching the coaming and the front portion of the boat, but would have the same issues of getting a good fit (maybe not a big deal) and should probably be glassed on at least one side. Either of the wood options would provide extra support for when sitting on the deck. The front bulkhead will be plywood and will epoxied in place because I intend to use the front bulkhead as the support for a minicell foam footbrace (adjustable with spacers). Right now, I think I'm leaning towards the plywood option. A very low priority bonus of the birch ply is that it would give a nice light background upon which I could add a signature (built by me, 2005-2007, etc.). I also have to decide whether to glass both bulkheads in, or use silicone to install them as Vaclav describes.
Cheek plates (hip braces, butt plates) or not?
Cheek plates are pieces of wood installed vertically beside the seat in the cockpit. They serve to take up the slack which is helpful for getting a good fit in the boat and helps with rolling. They also serve as an attachment point for the backband. In his book, Nick recommends them. However, it's pretty tight in there already and a little minicell foam could probably serve the bracing function well. The backband could in turn be supported by a couple of padeyes located under the deck beside the coaming. Last night I decided that I was going to omit the cheek plates but now I'm thinking of putting them in, mainly for the purpose of backband attachment. Like the bulkheads, these can be made of a panel of glass-reinforced strips or a piece of glass-reinforced birch plywood. Oh what to do, what to do.
Paddle park or not?
I had originally planned on installing a paddle park beside the cockpit but am now considering leaving it off in the name of simplicity. The paddle park is a hook and bungee that provides a place to put the paddle without having it float away (see Pedro's version here). I'm thinking now a loop of bungee running between a couple of the padeyes on the bow would serve a similar function. I have already carved a hook out of mahogany so to install the paddle park I need to epoxy that hook onto the hull and also drill a couple of holes for the bungees (which actually involves drilling an over-sized hole, filling with thickened epoxy, then re-drilling a hole through the cured epoxy for the bungee to pass through with a tight fit).
If you have any insight or comments, please let me know! (Use the post a comment link below.)
I am hoping to do some epoxy work this weekend (I hope the weather warms some more). I need to epoxy the mobies into place under the hatch covers and epoxy a mahogany padeye onto each hatch lid. Depending on the decisions I make regarding the above, I need to glass one or two pieces of birch for the bulkheads, and a couple of pieces for the cheek plates, then epoxy each into place. If I use the paddle park (and after reading some of the comments regarding Glen's & Pedro's paddle parks linked above, I think maybe I should), then I should drill the holes for the bungee cords and fill with thickened epoxy and epoxy the hook in place.
Thứ Ba, 6 tháng 3, 2007
The To Do List
I've created another version of the To-Do list. For earlier versions of the list go here, or here, or here.
Kayak To-Do List
1. Sand inside seam
2. Install mobies
a. Mark location
b. Mask surrounding area
c. Cut patches of glass cloth for reinforcement
d. Epoxy in place with thick epoxy & fillets overlayed with glass cloth
3. Build & install cheek plates
4. Build & install bulkheads
5. Build & install bulkhead footbrace
6. Install paddle park
a. Drill holes for paddle park bungee
b. Fill with thickened epoxy
c. Re-drill holes
d. Attach hook with thickened epoxy
e. Install bungee (after varnish)
7. Install backband
8. Carve seat from minicell foam
9. Wet sand epoxy
10. Varnish
a. Wet sand
b. Varnish
c. Wet sand
d. Varnish
e. Rub to a gloss
11. Install soft padeyes
12. Install deck lines
13. Install bungees into mobies
14. Install weather-stripping into hatch seal channels
15. Carve & install handles/grab loops for bow & stern
16. See if it floats
Thứ Tư, 14 tháng 6, 2006
Pedro's Woven Rope Carrying Handles
Pedro Almeida over at the Kayak Building Bulletin Board has come up with a new and interesting version of a rope carrying handle. He uses a series of knots to bring together four separate cords to form a carrying handle for what looks like a comfortable grip. For photos of Pedro's kayak and deck rigging including the carrying handles, visit his Flickr site here.
Pedro has very graciously written a set of illustrated instructions and has provided that to the boat-building community. You can find his instructions here.
Pedro has very graciously written a set of illustrated instructions and has provided that to the boat-building community. You can find his instructions here.
Thứ Sáu, 2 tháng 6, 2006
Coaming lip, sanding, hatches cut and hatch lips built
-----I have photos to add but they'll have to wait until a later date--------
I have gotten a few things done in the last couple of weeks. The first on my "to do" list was to build the cockpit coaming lip, the rim around the top of the cockpit to which the skirt attaches. There are a number of ways to do this. Probably the most common way it is done on strip-built kayaks is as described in Nick Schade's book using 1/4" wide by ~1/8" thick strips of hardwood (ash or walnut are common), wrapped around the top of the coaming with about 6 laminations glued in place. While this is reported to be easy enough, dealing with many thin pieces of wood buttered in epoxy (they get darned slippery) and trying to keep everything aligned didn't have all that much appeal for me. Since the finished product is 1/4" thick by 1/2"-3/4" wide hardwood & glue, it seems to me that this might be heavier than other options. A second common method is that described by Vaclav on the One Ocean website, where a coaming is laid up in carbon fiber (and/or fiberglass, but carbon seems to be common) over top of a form built on the boat out of styrofoam. This method seems simple enough, but I don't have carbon fiber so quite a few layers of glass would likely be necessary to get the required strength and stiffness. Something I began to think about was using thin (1/8") birch plywood reinforced with a couple of layers of fiberglass to form the lip. The birch plywood is thin enough to flex into place and conform to the curvature of the top of the coaming (it is curved from the side profile), but when encased on both sides in layers of glass, should be both stiff and strong. Recently, I saw a post on the KBBB where a builder (Gaetan) used plywood (stained to match the colour of the boat) for his coaming lip. The result looked great and that sealed it - that's how it was going to be done.
The process was fairly simple - I rough cut a piece of 1/8" birch plywood to the size of the cockpit rim, leaving it over-sized to be trimmed later. I oriented the grain perpendicular to the boat so that it flexed into place easily. I then tacked the lip into place on top of the trimmed coaming riser using CA glue (I should have been using accelerator too but the spray pump on the little bottle is buggered and I've given up fighting with it). I then trimmed the inside of the cockpit lip to be flush with the riser and rounded off the corner a bit. I then glassed the lip with 2 layers of bias-cut 4 ounce fiberglass which wrapped from the top of the lip, down the riser, and onto the underside of the deck (barely). The 4 ounce cloth had no trouble making the bends and wets out very easily. It is very nice stuff to work with. Once this had cured, the rough edges at the bottom were smoothed out (a scraper works very well as long as the epoxy is not too hard) and the outer edge of the lip was trimmed down to it's final size of 3/4". I then applied a fillet of epoxy underneath the lip at the junction with the riser to smooth out this corner to a radius the glass can manage, then applied 2 layers of fiberglass which again wrapped from the deck, up the riser and under the the lip. I used a trick I read about on the KBBB to hold this glass in place and make things in this hard to work area "smooth as glass" (described by John Monroe and credited to Rob Macks). I used 3/4" flexible vinyl tubing (purchased at Cdn Tire) squashed in underneath the coaming lip and held in place with spring clamps. Once the glass had partially cured, the tubing was pulled out to reveal ---- a mess! It seems I didn't get the tubing in far enough in many places and there were a lot of voids and air pockets above the glass and underneath the glass. I scraped some of the rough edges I could reach, but there is still a lot of smoothing to go underneath the lip. I may try to put another layer of glass in under the lip since I'm sanding a lot of the strength away in order to clean up the mess. For now, it's not easily seen so it's something I'm working on here and there while focusing on other things. In the end, the plywood coaming lip worked really well and was very easy to do, but I need to work on my technique for glassing underneath. One thing I considered was to put a layer of glass on the underside of the whole lip BEFORE tacking it in place on top of the riser while the glass was still green and flexible. This would have been very easy, but I went for what I thought would be the stronger method by having the glass continuous from deck to riser to lip. Next time, I'd probably do it as I originally considered with putting a layer of glass on the underside of the plywood lip prior to tacking it in place, with a fillet underneath and an extra layer of glass on the outside, avoiding all the trouble of trying to work with glass underneath the installed coaming lip.
While the weather was nice last weekend (overcast but comfortable working temperature) I took the opportunity to drag the boat outside to do some sanding in the fresh air. I also took a few pictures, and sat in the boat to determine the approximate location of the front bulkhead (to ensure I cut my hatch in front of it!).
This week, I cut out the hatches. This went fairly well despite my nervousness about cutting giant holes in the deck of boat. The first step was to determine the shape of the hatches. Using the offset's in Nick's book as a guide, I experimented with a number of shapes. I printed these out on the computer to the right scale which meant taping together a bunch of sheets of paper to create my templates. After considering the diamond shape provided in the book and different egg shapes, I settled on a trapezoid shape with round corners and sides roughly parallel to the sheer line. I then masked off the areas to be cut and with my templates transferred to pieces of cardboard, I traced the shapes onto the boat. Looking at things on the boat, I decided that I had the rear hatch too large, so I scaled it down a bit (about 1/2" all around seemed about right) and moved it aft about 6". This all took me the better part of an evening to get something I was satisfied with.
I started the cut as others have described, using a cutting disc on my dremel. I then used a blade from the jig saw and by hand cut through to make the slot wide enough to fit the jigsaw blade. Then with a new Bosch fine-cut blade and the jig saw on a medium speed, I cut out each hatch. The actual cutting went fairly well. I am glad that I decided not to rush out and purchase a new $200 Bosch jigsaw, and I am glad that I did decide to spend the big bucks and get the Bosh blades (about $12 for a pack of 4). In the end the actual cutting was a bit anticlimactic (which is OK, that means it went well).
With the hatches cut, it was then time to build the hatch lips. I used the method described by Vaclav on the One Ocean web site. Ken (aka Spidey) has some good pictures and a good description of the process on his web site. Before heading to the hardware store I should have double checked what size of weatherstripping to use to form the gasket channel, but I didn't so I just got what looked about right. The 1/8" stuff looked too small, so I went with 1/4" x 3/8" closed cell foam gasket tape. I taped the hatches into position from the outside, adding a couple of strips of cedar to ensure the hatches would sit flush despite any pressure that would be applied in laying up the glass for the lip (not to mention the 20 lbs of wet sand I piled on top). With the deck turned underside-up, I used thin clear packing tape over the whole area to ensure that my gaskets would not yet be a permanent part of the boat. I then applied the self-adhesive weather-stripping to the perimeter of the hatch lid staying about an 1/8" in from the edge. With this in place, I applied a fillet of thickened epoxy (406 filler) pigmented black with graphite powder (mostly because everybody else seems to tint their hatch lips and I didn't want to be left out) on both sides of the weatherstripping. I then began to lay up strips of glass over top of this to make the hatch lip. For the first 1-2 layers, I used 4 ounce glass because it conforms better to curves and does not trap air as easily (I think I still trapped a fair number of bubbles), then followed with strips of 6 ounce glass cloth for a total of 5-6 layers. The glass was wet-out 1 layer at a time using epoxy with graphite powder added to make it black-ish. Once all of the glass cloth was layed up and wet-out, I put a sheet of poly over top and piled damp sand on top of that in an effort to push everything smooth. I was somewhat surprised how long this process took. I started at 10 pm, and did not complete the process until 1:30 am. In the morning, with the epoxy partially cured but still flexible, I removed the sand and the sheet of poly, then peeled the gaskets off of the deck and removed the tape. It all went pretty well, though there are wrinkles from the plastic layed over top. Next, I will trim down the rough edges of the hatch lip, scrape out the weather stripping from the gasket channel, then permanently bond the hatch lip to the underside of the deck.
Đăng ký:
Bài đăng (Atom)