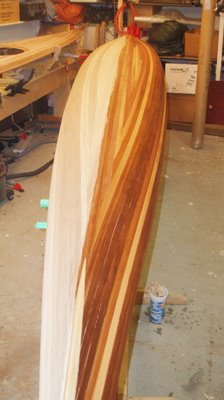
I had a very satisfying moment late Saturday night. In the final preparations prior to fibreglassing the hull, I wet down the hull with a damp rag. This brought out the colours of the cedar from the dull tan colours I've grown familiar with, to vibrant rich browns ranging from deep chocolate to bright amber and that beautiful cedar colour that people love. It was amazing.
It was about
The above photo shows the hull supported on the forms & internal strongback, which in turn is supported on the stands. The deck has been removed from the forms for the moment and is sitting in the background. I'll put the deck back onto the forms prior to fibreglassing.
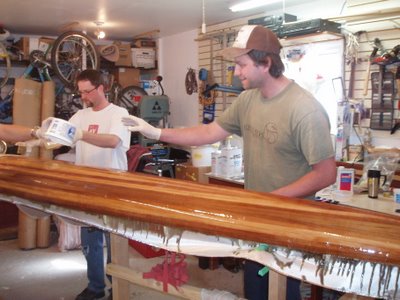
Early the next morning I gave the hull a final sanding with 120 grit paper and wiped it down with acetone to remove the dust and any contaminats. With the aid of Rob & Martin (the latter of Kisseynew Canoe Co.), we began the task of fibreglassing the hull. Initially, I was going to lay on 3 layers of fibreglass: a full layer of 6 oz cloth, an additional layer of either 4 or 6 oz over the central bottom area (the football), and another layer of either 4 or 6 oz along the keel line towards the stems. Martin cautioned me against this approach, feeling that it would add a lot of weight, but not much strength or abrasion resistance (my main reason for the additional layers). Instead, we used the full layer of 6 oz cloth with a strip of the same approximately 4” wide along the entire length of the boat. After some deliberation, we opted not to put the smaller piece on top as suggested in Nick’s book, but rather to hide it underneath the larger sheet. In the end, I believe we were correct to do it this way, as I had a very smooth transition at the edge of the lower layer rather than a step which can be sanded into as described in the book.
The above photo shows Martin & I rolling out what is to become a second layer of cloth. In the photo below, we're probably discussing the merits of various quantities of cloth.
The fibreglassing went well I think. Martin pumped & mixed small batches of epoxy while Rob & I brushed it on with paint brushes to wet out the cloth, working from bow to stern. As we did this, Martin kept watch to ensure we were doing things correctly and keeping a watch for areas where the wood had soaked up much of the epoxy. We then squeegeed off the excess resin, again working bow to stern, just as the epoxy began to thicken. It would seem that I was not as efficient at this as was Martin. While sanding later I could tell the difference between which areas he had squeegeed and which I had. The areas he had done were largely flat and even. The areas I had done were less so. I think I did not remove sufficient resin in some areas as there were hills and valleys (albeit slight ones) present. At first I thought the hills were excess epoxy on top of the glass, but when I started to scrape & sand, I realised that the areas with visible weave were not the valleys as I first thought, but rather the hills. The areas where the glass was completely buried in epoxy were actually lower. It seems to me that the glass must have floated up on excess resin, creating the hills. Damn! That gives me something to work on for the deck I guess.
In the above photo Rob & I pour on the epoxy while Martin waits to mix up a new batch of epoxy.

Below, Martin mixes.

Once the fibreglass had cured to a “green” stage (no longer soft, but not yet hard) approximately 4 ½ hours later, I applied a second coat of epoxy, brushing it on then removing the excess by squeegee. I then allowed this to cure overnight before spending an hour the next morning sanding the whole hull with 120 grit to take off all of the high points. I’ll have to add a 3rd coat to completely fill the weave, but I think I’ll wait until the hull and deck have been reunited and the deck seams glassed before I do that.

Above: The cloth overhangs the hull and helps to catch drips. Below: Once partially cured, I trimmed the excess cloth with a utility knife.
 Below: One final photo for the night, this one of the ash stem on the bow.


Không có nhận xét nào:
Đăng nhận xét