Chủ Nhật, 16 tháng 5, 2010

Adapt your points of view – Revit 2011

A few years back when I worked for a well known UK reseller, a colleague and I put together a presentation to demonstrate how Inventor and Revit could work together. Part of this presentation showed how to model in Inventor and then pass the geometry to Revit as a SAT file for use within a Revit project. Of particular interest at the time was Inventors adaptive capabilities and we used these to great affect in a structural atrium support solution.

image

Whilst this was a virtual design concept, the original idea came about from a real project I had been involved in 12 years earlier with Househam Henderson Architects. This was for a TV company that were refurbishing a building, turning it into their new offices and studios in central London. The building being renovated had an enclosed court yard which was opened to the elements, but the plan was to enclose this courtyard with a glazed roof to form an atrium. This would provide a cafe and a social area for staff and visiting guests. One issue was that the new glazed roof would need supporting from the atrium floor level. 

1276_N11

So a structural tree support system was designed to support the roof. At the time this was modelled in AutoCAD release 13, yes you did read that right, that's how old the project is! The big challenge at the time was the scheme constantly changed as the designer and the structural engineer refined the concept further. Load distribution was a nightmare! My special thanks goes out to Househam Henderson for allowing me to use the image above.

So when I saw the new adaptive component family in Revit 2011, I immediately got excited as I remembered the modelling challenges I had encountered in the past. Whilst Inventors adaptive tools resolve the problem, I wanted to do this in Revit! :-)

image 

Understanding how the new adaptive points react and their various parameters is without doubt the key. This short video introduces you to the new adaptive family and demonstrates how to create a simple structural tree support. Hope this is useful…..
Thứ Năm, 13 tháng 5, 2010

My 3d Models

Here is a couple of examples of my 3d work. If you want to see my full portfolio, go to www.coroflot.com/raymundo302, I posted some more after the jump


Thứ Tư, 12 tháng 5, 2010

Mothers Day on the Coupes and Versa Boards


This past weekend I drove up to a friends house near Galax, Va. for a cool Mothers Day weekend with a couple families.  On one of the days we took boats out on the New River for some good family fun.  We had two first time Versa Board paddlers, a couple youngins in the Deuce Coupe with Mom, and an 8 year old out braving the river, rapids, and long horn cattle all on his own in the Coupe.  It was a great day.


I like being able to hand the Versa Board off to anyone knowing that they are going to have a great time.  Its a very confidence inspiring board.  Anyone can jump on, stand up, and take it for a spin without worrying about stability, tracking, or maneuverability.  The same is true of the Coupes and this weekend was a perfect test of that.  Maria jumped on the Deuce Coupe with her two chillins and was able to carry the whole posse easily.  At the same time Roman paddled where ever he wanted and controlled the Coupe easily all by him self.

Looking forward to another trip.
Shane


Autodesk Solar Radiation Technology Preview – Revit 2011

image

Autodesk have released a Solar Radiation Technology Preview for Revit 2011. You can find details here on Simon Gillis’s blog…..

http://thesustainabledesigntoolbox.typepad.com/blog/2010/05/solar-radiation-technology-preview-for-revit-2011.html

you can download from here……

http://labs.autodesk.com/utilities/ecotect/

Thứ Ba, 11 tháng 5, 2010

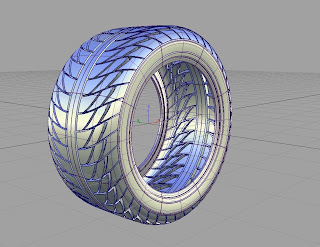
Modelling a wheel with a tread pattern in Alias Studio


 This is a tutorial on how to model a real tread patter as opposed to just using textures to achieve the desired affect... so just click on the link to learn more


Step 1 Make primary tire profile. Surface>Revolve around Y axis, with 360 degrees, 8 sections, Surface degree of 3

Step 2 Make the inner tread curves that will serve as the tread’s floor. Make sure they go a little bit past the tire profile curves so we can later dived the tire surface. Revolve Curve

Step 3 Make a line going straight up from the center of the tire, make two copies of that line, Rotate one 0,-22.5,0 and the other 0,22.5,0. This will make a 45 degree section, Surface edit > Creatcurveonsurface> Project curve
Step 5 Trim all surfaces outside of that 45 degree section Surface Edit>Trim>Trims Surface, Click on all the sections outside of the 45 degree section and discard. Use the Surface edit> Create Curves on Surface> Intersect on the two tread surfaces, divide the main tire profile and trim away the excess skin
Step 6 Start developing tread shapes
Things to Consider
  • Remember to place tread curves above the tire not on ground plane,

  • Try simple pattern when starting just to get a feel of how it’s done.

  • Treads usually have a two grooves in the middle to prevent hydroplaning

  • Usually treads have one long groove going from the middle to the outside, to expel water, and a traction pattern between those two grooves.

  • To develop the inside grooves you need to have the next repeat, so I got the initial groove curves, place its pivot point in 0,0,0 and went edit>duplicate>object see picture below

  • The rule of multiplying the tread count is based on mathematics, since our 45 degree section is 1/8 of the wheel, than our multiples have to be by 8, if you want one tread per section than you want 8 multiples at 45 degrees, I want 5 treads per section so I need 40. So if you want your pattern to repeat 40 times, the degree change would be 9, since 40x9=360. If you want your patter repeat 80 times than the degree change would be 4.5

Steps 7 once you’ve developed your tread make sure its pivot is on the center line and scale it down to about halfway. Only the curves that are not repeated.
Step 8 skin all the curves to its smaller counter part
Step 9 duplicate the new skin, this time with enough duplication to cover your 45 degree segment, basically duplicate more than is needed and delete the surfaces that aren’t directly touching your tire. My case it was 4 with rotation 0,9,0 and 2 with rotation 0,-9,0
Step 10 Select all the new skins and go to front view. Use the old 45 degree lines to trim away all the skin we don’t need
Step 10 Select all the tread pattern surfaces and both the tire surfaces, then go to surface edit> Create Curves on surface> Intersect. Once everything is pink click on both the outer surface and the inner tire surface. This should put all the COS where they should be.
Step 11 Delete all the skins you have made, We only needed them to make the COS
Step 12 Go to the top view and project two straight curves for the inside grooves. Make sure they are surrounding the end of the curves
Step 12 Save before trimming because mistake will happen. In the top tire surface trim away all the grooves. In the bottom surface trim away the opposite trim pattern
Step 13 Start skinning the two tread patterns. Skin one of the treads in the middle so you can duplicate the surfaces.
Step 14 Duplicate the skins to cover all the treads. Trim and delete the skin you don’t need exactly how you did in step 10
Step 15, you can either repeat all the steps in the other side or slice it through the middle and mirror it like I did. I highly suggest you just mirror it. Edit>Duplicate>Mirror XY
Step 16, Nothing left to do but to Duplicate the tire around 7 times to complete the wheel. Edit>Duplicate>Object Number 7 Rotation 0,45,0
My email is Raymundo302@gmail.com, if you have any comments or feedback just send me a message. Remember to check up on my blog as I will keep posting tutorials.

Thứ Sáu, 7 tháng 5, 2010

Excitech Revit Architecture User Group

I attended yesterdays Excitech Revit User Group. Good event, although it was a long day and rather jam packed. Good to see many old faces either from firms that I had presented to in the past or ex colleagues. I did a 30 min presentation on Managing Large Concept Design Projects, which I think was well received, certainly got a lot of questions after the event about what I showed.

Angus Brown from Fraser Brown Mackenna Architects did an excellent presentation on how they had created parametric content for the development of many of there student accommodation projects. I remember meeting Angus about 4 years ago, his company where early adopters of Revit. But Angus had a vision on how parametrics could help with design, especially with the type of work his business was being commissioned to do. Whilst he had many frustrations in the early days with Revit, he seems to have developed some great processes and the results are excellent.

Simon Gillis from Autodesk did a inspiring presentation on Autodesk’s approach to sustainable design. Much of this can be found on the Autodesk website. Simon also showed Digital 210 King research project……

Working with the CIMS Lab at Carleton University and Faro Technologies, we are developing a digital model of our offices in Toronto using Building Information Modeling (BIM). We hope that this model becomes a valuable resource to a community of simulation and modeling researchers.

http://www.digital210king.org/

image

Be sure to check out the website, as datasets, images, laser scans etc can be downloaded and reviewed.

Revit and Newforma

HOK are big users of Newforma. If you are looking for a document management system which seamlessly fits into workflow with no disruption to your existing processes  you need to checkout Newforma. People often ask me about Newforma, “Why is it so special, what does it off that other systems don’t already provide"?” To be honest I could write a book on what it provides, but one thing is for sure, it does exactly what it says on the tin. That’s its beauty.

When I worked for an Autodesk reseller I got to see many different document management systems. My general opinion was that most where geared towards a manufacturing / engineering. The AEC industry is different and whilst it may seem to make sense that some of these system could work or be adapted, their rigid nature just didn’t allow them to work very efficiently in a AEC firm. So if you either already using Newforma are interested in what it has to offer obviously checkout the Newforma website, but also read this article on AECbytes which explains how PCS Structural Solutions are using Revit Structure and Newforma together.

http://www.aecbytes.com/tipsandtricks/2010/issue48-newforma.html