Thứ Bảy, 30 tháng 1, 2010
Kayak Sledding in the Liquidlogic Deuce Coupe.
Thứ Năm, 28 tháng 1, 2010
This Is Canoeing
From the production company's web site:
“THIS IS CANOEING” is a 2-disc celebration of canoeing, showcasing top single-blade paddlers in their pursuit of remote wilderness journeys or challenging white water. Multi-award winning film maker, Justine Curgenven captures the essence of canoeing in 12 short films. From open canoe slalom races to 1,000 mile birchbark expeditions, Justine provides insights into the diversity of the sport and the influential people who tell it’s story. Immerse yourself in this globe-trotting 3 hours of adventure to world class canoeing destinations in Canada, the United States, Scotland & Wales.You can pre-order your copy of the videos at the Cackle TV web site. There is also more information about the videos, including information on the featured paddlers and the waters they are paddling.
FEATURING;KEVIN CALLAN – BECKY MASON – PAUL MASON – MARK SCRIVER- ANDREW WESTWOOD - KAREN KNIGHT – BOB FOOTE – RAY GOODWIN - WENDY GRATER - CHRIS COOPER – DAVE ROSSETTER – ELI HELBERT - JOHN ‘KAZ’ KAZIMIERCZYK – HAILEY THOMPSON – CAROLYN PETERSON
Thứ Hai, 25 tháng 1, 2010
Bad Ass Outfitting by Liquidlogic Kayaks
- All one contour padded construction
- UV resistant facing material
- Quick draining mesh construction
- Anti-microbial material, lets just say "less paddler stench" :)
- Durability you can't rip, or tear this stuff.
One of the largest issues that people bring up or try to sell against LL boats with the Bad Ass Outfitting is the ability to get into the back of our boats. What I want to do now is show you several options on how to get into the back of the boat. I think everyone will find once they know how to get in the stern of a Liquidlogic boat you will see that its easy. First thing as you can see in the above photo is that you take the back off the back band. It's held there by a hook and loop material.
- Pull the back of the seat pad off the back band.
- Release the ratchets until the back band is all the way to the back of the cockpit rim.
- Lift the back band up and onto the back of the cockpit rim while continuing to release the ratchet. Presto magico, all the access you will ever need.
Quick Access Option
- Push the back band back a couple inches.
- Push down and towards the front of the boat on the backband.
- It will fold down flat on the seat for access. A little forceful but quick.
- Pull the back of the seat pad off the back band.
- Loosen the ratchet all the way on one side of the backband.
- Pull the loosened side up and slide gear in under the back band.
- This is a quick an easy way to get access to one side of the stern.
The other part of this whole system that is very cool is the ease with which you can adjust and place your hip pads just where you want them. The hip pad compartment is easily opened by pulling the material from the cockpit rim. It opens a pocket that takes the hip pads and shims to create a proper fit. One nice trick to placing them in exactly the position you would like them is using a piece of paper, index card, or post card from Grandma as a spacer behind the hip pad so it won't stick in place while you are trying to locate your pad. Then once it feels like its in the right place just pull the paper out and the pad sticks where you want it. This allows you to place your hip pads exactly where you want them while you are sitting in the boat.
The Paper Trick for locating your hip pad is easy to do while sitting in the boat
Hip Pad in place. Now just close the compartment.

The thigh braces are easily adjusted with just a couple turns of the screws under the outside edge of the cockpit rim next to the thigh braces. There are two screws that control the thighbraces so loosen each of them a couple turns. Then just move them where you would like and retighten the screws. This will give you more control over the feel of the thighbraces.
Important
Loosen the screws just a couple turns if you loosen more you may take the screw all the way out of its threaded nut and that can be hard to fix.
The below video is not condoned or approved by Liquidlogic :) However it is funny. There is poor behavior and some bad language but you gotta love the energy. Like I said don't watch it.
Please leave any comments or questions below in the comments and I will answer them.
Thanks
Shane
Chủ Nhật, 24 tháng 1, 2010
Linux Network Printing from progeCAD using Samba
One common network configuration for business file storage and printing is the use of Linux file and print servers on low-cost PC hardware. The advantages of UNIX & Linux servers in an SMB office automation environment are:
- Linux (also some UNIX, i.e. Solaris) is free to download
- Linux is secure, fast and stable
- Linux is scalable and highly configurable
Microsoft Windows, on the other hand, does work very well for supporting graphical end-user applications. progeCAD is a strongly graphical, end-user application for AutoCAD-compatible Computer Aided Design. To connect Windows PCs to a Linux back-office, we use Samba server. Samba is free Linux server software for sharing Windows folders or printers on a network:
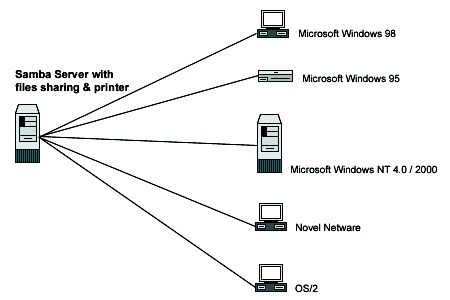
However, Samba will slow progeCAD's performance if not correctly configured. Samba is packaged for a wide variety of Linux types ("distributions") and installation is best carried out with free packages available for your version of Linux. Here are some more tips for setting up a network USB printer.
Once the USB printer is itself correctly configured by the local Linux printing subsystem (CUPS, LPRNG, UNIX LPR) the printer is then "shared" by its queue name onto the Windows SMB network in the Samba configuration (usually smb.conf, section shown here for Debian Linux - see Samba website for complete configuration details):
[printers]
comment = Sample Printers
path = /var/spool/samba
create mode = 0700
browseable = yes
writable = yes
guest ok = yes
public = yes
printable = yes
use client driver = no
printer admin = root
[My5500]
comment = Demo Example HP 5500 colour (change this with your own printer)
path = /var/spool/samba
browseable = yes
writable = no
guest ok = yes
printable = yes
default devmode = yes
use client driver = no
printer admin = root, administrator
Explanation: Driver configuration can either be client-side or server-side. We strongly recommend server-side drivers (default devmode = yes, use client driver = no) for speed and reliability. Only the Linux administrator is here given permission to "set up" the printer on the server side (printer admin = root). However this creates some challenges. The Windows driver will need to be "uploaded" to the Linux server. We will need to create an additional Samba configuration for allowing this:
[PRINT$]
path = /var/lib/samba/printers
guest ok = yes
browseable = yes
read only = yes
write list = root
admin users = root
create mask = 0644
directory mask = 0755
Once smb.conf is saved, Samba needs to be restarted. A quick network browse of our Linux machine from Windows (i.e. from Windows Explorer type '\\server-name') should list the shared printers and folders on that 'server-name'. NOTE: For security purposes we have only allowed "root" (and administrator) any kind of admin rights to the Samba printers. Our problem is that Windows doesn't have a UNIX user called "root". We get around this by initially connecting to our new shared printer from the DOS / Command prompt as follows:
runas /netonly /user:root "rundll32 printui.dll,PrintUIEntry /p /t3 /n \\server-name\printername" (i.e. \\pc123\My5510 in this example)
You should be prompted for the Linux password for "root", and then prompted whether you want to select a Windows driver at this time - click "No".
A spartan Properties Box for this printer should appear. Click on the "Advanced" tab along the top of the box and click the "New Driver.." button. Select a 'Generic -> Ms Publisher Color Printer' if you want to send Postscript to your Linux printer (this is a good idea, CUPS will automatically reformat Postscript files to something usable by the actual USB printer hardware if correctly configured). Windows should begin uploading the local driver from your PC to the Samba server. Now click the "Apply" button at the bottom of the properties box and you should see several more tabs appear in this dialogue box if everything goes as planned. You may now close this Properties Box.
Because "administrator" is also listed as an admin for our My5500 printer, Windows administrator can make centrally-stored changes to this Samba printer (like setting paper size from Letter to A4, or changing the Postscript mode). NOTE that we have thus far only highlighted steps to configure Samba printers on the server side. Now we can finally add this as a Windows printer by navigating to \\server-name in Windows Explorer, right-clicking the printer and clicking "connect" from the drop-down menu that appears.
This post does not completely cover Samba configuration, only those tips found best practice for printing. We have found the above approach to offer best performance and reliability for printing to Samba server on Linux in progeCAD IntelliCAD (as well as Microsoft Office applications) from Windows. However other procedures may work better for different plotters and we welcome your comments here.
Indoor paddling? Play's the thing!
We weren't looking forward to the indoor paddling season this year. In the past, we made good use of true "flat water" time to practice specific skills like rolls, braces and rescues. But these days, the things we want to practice require space and waves. There's just no good way to work on surf landings indoors.
But we've been pleasantly surprised to discover that this has actually been a very fun and productive indoor paddling season, thanks in large part to our BCU training (with Bill Lozano of BCUNA, Scott Fairty of Geneva Kayak Center and Kelly Blades). We credit the BCU with helping us get out of our work-on-a-specific-skill mentality and into more of a learn-by-play approach.
In the coming weeks and months, we'll post some of the games we've been playing, along with photos and videos. If you have some to share, please post them in our comments.
Thứ Sáu, 22 tháng 1, 2010
Liquidlogic Remix XP on the Grand Canyon
Thứ Ba, 19 tháng 1, 2010
Whitewater paddling in a Sit-On-Top kayak: The Coupe by Liquidlogic
Cheers
Shane
