Hiển thị các bài đăng có nhãn SolidWorks 2013. Hiển thị tất cả bài đăng

Thứ Năm, 1 tháng 8, 2013

If a picture tells a thousand words, an animation tells a million!

Recently, I had a discussion with several SolidWorks users about unique ways of exploring and showcasing SolidWorks models and noticed a common hesitancy when the conversation turned to using Animations.  To my amazement this hesitancy came from premonitions that creating an Animation is hugely complex or involves a pricey add in.  In reality, creating an animation is very easy and the tools to do so are included in every copy of SolidWorks.  In this blog, we’ll take a look creating an animation.

To begin, I’ll need something to animate, so here’s my assembly:


The intention is to have the boat pull into harbour and the package be lowered onto it.  We’ll also have a vehicle drive past on the road behind just to make the animation a little more interesting.  Bonus points for anyone who can name the car!


First step is to prepare the assembly for animation by adding in appropriate mates, the intention here is to limit the axis of freedom in the components we want to animate.  In my assembly this is the boat and the car.  As you can see in the images below I've mated the boat to a sketch line defining the path I want it to follow.  For the car, I've mated the tyres to the road to stop it floating away when I try to move it.


Now the assembly is prepared we can begin work on the animation itself.  We begin by ‘right clicking’ on the model tab and selecting ‘Create new Motion Study’ if no motion study tab is present.  By switching over to the Motion Study tab the interface used to create animations is visible. There are two main tools that are used here: the vertical time bar and the component ‘keys’, these tools are highlighted in the image below

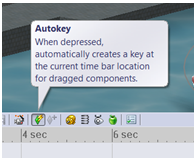


top tip here is to ensure the ‘Autokey’ functionality is enabled.  This automatically creates keys in relation to where we have our time bar placed.  The purpose of this function will become clearer when I begin to move my components around.


I can now start to define the movement of the components in my animation.  This is achieved by firstly moving the time bar to the desired postion, then simply moving the component in the graphics area.  An example of this is shown below, firstly I move my time bar to 13 seconds, then move the boat to where I want it to be at 13 seconds.


The same process is then repeated for the car and boat package.  A good tip if you have difficulty controlling the movement is to ‘right click’ and select ‘move with triad’ as I do in the images below where I move the car along the road and lower the package onto the boat.  Notice I set the package to begin lowering at 13 seconds, this is achieved by simply dragging the start key to the desired time location.


The last thing left to do is set up some appropriate orientations for viewing the animation from.  This is achieved by positioning the orientation where desired, placing the time bar where you want that specific view to be used, right clicking and selecting ‘place key’.


Once you have your view orientations established make use of the ‘recalculate’ button to update your study and preview your animation and that’s it! You’ve created an animation.  Use the save button when your happy with the results.


When saving you have extensive control over the output with the ability to define file type, aspect ratio, frames rate and so on.  Additionally, you have a choice of renderer, with the ability to use either the standard SolidWorks screen or if available, Photoview.


Check out the animation I created in the process of creating this blog in the video below:

Thứ Ba, 30 tháng 4, 2013

Get More With SolidWorks Tutorials


I find that the best way to learn about the tools available in SolidWorks is by using them.
And one way that SolidWorks helps you to do this is by including an extensive selection of tutorials on a wide range of tools. These tutorials are fully incorporated into SolidWorks and are available in the SolidWorks resources tab of the task manager, or under the Help menu.

The tutorials are not only great examples of how to use the tools available to you in SolidWorks, they can also be used to try out some of the tools that you may not have used before such as Routing or Simulation. There is also a large section of tutorials for the newest additions to the software such as the new user interface for the Section Tool and Orientation Dialogue Box.
The tutorials are organised into easily navigated groups so that you can get straight to the relevant subject area.


By hovering your mouse cursor over the tutorial links, each of the tutorials will describe to you a rough timing for completion and also an overall description of what you will achieve upon completion.


Then to open the tutorial, simply click on the one that you want. Each Tutorial will start with an overview describing the process to be followed.


The tutorials then describe exactly what the process is for the lesson, guiding you through step by step and helping you to understand not only what you are doing, but also describing why. There are clear instructions that include images of the process that is being carried out so that you can check your progress.

When opening the SolidWorks tutorials, your SolidWorks window automatically resizes to allow room for the tutorial window to be shown at the same time. And the interaction between SolidWorks and the tutorials doesn’t end there.

In the instructions for carrying out the tutorial, if you need to use a tool, both the name of the tool and what the button for that tool icon looks like in SolidWorks are given. If you are unsure at any point of where that tool is in SolidWorks, you can simply click on the button in the tutorial text and it will be highlighted in the SolidWorks user interface.

Also contained within the instructions are links to open SolidWorks models that can be used for the tutorial content.
All of this combines to make the tutorial set that is built in to SolidWorks a valuable knowledge resource for learning more about the software that you use.

Thứ Năm, 3 tháng 1, 2013